background image

K

u

n

st

st

o

ffs

c

h

w

e

te

c

h

n

ik

W
e

ld

in

g

 T

a

b

le


C

h

a

p

te

r 6

20

2

19

2

18

2

17

2

16

2

15

2

14

2

13

2

12

1,5

11

1,5

10

1,5

9

1,5

8

1,5

7

1,5

6

1

5

1

4

1

3

0,5

2

0,5

1

0,5

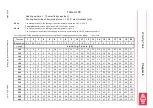
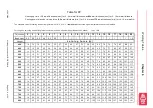
PE 80

PE 100

Tickness

Bead height

Lenght

J o i n i n g  f o r c e   

[kp] 

For 

smaller 

wall thickness higher temperatures should be relized.

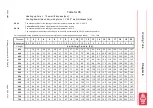
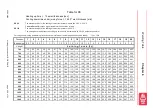
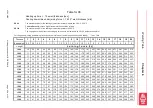
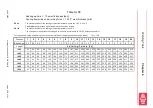
The standard value for the heating element temperature is 220° C.

The change-over and pressure building up time should be realized with PE 100 as fast as possible!

For the given adjusting and welding force the movement force of the welding slide has to be added!       1 kp = 10 N

Table for PE 

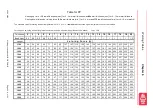
Heating up time  =  10 x wall thickness [sec]

Cooling down time under joining force  = 1,333 * wall thickness [min]

The standard value for the heating element temperature is between 200° C - 220° C.

127

133

139

145

151

157

163

169

175

181

187

193

199

205

211

217

120

126

132

137

143

149

154

160

166

172

177

183

189

194

200

206

114

119

125

130

136

141

146

152

157

163

168

173

179

184

190

195

108

113

118

123

128

133

138

143

148

154

159

164

169

174

179

184

101

106

111

116

121

125

130

135

140

145

149

154

159

164

169

173

95

100

104

109

113

118

122

127

131

136

140

145

149

154

158

163

89

93

97

101

106

110

114

118

122

127

131

135

139

143

148

152

82

86

90

94

98

102

106

110

114

118

121

125

129

133

137

141

76

80

83

87

91

94

98

101

105

109

112

116

119

123

127

130

70

73

76

80

83

86

90

93

96

100

103

106

109

113

116

119

64

67

70

73

76

79

82

85

88

91

94

97

100

103

106

109

57

60

63

65

68

71

73

76

79

82

84

87

90

92

95

98

51

53

56

58

61

63

65

68

70

73

75

77

80

82

85

87

45

47

49

51

53

55

57

59

61

64

66

68

70

72

74

76

38

40

42

44

46

47

49

51

53

55

56

58

60

62

64

65

32

34

35

37

38

40

41

43

44

46

47

49

50

52

53

55

26

27

28

29

31

32

33

34

35

37

38

39

40

41

43

44

19

20

21

22

23

24

25

26

27

28

28

29

30

31

32

33

13

14

14

15

16

16

17

17

18

19

19

20

20

21

22

22

7

7

7

8

8

8

9

9

9

10

10

10

10

11

11

11

420

440

460

480

500

520

540

560

580

600

620

640

660

680

700

720

0

3

.0

3

.2

0

0

9

W
o

rk

in

g

 In

s

tru

c

tio

n

s

 W
ID

O

S

 P

S

M

 1

5

p

a

g

e

 2

2

/ 2

 o

f 3

3

Summary of Contents for PSM 15

Page 1: ...Ditzingen Heimerdingen Fax 49 0 71 52 99 39 40 Website www widos de Email info widos de Headquarters D 71254 Ditzingen Heimerdingen Country Court Stuttgart HRB 200973 Managing director Dieter Dommer W...

Page 2: ...mers entries Inventory no Location Address of manufacturer WIDOS W Dommer S hne GmbH Einsteinstr 5 D 71254 Ditzingen Heimerdingen Phone 49 7152 99 39 0 Fax 49 7152 99 39 40 E Mail info widos de Addres...

Page 3: ...ur advisers in the factory or in our subsidiary companies We will help you with pleasure According to our interest to continuously improve our products and working instructions we kindly ask you to in...

Page 4: ...precautions 9 2 6 Instructions for the staff 9 2 7 Dangers while handling the machine 10 2 8 Special dangers 10 2 8 1 Danger of stumbling over pneumatic and electric wires 10 2 8 2 Danger of combustio...

Page 5: ...clamping Page 5 of 33 7 1 In general 24 7 2 Clamping elements 24 7 3 Cleaning the machine 24 7 4 Service unit 24 7 5 Transport 25 7 6 Disposal 25 8 ELECTRIC AND PNEUMATIC DIAGRAMS 26 9 SPARE PARTS LI...

Page 6: ...egulations especially the regulations for the prevention of accidents The described plastic welding machine may only be operated maintained and repaired by persons who are trained and informed about t...

Page 7: ...ssions By using the stated plastic materials during operation within a temperature range of up to 260 C no poisonous vapors are generated Ambient conditions in the welding area Keep the workshop clean...

Page 8: ...on may have severe consequences for the health This symbol means a possibly dangerous situation The disrespect of this indication may cause light injuries or damages of machine parts This symbol means...

Page 9: ...ssary personal protection equipment is to be provided by the operator All available safety equipment is to be inspected regularly 2 5 Information on safety precautions The working instructions are to...

Page 10: ...d dripping water According to VDE 0100 the machine may only be applied on building sites via power distributors with FI security switch 2 8 Special dangers 2 8 1 Danger of stumbling over pneumatic and...

Page 11: ...wear parts In case of purchase orders please always indicate the machine number 2 10 Cleaning the machine The materials you use for cleaning the machine have to be properly treated and have to be appr...

Page 12: ...he heating element at a defined pressure This process is called adjusting The applied power can be seen on the range display you find on the machine Having reached the mandatory bead height the pressu...

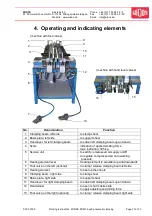
Page 13: ...g beam up and down 4 Scale indication of applied welding force max indication 325 kp 5 Service unit to switch compressed air supply on off to regulate compressed air onto working pressure 6 Heating el...

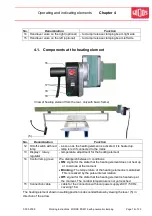
Page 14: ...ated it is heated up lamp is red if connected to the mains 13 Display rotary regulator temperature adjustment for the heating element 14 Control lamp green We distinguish between 3 conditions ON signa...

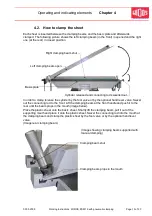
Page 15: ...vel out the connecting rod to the front Lift the clamping beam at the front handle and push it to the rear until the beam props in the mouth image below Place the plastic sheet onto the basic sheet Sh...

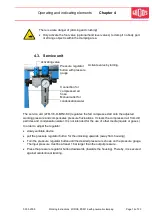
Page 16: ...tuations It clears the compressed air from dirt particles and condensation water It is not intended for the use of other media liquids or gases In order to adjust the regulator slowly ventilate device...

Page 17: ...tightly onto the right attachment Put the vertical sheet onto the interior of the right clamping beam onto the ledge and fix sheet e g with screw clamps Additionally fix the heating element in height...

Page 18: ...d to the connector of the service unit chapter 4 3 The machine only has to be introduced and used by skilled persons For their qualification they can pass an exam of plastic welding according to DVS a...

Page 19: ...of oil in the welding area Put the sheets under the clamping beams adjust the sheets to each other and clamp the sheets with the optional foot valve or the hand lever valve chapter 4 2 Close machine b...

Page 20: ...the welding force press the stopwatch During the cooling down adjust the force if necessary once again the cooling down force is the same as the adjusting force After the cooling down time has elapse...

Page 21: ...5 Phone 49 0 71 52 99 39 0 W Dommer S hne GmbH D 71254 Ditzingen Heimerdingen Fax 49 0 71 52 99 39 40 Website www widos de Email info widos de 03 03 2009 Working Instructions WIDOS PSM 15 with pneuma...

Page 22: ...40 43 6 1 10 11 13 15 17 19 20 22 24 26 28 29 31 33 35 37 5 1 8 10 11 13 14 16 17 19 20 22 23 25 26 28 29 31 4 1 7 8 9 10 11 13 14 15 16 17 19 20 21 22 23 25 3 0 5 5 6 7 8 9 10 10 11 12 13 14 15 16 17...

Page 23: ...114 119 125 130 136 141 146 152 157 163 168 173 179 184 190 195 108 113 118 123 128 133 138 143 148 154 159 164 169 174 179 184 101 106 111 116 121 125 130 135 140 145 149 154 159 164 169 173 95 100 1...

Page 24: ...254 260 265 271 276 281 189 194 199 205 210 215 220 225 230 235 240 245 250 256 261 266 178 183 188 193 197 202 207 212 217 221 226 231 236 241 245 250 167 172 176 181 185 190 194 199 203 208 212 217...

Page 25: ...271 276 281 286 291 296 301 307 312 317 322 327 332 337 342 347 255 260 265 269 274 279 284 289 293 298 303 308 313 317 322 327 239 244 248 253 257 262 266 271 275 280 284 289 293 298 302 307 223 227...

Page 26: ...10 x wall thickness sec Cooling down time under joining force 1 333 wall thickness min The standard value for the heating element temperature is between 200 C 220 C 415 421 427 433 439 445 451 394 40...

Page 27: ...7 18 20 21 23 25 26 28 29 31 33 34 36 7 0 5 8 9 10 12 13 15 16 17 19 20 22 23 24 26 27 29 30 31 6 0 5 7 8 9 10 11 13 14 15 16 17 19 20 21 22 23 25 26 27 5 0 5 6 7 8 9 10 11 12 13 14 15 16 17 18 19 20...

Page 28: ...134 137 141 145 79 82 86 89 92 96 99 103 106 109 113 116 120 123 126 130 133 137 74 77 81 84 87 90 93 97 100 103 106 109 113 116 119 122 125 129 70 73 76 79 82 85 88 91 94 97 100 103 106 109 112 115 1...

Page 29: ...7 171 174 177 181 184 188 191 194 198 132 135 138 141 145 148 151 154 157 161 164 167 170 173 177 180 183 186 124 127 130 133 136 139 142 145 148 151 154 157 160 163 166 169 172 175 115 118 121 124 12...

Page 30: ...5 239 242 245 249 252 256 189 193 196 199 202 205 209 212 215 218 221 225 228 231 234 237 241 178 181 184 187 190 193 196 199 202 205 208 211 214 217 220 223 226 166 169 171 174 177 180 183 185 188 19...

Page 31: ...orks after one year Machines which are loaded above the average the checking cycle should be shortened The works have to be executed by company WIDOS GmbH or by one of its authorized representatives 7...

Page 32: ...Page 25 of 33 7 5 Transport The machine has to be carefully handled Protect against shocks and hits Close the clamping beams during the transport 7 6 Disposal The machine and wear parts have to be di...

Page 33: ...49 0 71 52 99 39 0 W Dommer S hne GmbH D 71254 Ditzingen Heimerdingen Fax 49 0 71 52 99 39 40 Website www widos de Email info widos de 03 03 2009 Working Instructions WIDOS PSM 15 with pneumatic clamp...

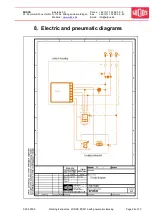
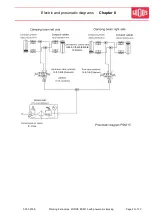
Page 34: ...Kunststoffschwei techni k Electric and pneumatic diagrams Chapter 8 03 03 2009 Working Instructions WIDOS PSM 15 with pneumatic clamping Page 27 of 33...

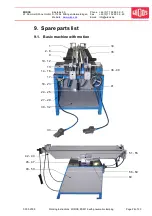
Page 35: ...eimerdingen Fax 49 0 71 52 99 39 40 Website www widos de Email info widos de 03 03 2009 Working Instructions WIDOS PSM 15 with pneumatic clamping Page 28 of 33 9 Spare parts list 9 1 Basic machine wit...

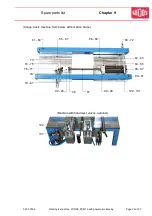
Page 36: ...rking Instructions WIDOS PSM 15 with pneumatic clamping Page 29 of 33 Image basic machine from below without base frame Machine with hand lever valves optional 61 64 65 67 76 77 78 79 81 74 75 73 92 9...

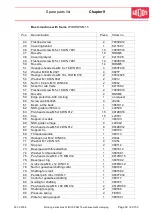
Page 37: ...or service unit 1 8211603 20 Flat head screw M 5 x 10 DIN 7991 2 7991E010 21 Pan head screw M 4 x 12 DIN 912 4 0912D012 22 Washer M 4 DIN 125 4 0125D 23 Hexagon nut M 4 DIN 934 2 0934D 24 Plastic hose...

Page 38: ...2 NSK guide rail 500 mm 1 L20500 63 Pan head screw M 5x16 DIN 912 15 0912E016 64 Cap 15 L20501 65 Support movable 1 380103 66 NSK guide carriage 4 L20CLZ 67 Pan head screw M 5x12 DIN 912 8 0912E012 68...

Page 39: ...Ball bearing 6005 ZZ 2 L6005Z 94 Sleeve intermediate bearing 1 380162 95 Pan head screw M 8 x 70 DIN 912 2 0912H070 96 Nut for bevel gear bolt 1 3801611 97 Threaded rod TR 16x4 1 380168 98 Coupler pl...

Page 40: ...Spare parts list Chapter 9 03 03 2009 Working Instructions WIDOS PSM 15 with pneumatic clamping Page 31 of 33 9 2 Heating element 1 2 4 14 5 7 10 18 11 13 15 17 21 22 20 19 24 26 27 28 29 30 33 31 32...

Page 41: ...Pan head screw M 5 x 30 DIN 912 4 0912E030 18 Support for heating element 1 8215642 19 Switch on off red 1 H0903 21 Handle case 1 H09077 20 Antilink grommet 1 EKT08 22 Pan head screw M 4 x 70 DIN 912...

Page 42: ...product Plastic welding machine WIDOS PSM 15 with pneumatic clamping to which this declaration refers corresponds to the following norms and normative documents 1 DIN EN ISO 12100 1 und 2 substitute f...

Reviews: