WiebeTech
Forensic RTX411-QJ User Manual (A9-411-0001 REV 1.0)
- 7 -
4. HPA/DCO
4.1 HPA/DCO Indication
Forensic RTX’s write-block LED will blink if a drive containing a hidden area
(called an HPA or DCO) is connected. If the drive does not have an HPA or DCO,
the LED will light solid.
See
http://www.wiebetech.com/hpa_dco.php
for more information.
4.2 HPA/DCO Mode Setting (Requires USB or FireWire connection)
By default, the Forensic RTX is shipped on mode #1, leaving the HPA and DCO areas “as is” on the hard
drive. To change your HPA/DCO mode setting, you must use the WiebeTech Forensic Software Utility.
The Utility is available for download from our website,
www.wiebetech.com
, or on the WiebeTech Product
CD in the WiebeTech Extras folder. For more info on the Forensic Software Utility, see the separate
user’s manual, which is also on the website and CD.
Your WiebeTech Forensic RTX will alert you to the presence of any HPA or DCO. You may then use the
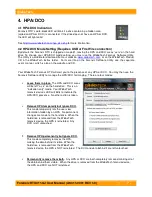
Forensic Software Utility to manage the HPA/DCO for imaging. There are four modes:
•
Leave them in place.
The HPA and DCO areas
will be left “as is” on the hard drive. This is an
“indication only” mode. Your WiebeTech
forensic device’s LED will blink to indicate the
HPA/DCO presence. No other action is taken.
•
Remove HPA temporarily but ignore DCO.
This mode temporarily lets the user view
information hidden by an HPA. No permanent
changes are made to the hard drive. When the
hard drive is removed from the WiebeTech
forensic device, the HPA is reinstated. Any
DCO is left untouched.
•
Remove HPA permanently but ignore DCO.
This mode completely removes the HPA,
making the data behind it visible. When the
hard drive is removed from the WiebeTech
forensic device, the HPA is NOT reinstated. The DCO and data behind it are left untouched.
•
Permanently remove them both.
Any HPA or DCO are both completely removed, making all of
the data behind them visible. When the drive is removed from the WiebeTech forensic device,
the HPA and DCO are NOT reinstated.


