background image

All information, illustrations and specifications in these Operating Instructions are based on the latest information available at the time of 

publication. We reserve the right to make design changes at any time without prior notification


36 

6.0. Maintenance 

6.10. Disassembly / disposal 


CAUTION!  

Proceed with caution when 
disassembling the Whisper 
Twister. Please refer to the 
chapter "Safety measures" and 
local safety regulations


Main areas of danger are: 


residual pressure in lines 
and components, 


heavy parts that could 
fall after disassembly, 


sharp edges, 


crushing if machine 
topples. 


Disassembly for disposal 

1.


Place Whisper Twister on 
firm ground. 

2.


Drain hydraulic oil. 

3.


Disassemble Whisper 
Twister, working from top 
to bottom. 


IMPORTANT:


Specifications and laws 
concerning the disposal of 
hazardous substances and 
pollutants must be observed 
in all cases. Familiarize 
yourself completely with the 
procedure for disposal. 


6.11. Unauthorized conversion and 

spare part manufacture. 


Conversions of or 
modifications to the Whisper 
Twister are permissible only 
after consultation with the 
manufacturer ! 


The use of original parts 
and accessories authorized 
by the manufacturer is in 
the interest of safety. The 
use of other parts can 
change the properties of the 
Whisper Twister. In this 
case, the manufacturer is 
exonerated from liability in 
the event of damage. 

Summary of Contents for 4604.000

Page 1: ...Translation of original Operating Instructions Leaf blower Whisper Twister 4604 000 From equipment I D No Status September 2016 4604 99 01...

Page 2: ...604 to which this declaration refers corresponds with the relevant basic safety and health requirements of the machinery directive 2006 42 EC Rammingen the 29 09 2016 Horst Wiedenmann Place and date o...

Page 3: ...t Leaf blower Whisper Twister 4604 referred to by this declaration complies with the requirements of Machinery Directive 2006 42 EC Rammingen the 29 09 2016 Karl Wiedenmann Place and date of issue Sal...

Page 4: ...ese numbers when you order spare parts We recommend that you additionally file these identification numbers in a secure place away from the machine BEFORE DELIVERY OF THIS MACHINE your dealer performe...

Page 5: ...26 4 1 General 21 4 2 Direction of rotation and number of revolutions of the drive 22 4 3 Danger Zone 23 4 4 Swiveling the blower casing 24 25 4 5 Mechanical adjustment of the blowing nozzle 26 4 6 H...

Page 6: ...ces Follow safety instuctions Carefully read all safety messages in this manual and on your machine safety sings Keep safety sings in good condition Replace missing or damaged safety sings Be sure new...

Page 7: ...se can cause impairment or loss of hearing Wear a suitable hearing protective device such as earmuffs or earplugs to protect against objectionable or uncomfortable loud noises Operating equipment safe...

Page 8: ...or turn signal lights Use headlights flashing warning lights and turn signals day and night Follow local regulations for equipment lighting and marking Keep lighting and marking visible and in good w...

Page 9: ...oving any guards or shields Keep hands feet and clothing away from moving parts Avoid high pressure fluids Escaping fluid under pressure can penetrate the skin causing serious injury Avoid the hazard...

Page 10: ...i a w EN287 Avoid potentially toxic fumes and dust Hazardous fumes can be generated when paint is heated by welding soldering or using a torch Do all work outside or in a well ventilated area Dispose...

Page 11: ...ch indicate potential danger The hazard is identified by a symbol in a warning triangle An adjacent pictograph provides information on how to avoid personal injury These safety signs their placement o...

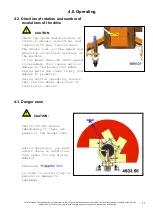
Page 12: ...lower while the engine is running Blow out cover When operating ensure that sufficient distance is left as there is a risk of injury from thrown or flying objects Direction of rotation and number of r...

Page 13: ...make design changes at any time without prior notification 13 1 0 Safety 1 1 Safety Decals Service Before performing service or repair work turn off engine and remove key Noise level This decal indic...

Page 14: ...onding specifications must be observed on public roads Before starting pay attention that nobody is around Child Make sure to have a good view It is forbidden to stand within the risk area of the appl...

Page 15: ...possible a Read the operator s manual b Do not operate the machine without guards shield and safety devices in place and working c Do not operate the machine when children and others are around d Do n...

Page 16: ...for safe operations Observe these signs for your safety Check the engine speed and sense of rotation stickers on the machine against the specifications of your tractor The stickers specify to which e...

Page 17: ...60 mm Remove front protective cover Release securing screws in hole row A and B Secure the mount D in hole row B and C The mount for the top connecting rod can also be extended 60 mm Release securing...

Page 18: ...ges at any time without prior notification 18 2 0 Mounting 2 5 Drive shaft adjustment To adjust the length hold the half shafts next to each other in the shortest working position and mark them Shorte...

Page 19: ...exchanged for a wide angled cardan shaft of the same size The protection for the cardan shaft has to be fixed with the safety chain 2 7 Hydraulic connections For hydraulic swiveling of the blow out n...

Page 20: ...unting 2 8 Attaching the blow out nozzle Remove protective cover A for this purpose release countersunk screws B Withdraw shaft C and bearing bushes D Fit blowout nozzle on sealing profile Press in be...

Page 21: ...he Whisper Twister down only on firm unyielding and flat ground 3 2 Removal from tractor Lifting out Whisper Twister Insert both supports in the holder from below as shown in Fig 4603 16 Attach suppor...

Page 22: ...heir action before starting service to make sure that all protective devices have been properly mounted It will be too late for this during operation Make sure that no one is in the risk area of the a...

Page 23: ...th your tractor data The decals tell you the speed and direction of rotation settings of the machine If the power take off shaft speed is exceeded this causes serious damage to the blower fan wheel Fl...

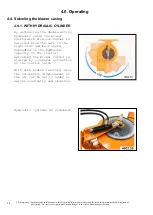
Page 24: ...er casing 4 4 1 WITH HYDRAULIC CYLINDER By activating the double acting hydraulic valve the blower casing with blow out funnel is swiveled from the left to the right side and back again Depending on t...

Page 25: ...n We reserve the right to make design changes at any time without prior notification 25 4 0 Operating 4 4 Swiveling the blower casing 4 4 2 WITH ELECTRIC SPINDLE If the rocker switch on the electric s...

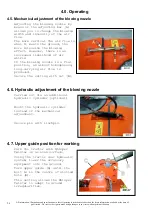
Page 26: ...lowing effect However there is an increased likelihood of air whirls If the blowing nozzle is a flat position an almost homogeneous long carrying air flow is produced Secure the setting with nut B 4 6...

Page 27: ...be careful of CHILDREN The power take off shaft never switch on when the motor is switched off always switch off when it is not required always switch off before you lift up the Whisper Twister 5 2 Sw...

Page 28: ...Use only original parts Third party parts often do not match the required quality and thus endanger your safety Moreover the sustained warranty and recognition of justified warranty claims can only be...

Page 29: ...interval Area Maintenance measure Weekly Cardan shaft LUBRICATE see manufacturer s instructions see chapter 6 4 1 Rotating assembly LUBRICATE see chapter 6 4 2 Moving parts Lubricate with spraying oil...

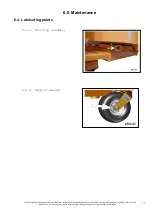
Page 30: ...me of publication We reserve the right to make design changes at any time without prior notification 30 6 0 Maintenance 6 4 Lubricating points 6 4 1 Cardan shaft Grease inside the exterior sliding pro...

Page 31: ...ating Instructions are based on the latest information available at the time of publication We reserve the right to make design changes at any time without prior notification 31 6 0 Maintenance 6 4 Lu...

Page 32: ...not approved for the use of BIO oils CAUTION High pressure fluids leaking under high pressure can penetrate the skin causing serious injury For this reason depressurise the system before disconnectin...

Page 33: ...sed on the latest information available at the time of publication We reserve the right to make design changes at any time without prior notification 33 6 0 Maintenance 6 6 Hydraulic connection diagra...

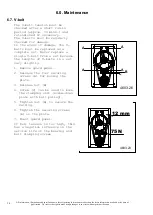
Page 34: ...for damage In the event of damage the V belts must be replaced as a complete set Never replace a single V belt from a set because the lengths of V belts in a set vary slightly 1 Remove guard panel 2 R...

Page 35: ...ire pressure minimum 0 5 1 0 bar Due to the low tire pressure the contact surface of the tire can be enlarged and lanes can therefore be reduced or even avoided Notice The load capacity is reduced Dri...

Page 36: ...opples Disassembly for disposal 1 Place Whisper Twister on firm ground 2 Drain hydraulic oil 3 Disassemble Whisper Twister working from top to bottom IMPORTANT Specifications and laws concerning the d...

Page 37: ...adjustment for 180 Wide support wheel running on pneumatics Parking supports Blowout nozzle or near ground blowout nozzle see special equipment Mechanical adjustment of the blowing nozzle Cardan shaf...

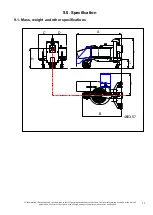
Page 38: ...m E Width with lateral blowing direction 700 mm F Height 920 mm G Height up to the draft linkage 310 mm H Height up to center of the primary shaft 635 mm Swiveling angle of blower casing 180 Drive out...

Page 39: ...rating Instructions are based on the latest information available at the time of publication We reserve the right to make design changes at any time without prior notification 39 9 0 Specification 9 1...

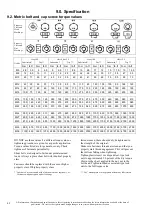
Page 40: ...1150 850 1075 800 1350 1000 M27 490 360 625 450 950 700 1200 875 1350 1000 1700 1250 1600 1150 2000 1500 M30 675 490 850 625 1300 950 1650 1200 1850 1350 2300 1700 2150 1600 2700 2000 M33 900 675 1150...

Page 41: ...f publication We reserve the right to make design changes at any time without prior notification 41 9 0 Specification 9 3 Serial number Record product identification no serial no in the space provided...

Reviews: