background image

6

5- Push the battery forward till the end.

6- Let the rear part of the battery pack come

down into the pocket.  

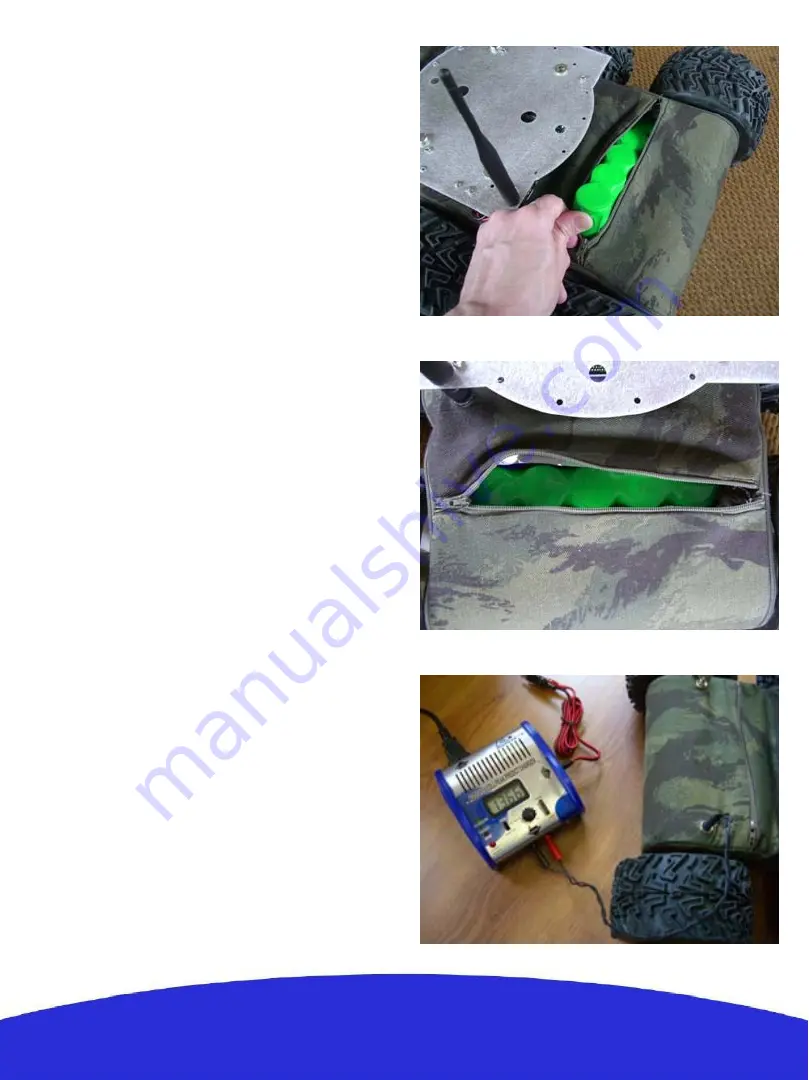
Extraction:

Open the zip. Put your finger in the rear part of 
the battery and push forward and pull up at the 
same time to unlock the battery pack. Extract the  
pack and unplug the connector.

Charge:

A battery charger is included with the platform. 
First make sure the platform and the charger are 
OFF, then connect the plugs of the charging 
cable on the side of the charger and then on the 
robot’s charging connector, finally switch the 
charger ON and set the charging current.

Summary of Contents for U-TROOPER

Page 1: ...updated information about this product visit the official site of wifibot http www wifibot com Index Package contents Quick start Platform overview Platform interfaces Battery installation Computer a...

Page 2: ...for the IP camera Platform overview 2 Front battery zip Charging connector Power ON OFF Rear battery zip Antenna 5dBi Power output Aluminum support Quick start 1 Install the RTMIX multi robot interfa...

Page 3: ...the 12V output An incorrect use of this connector beyond those values short circuit or other can provoke a malfunction of the platform or of the DC DC converter and even damage it The charging connec...

Page 4: ...atform at all times RS232 connector The low level motor control of the platform is to be accessed through this connector using a certain communication protocol see the RS232 protocol section The anten...

Page 5: ...o left while the battery pack on the rear has to be inserted from left to right see photo 5 Battery installation The robot gets its power from two battery packs with 5 Ni MH cells each with a capacity...

Page 6: ...forward and pull up at the same time to unlock the battery pack Extract the pack and unplug the connector Charge A battery charger is included with the platform First make sure the platform and the c...

Page 7: ...other model For more information about your particular camera and embedded computer please refer to their respective manuals included in the USB key included with the robot The top aluminum support o...

Page 8: ...ble of the computer and the camera on the appropriate screw clamp Connect the RS232 and antenna connector to the computer Screw back the aluminum support on top of the platform and screw the IP camera...

Page 9: ...stall button 5 When asked to reboot your computer always say no 6 Once installation is done create a folder rtmix in the web shared folder of the web server installed on your computer If you have foll...

Page 10: ...reference which can be selected with a menu located just under the Mesh and Map buttons Certain types of supported cameras have incorporated relays which are set with the I O checkbox The base can be...

Page 11: ...menu allows to choose between two modes of presentation Normal view default Fullscreen view This is a mode where the video windows covers the whole screen It is particularly useful when using configu...

Page 12: ...t to be added to the interface menu do the following Select the cameras and sensors to be displayed Drag the cameras and the sensors at the desired location Set the size opacity and z order of the dif...

Page 13: ...ol TCP IP item to display the Internet Protocol TCP IP Properties window in Fig2 4 Check the Use the following IP address option then enter the IP address for the network adapter Set IP address depend...

Page 14: ...erties window appears Fig1 3 Click the Wireless Networks tab A list of wireless access points appears in the Available networks box in Fig1 4 If the wifibot network is not listed in the Available netw...

Page 15: ...s Under Linux the interconnection is done through Dynamic NAT Network Address Translation and the CPU uses two different IP adresses one for the internal LAN and one for the WLAN In both cases all loc...

Page 16: ...mode we do not have any central management each client can talk directly to the other This mode works fine for networks with few elements Without any routing algorithm each element needs to have a di...

Page 17: ...k to be used 1 Open Network Connections Select your Wireless card right click on it and select Properties 2 Click the Wireless Networks tab 3 Enable Use Microsoft Windows to configure my wireless netw...

Page 18: ...settings of the different network interfaces present on the robot and the wireless settings when it applies All the micro troopers have the eth0 interface for the LAN and the wlan0 interface for the...

Page 19: ...work the robot will connect channel to be used Infrastructure Managed LAN IP settings WLAN IP settings If the wireless network is further to be connected to another network i e Internet we need to spe...

Page 20: ...d in mesh mode 20 The interfaces conf configuration file This file is very simple all it does is to indicate what interfaces we have and if the wireless ones will work as standard Wi Fi or doing Mesh...

Page 21: ...he WLAN interface IP and ports we will connect to from outside The LAN device IP and ports we want to reach i e the camera Start the control server to wait for connections Creates the interface in ord...

Page 22: ...e Desktop Connection 3 In the Computer box type the IP address or the name of the robot you want to connect to Fig 1 4 Click Connect 5 When the Log On to Windows dialog box appears type root as the us...

Page 23: ...Open the SSH client 2 Enter the CPU IP address the default port is 22 and then start the connection 3 The first time a connection is established the program will ask for confirmation 4 Enter login ro...

Page 24: ...the file sharing capabilities of Windows XP From your computer in order to connect to the robot and transfer files do the following 1 Click Start Run 2 In the Open field type Robotname or IP address...

Page 25: ...onvenience you will find in the USB key a free SCP client in data software WinSCP Connect to the robot in the following steps 1 Enter the IP address here 2 Enter User name root 3 Enter password wifibo...

Page 26: ...Users are free though to make use of the existing protocol between the embedded computer and the provided control interface for their own projects or to create a new one altogether that would suit be...

Page 27: ...one by the use of different and specific messages that the robot separately processes in order to take the proper action We will present here only the basic set of messages necessary for your program...

Page 28: ...ramming of remote control applications on computers under both Windows and Linux The USB key The USB key included with the robot has multiple purposes It is the support for the operative system it con...

Reviews: