background image

Flow water heaters type 

POW-LCD MULTI

INSTALLATION 

AND OPERATION

MANUAL

Summary of Contents for Type POW-LCD MULTI

Page 1: ...Flow water heaters type POW LCD MULTI INSTALLATION AND OPERATION MANUAL ...

Page 2: ...quipment is not intended to be used by persons including chil dren of lower physical sensory or mental capability unless they operate it under supervision Attention should be paid to children not playing with the equipment Installation instructions The installation and start up of the POW LCD MULTI heater should be done by a person qualified in accordance with the guidelines contained in the Manua...

Page 3: ...lectrical wiring in accordance with Figure 4 12 Connect the ribbon cable by inserting the plug with the proper side to the socked marked LCD see Fig 2 13 Put on the housing and screw it with a fastening screw Fig 2 Display board with ribbon cable 1 Plug 2 Socket marked LCD 3 Display board Fig 1 Heater housing 1 Display 2 Button increasing the set temperature 3 Button decreasing the set temperature...

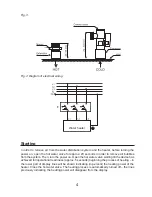
Page 4: ... the hot water valve waiting till the device has achieved full operational readiness approx 5 seconds beginning the process of heating in the lower part of display lines will be shown indicating in percent the heating power of the heater Close the hot water valve The heating process is automatically turned off the lines previously indicating the heating power will disappear from the display Fig 4 ...

Page 5: ...easures temperature of outlet water every 10 seconds If two temperature measurements are the same it means the temperature has stabilized and the electronic system can compare it with the set temperature In case when the obtained temperature is smaller from the set temperature due to the drop of the mains voltage the heater increases the power automatically so that the water temperature achieved t...

Page 6: ...mmed temperature will be displayed and thereby the set temperature with which the heater is to heat the water In order to re program any of the buttons T1 T2 T3 follow the instructions given in points 1 and 2 Display service mode The simultaneous pressing of buttons marked and for about 1 second will make the display shift from the basic mode the information about the set temperature and power is ...

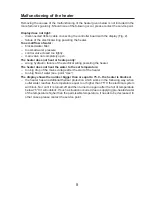
Page 7: ...e socket marked LCD Fig 2 3 Close the control valve marked 1 4 Unscrew the control valve plug marked 2 5 Take out the mesh filter marked 3 6 Remove dirt 7 Insert the mesh filter 8 Screw the valve plug 9 Open the control valve and check the tightness of connections 10 Connect the ribbon cable of the display board Fig 2 11 Close the housing 12 Remove entrapped air from the heater and then start it i...

Page 8: ...f the electrical wiring powering the heater The heater does not heat the water to the set temperature too big drop of the mains voltage after the start of the heater too big flow of water see point Use The display shows the number bigger than or equal to 75 0 the heater is blocked the heater has an additional thermal protection which works in the following way when outlet water reaches the tempera...

Page 9: ...itch 6 Air lock sensors 7 Inlet water temperature probe 8 Outlet water temperature probe 9 Outlet water thermal switch 10 Pressure switch 11 Terminals will be parts of the pressure switch 12 Hole for inserting the power cord 13 Controller board 14 Supply water pipe cold 15 Outlet water pipe hot 16 Protective conductor terminal ...

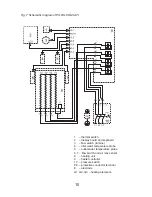
Page 10: ...ay board and keyboard 3 flow switch turbine 4 inlet water temperature probe 5 outlet water temperature probe 6 7 flow switch and air lock sensor 8 heating unit 9 heater controller 10 pressure switch PE protective conductor terminal E electrode G1 G2 G3 heating elements ...

Page 11: ...onnecting mm2 4 x 2 5 4 x 2 5 4 x 2 5 4 x 4 4 x 4 4 x 6 Maximum cross section of connecting cables mm2 4 x 10 Rated power of the miniature circuit breaker A 20 20 25 32 32 40 Minimum water resistance at 15O C Ωcm 1300 Pressure of the supplying water MPa 0 1 0 7 Minimum starting flow l min 2 7 Maximum temperature of the supplying water O C 60 Water pipe G Dimensions height x width x depth mm 447 x ...

Page 12: ... point collecting the waste equipment Collection points are run among others by wholesalers or retailers of such equipment as well as by gmina organizational units conducting the activity in the scope of collecting waste The above statutory obligations have been introduced in order to limit the amount of waste created from deteriorated electric and electronic equipment as well as to ensure the pro...

Reviews: