Operating Instructions Temperature Indicating Controller CS4H / CS4L
V1.1
•
05/2006
- 30 -
6. Running
After the controller has been mounted to the control panel and wiring is completed, it can be started in the
following manner.
(1) Turn the power supply to the CS4H, CS4L ON.
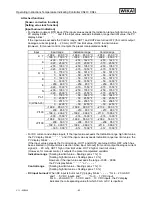
For thermocouple and RTD inputs, for approx. 3 seconds after the power is switched ON, sensor input
character and temperature unit are indicated on the PV display, and the input range high limit value is
indicated on the SV display.
See (Table 6-1).
For the DC input, for approx. 3 seconds after the power is switched ON, sensor input character is indi-
cated on the PV display, and the scaling high limit value is indicated on the SV display.
See (Table 6-1).
However, if the scaling high limit value has been changed in the Scaling high limit setting, the changed
value is indicated on the SV display. (During this time, all outputs and the LED indicators are in OFF
status)
After that, the process variable is indicated on the PV display, and SV1 or SV2 is indicated on the SV di
splay and the control starts.
(When the Control output OFF function is working, [
] is indicated on the PV display)
(Table 6-1)
°C °F
Sensor input
PV display
SV display
PV display SV display
K
J
R
S
B
E
T
N
PL-
C (W/Re5-26)
Pt100
JPt100
4 … 20 mA DC
0 … 20 mA DC
0 … 1 V DC
0 … 5 V DC
1 … 5 V DC
0 … 10 V DC
Scaling high limit value
(2) Input each setting value.
Input each setting value, referring to “5. Setup”.
(3) Turn the load circuit power ON.
Starts the control action so as to keep the controlled object at the main setting value.


