background image

5

Extension Cord

Because of the potential safety hazards under cer-

tain conditions, it is strongly recommended that you 

DON’T USE AN EXTENSION CARD with this appli-

ance. However, if you must use an extension cord, it 

is absolutely necessary that it be a UL/CUL-Listed, 

3-wire grounded type appliance extension cord hav-

ing a grounding type plug & outlet and the electrical 

rating of the cord 110 volts.

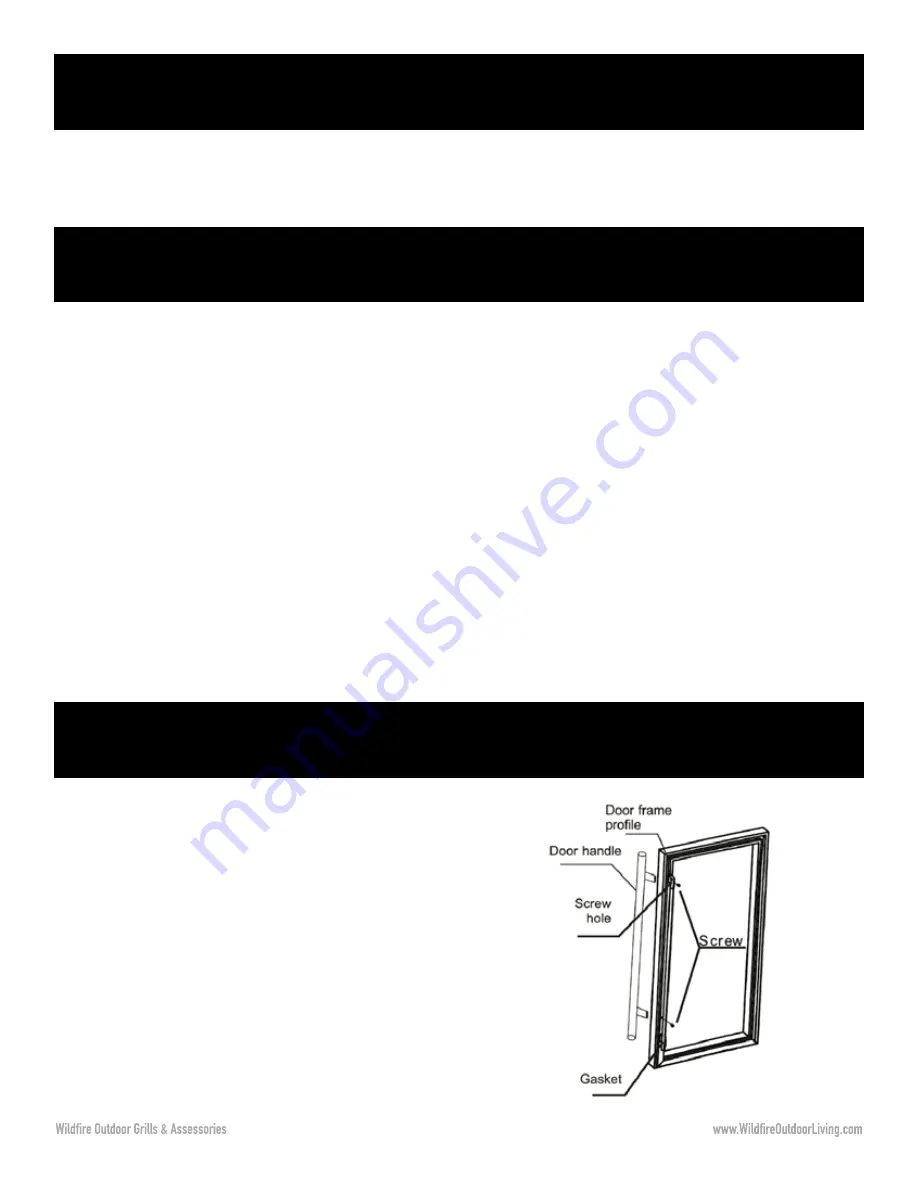
Installing the stainless steel handle

To install the handle, follow the instructions below:
1. Remove the rubber gasket from the right side of 

the inside of the door. (you don’t need to remove the 

whole gasket, just the side that covers the openings 

for the screws.)
2. Remove the screws from the included bag. Feed 

the screws through the holes from the inside until 

they poke through to the outside front of the door 

frame.
3. Align the handle with the two screws, then tighten 

the screws into the handle using a screwdriver until 

the handle is both flush and secured tightly against 

the door frame. DO NOT over-tighten the screws, as 

you may cause damage to the door frame.

Installing the refrigerator

BEFORE USING YOUR APPLIANCE 

Remove the exterior and interior packing. 
Before connecting the appliance to the power 

source, let it stand upright for approximately 24 

hours. This will reduce the possibility of a malfunc-

tion in the cooling system from handling during 

transportation. 
Clean the interior surface with lukewarm water using 

a soft cloth. 
Install the handle on the door, if it is not already 

attached (see below)

INSTALLATION OF YOUR APPLIANCE

The appliance is designed for built-in recessed or 

free-standing installation. 

Note: This appliance may be used for the storage of 

medicine and other medical products. 
Place your appliance on a floor that is strong enough 

to support it when it is fully loaded. To level the unit, 

adjust the front leveling legs.
Take care that the air vent at the front of the appli-

ance is never covered or blocked in any way. Note: It 

is recommended that you do not install the appliance 

near an oven, radiator or other heating source. Heat 

sources may increase electrical consumption. Don’t 

install in a location where the temperature will fall 

below 50 ° F ( 10°C). For best performance, do not 

install the appliance behind a cabinet door or block 

the base grille. 
Avoid locating the unit in moist areas. 
Plug the appliance into an dedicated, properly 

grounded wall outlet.

Summary of Contents for WFR- 15

Page 1: ...eave this manual with refridgerator for future reference To consumer Keep this manual for future reference as it contains important Warnings and Instructions CONFORMS TO UL STD 60335 1 60335 2 24 CERTIFIED TO CSA STD C22 2 NO 60335 1 60335 2 24 BEFORE USE PLEASE READ AND FOLLOW ALL SAFETY RULES AND OPERATING INSTRUCTIONS 062022_V1 AFFIX SERIAL NUMBER LABEL HERE ...

Page 2: ...and Instructions This manual provides specific operating instructions for your model Use your refrigerator only as instructed in this manual These instructions are not meant to cover every possible condition and sit uation that may occur Common sense and caution must be practiced when installing operating and maintaining any appliance If you lose this manual a replacement copy can be downloaded fr...

Page 3: ...nance 7 Troubleshooting 9 Rating Plates 11 Exploded Parts View List 13 Notes 19 DANGER WARNING CAUTION DANGER means if the danger is not avoided it will cause death or serious injury WARNING means if the warning is not heeded it can cause death or serious injury CAUTION means if the precaution is not taken it can cause minor or moderate injury or property damage CAUTION WARNING DANGER ...

Page 4: ...t is recommended that a separate circuit serving only your appliance be used Do not use outlets that can be turned off by a switch or pull chain Never clean appliance parts with flammable fluids These fumes can create a fire hazard or explosion Do not store or use gasoline or other flammable vapors and liquids in the vicinity of this or any other appliance The fumes can create a fire hazard or exp...

Page 5: ...cal Connection Improper use of the grounded plug can result in electrical shock This fridge should be properly grounded for your safety The power cord of this fridge is equipped with a three prong plug which fits with a standard three prong wall outlet to minimize the possibility of electri cal shock Do not under any circumstances cut or remove the third ground prong from the power cord supplied F...

Page 6: ...BEFORE USING YOUR APPLIANCE Remove the exterior and interior packing Before connecting the appliance to the power source let it stand upright for approximately 24 hours This will reduce the possibility of a malfunc tion in the cooling system from handling during transportation Clean the interior surface with lukewarm water using a soft cloth Install the handle on the door if it is not already atta...

Page 7: ...l When the panel is locked no buttons will work other than the unlock function 3 Lights Press to turn the interior light on or off 4 Display Shows the currently set target temperature 5 Temperature Increase Press once to increase temperature by 1 6 Temperature Decrease Press once to decrease temperature by 1 7 Celsius Fahrenheit Switch Press and hold both temperature buttons to switch the display ...

Page 8: ...g the door If the power is going to be off for a longer period of time it is recommended that you transfer all perishable sensitive contents to a functional fridge or cooler To prevent odor and mold growth leave the door open slightly blocking it open if necessary Lay a towel down below the open front of the fridge in case any frost buildup melts and drains out VACATION TIME Short vacations Leave ...

Page 9: ... ENERGY SAVING TIPS The appliance should be placed in the coolest location possible away from heat producing appliances and out of direct sunlight Ensure that the unit is adequately ventilated Never cover air vents Do not keep the door open any longer than necessary Let hot foods cool to room temperature before storing them in the fridge Do not overload the fridge as it forces the compressor to ru...

Page 10: ...rmetically sealed The condenser is too dirty The ventilation opening is blocked or too dusty Check the set temperature Set to a lower temperature Do not open the door more often than necessary Close door properly Check the door seal and clean or replace if it does not provide a proper seal Clean the condenser when necessary Clear any obstructions and clean the dust You can solve many common proble...

Page 11: ...e Causes Solution Troubleshooting The interior lighting doesn t work It isn t connected to a power supply The lighting is turned off The circuit breaker is tripped or a fuse has been blown Plug in the fridge Turn on the lighting by pressing the lighting button on the control panel Turn the circuit breaker back on or replace the fuse The fridge is making too much noise The fridge is not properly le...

Page 12: ...ng consistently The door has been left open for more than 60 seconds The temperature has suddenly changed significantly from the set temperature Close the door and leave it closed for at least 15 minutes Leave the door closed and wait for the unit to reach the set temperature 4008961 Outdoor refrigerator YE GN L E N POWER PCB CONTROL PCB PLUG COMPRESSOR BK WH Model Rated Voltage Rated Frequency St...

Page 13: ...28g IP Rating IPX4 4008961 Rating Plates Outdoor refrigerator 4008961 CONFORMS TO UL STD 60335 1 60335 2 24 CERTIFIED TO CSA STD C22 2 NO 60335 1 60335 2 24 4008961 YE GN L E N POWER PCB CONTROL PCB PLUG COMPRESSOR BK WH YE GN L E N POWER PCB CONTROL PCB PLUG COMPRESSOR BK WH PTC PTC Model Rated Voltage Rated Frequency Storage Volume Rated Current Refrigerant High Side Pressure Low Side Pressure W...

Page 14: ...13 WFR 15 Exploded Parts View 1 2 3 4 5 6 7 8 9 10 11 12 13 14 18 19 20 21 22 23 24 25 15 28 29 30 16 1 3 6 2 7 1 7 2 32 33 ...

Page 15: ...62 13 solid door 1 02 00563 14 gasket 1 03 00089 15 handle 1 02 00555 16 shelf 3 02 00564 17 condenser fan 1 01 00136 18 back grill 1 02 00565 19 compressor base plate 1 02 00566 20 foot 4 02 00567 21 drip tray 1 03 00090 22 drip tray evaporating pipe 1 10 00040 23 Lock fixing plate 1 02 00558 24 switch 1 01 00137 25 kick plate 1 02 00568 26 condenser 1 10 00041 27 bottom seal plate 1 02 00569 28 ...

Page 16: ...15 WFR 24 Exploded Parts View 24 25 26 28 30 31 32 33 29 34 35 20 21 22 23 4 3 1 5 6 7 8 9 10 11 12 13 14 15 16 17 18 19 36 27 ...

Page 17: ... left door top hinge 1 02 00138 16 iron shelf 3 02 00139 17 gasket 1 03 00088 18 solid door 1 02 00221 19 handle 1 02 00555 20 kick plate 1 02 00170 21 bottom door axes 1 02 00556 22 bottom door hinge 1 02 00557 23 foot 4 02 00172 24 back grill 1 02 00173 25 drip tray evaporating pipe 1 10 00036 26 fan holder 1 02 00175 27 Power cord 1 01 00128 28 condenser clapboard 1 02 00176 29 compressor 1 10 ...

Page 18: ...17 WFRDD 24 Exploded Parts View 1 2 3 4 5 35 36 37 39 41 42 43 44 40 45 46 34 38 32 33 6 7 8 9 10 11 12 13 14 15 16 17 18 19 20 21 22 23 24 25 29 28 27 26 30 47 31 ...

Page 19: ... rail 2 02 00465 19 upper wood shelf 2 02 00466 20 bottom wood shelf 1 02 00467 21 upper baffle plate 1 02 00468 22 baffle plate connecting strip 1 02 00469 23 baffle plate foam 1 03 00085 24 bottom baffle plate 1 02 00197 25 baffle panel plate 1 02 00198 26 Handle 2 02 00199 27 Upper door 1 02 00166 28 gasket 2 03 00086 29 upper drawer holder 1 02 00167 30 bottom drawer 1 02 00168 31 Bottom door ...

Page 20: ...________________________________________________________________ ________________________________________________________________________________ ________________________________________________________________________________ ________________________________________________________________________________ ________________________________________________________________________________ ___________...

Page 21: ...________________________________________________________________ ________________________________________________________________________________ ________________________________________________________________________________ ________________________________________________________________________________ ________________________________________________________________________________ ___________...

Page 22: ...8 00AM 5 00PM AZ Mountain Time Or email us at OUR STAFF IS READY TO PROVIDE ASSISTANCE customerservice wildfireoutdoorliving com Copyright 2022 RPG Brands Wildfire Outdoor Living All rights reserved Products and specifications subject to change without notice The product images shown are for illustration purposes only and may not be an exact representation of the product 602 344 4840 ...

Reviews: