background image

Installation Guide & User Manual

PhoneMax

®

Model TEL 030

  Williams Sound 

® 

Helping People Hear

6

Installation Steps

Step 1: Make sure you have a telephone jack within 6 feet of

the place you’ve chosen to install the PhoneMax. If
you have an older 4-prong jack, you’ll need a modular
jack adapter. These adapters are available from elec-
tronic, phone, and other retail stores.

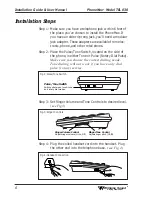
Step 2: Place the Pulse/Tone Switch, located on the side of

the phone, in either Tone or Pulse (Rotary Dial Pulse).

Make sure you choose the correct dialing mode.
Tone dialing will not work if you have only dial
pulse (rotary) service.

Step 3: Set Ringer Volume and Tone Controls to desired level.

(see Fig.3)

Step 4: Plug the coiled handset cord into the handset. Plug

the other end into the telephone base.

(see Fig. 4)

RINGER

OFF

LO

HI

RINGER T

ONE

I

II

III

Ringer Tone Control

Adjusts ringer pitch (I, II, III)

Ringer Volume Control

Adjusts ringer volume (Hi, Lo, Off)

Fig. 3: Ringer Controls

Fig. 4: Handset Connection

PULSE TONE

TO TEL. LINE

Pulse / Tone Switch

Switches between touch-tone 
and rotary dial modes.

Fig. 2: Pulse/Tone Switch

Summary of Contents for PhoneMax TEL 030

Page 1: ...RINGER FLASH REDIAL VOLUME SOFT LOUD Williams Sound Helping People Hear MAN 096 A Installation Guide User Manual Model TEL 030 PhoneMax ...

Page 2: ...mage can potentially result from misuse WARNING This product can be hazardous if immersed in water To avoid the possi bility of electrical shock do not use it while in the bathtub or shower or when you are wet If you accidentally drop it into water do not retrieve it until you have first unplugged the line cord from the modular wall jack Do not plug the telephone back in until it has dried thoroug...

Page 3: ...ation 2 Introduction 4 Components 4 Features Functions 4 Installation Steps 6 Table Desk Installation 7 Wall Plate Installation 7 Bare Wall Installation 9 PhoneMax Operation 10 Using The Volume Control 10 Making A Call 10 Answering A Call 10 Flash And Redial Buttons 10 Using The PhoneMax With A Hearing Aid 10 In Case Of Difficulty 12 Warranty 13 Specifications 14 FCC Notices 15 ...

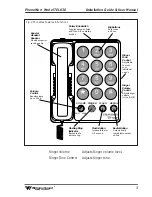
Page 4: ...ephone for users who don t need amplification We suggest you read this user manual carefully to become familiar with the Phonemax s features and their function The manual explains how to install use and care for your new Phonemax Components The following items are included with the PhoneMax Handset Plastic base Coiled handset cord Wall mount bracket Long wall cord User Manual Short wall cord Featu...

Page 5: ...lly redials last number called Flash Button Interrupts line for 1 2 second Big Buttons Easy to see and use Volume Control Boosts volume up to 25 dB Ringer Tone Control Adjustable to meet your individual needs Ringer Volume Control Adjusts ringer volume Hi Lo Off Pulse Tone Switch Toggles between Pulse and Touch Tone dialing modes RINGER FLASH REDIAL VOLUME SOFT LOUD Flashing Ring Indicator Flashes...

Page 6: ... either Tone or Pulse Rotary Dial Pulse Make sure you choose the correct dialing mode Tone dialing will not work if you have only dial pulse rotary service Step 3 Set Ringer Volume and Tone Controls to desired level see Fig 3 Step 4 Plug the coiled handset cord into the handset Plug the other end into the telephone base see Fig 4 RINGER OFF LO HI RINGER TONE I II III Ringer Tone Control Adjusts ri...

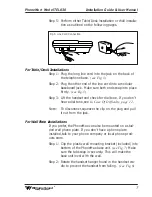
Page 7: ...al tone If you don t hear a dial tone see In Case Of Difficulty page 12 Note To disconnect squeeze the clip on the plug and pull it out from the jack For Wall Plate Installations If you prefer the PhoneMax can also be mounted on a stud ded wall phone plate If you don t have a phone plate installed talk to your phone company or local phone prod ucts store Step 1 Clip the plastic wall mounting brack...

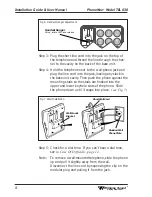
Page 8: ...inst the mounting studs so the studs are hooked into the upper and lower keyhole slots of the phone Slide the phone down until it snaps into place see Fig 7 Step 5 Check for a dial tone If you can t hear a dial tone see In Case Of Difficulty page 12 Note To remove a wall mounted telephone slide the phone up and pull it slightly away from the wall Disconnect the line cord by squeezing the clip on t...

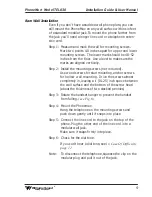
Page 9: ...unting screws not included Use wood screws for stud mounting anchor screws for hollow wall mounting Drive the screws almost completely in leaving a 1 8 0 125 inch space between the wall surface and the bottom of the screw head about the thickness of two stacked pennies Step 3 Rotate the handset hanger to prevent the handset from falling see Fig 6 Step 4 Mount the Phonemax Hang the telephone on the...

Page 10: ... Check the Volume Control setting lift the handset Step 2 Adjust the Volume control to a comfortable setting Using Flash And Redial Buttons Flash Button The Flash Button produces a 6 second disconnect useful when picking up an incoming call if your line is equipped with Call Waiting or when adding another party for three way calling Redial Button The Redial Button redials the last number dialed Us...

Page 11: ...lation Guide User Manual WARNING The PhoneMax is capable of amplifying sounds to a very loud volume Always set the VOLUME CONTROL to the SOFT setting before using the phone Instruct all potential users in its proper operation Do not let children play with the PhoneMax ...

Page 12: ...der Contact your local phone company Can make calls but phone doesn t ring for incoming calls There are a number of potential causes to this problem 1 The handset may not be placed properly on the base Make sure it is resting properly on the base 2 The Ringer Volume Control may be set to OFF Adjust the switch to LO or HI The flashing ring indicator always indi cates a call being received 3 Too man...

Page 13: ...to us with ship ping cost prepaid and advise us by letter of the observed diffi culty During the first five years following the date of purchase we will promptly repair or replace the product and return it at our expense After five years from the date of purchase we will service our products for a modest service charge Please return the enclosed warranty card to register your date of purchase This...

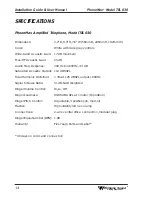
Page 14: ...io Freq Response 300 Hz to 2800 Hz 3 dB Saturated Acoustic Output 112 dB SSPL Total Harmonic Distortion 3 at 105 dB SPL output 1000 Hz Signal to Noise Ratio 51 dB NAB Weighted Ringer Volume Control Hi Lo Off Ringer Loudness 80 85 dBA SPL at 1 meter Hi position Ringer Pitch Control Adjustable 3 positions lo med hi Flasher High visibility red neon lamp Connections 2 wire central office connection mo...

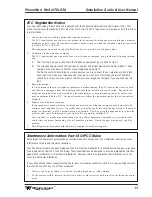
Page 15: ... authorized by the FCC For repair procedures follow the instructions under the section entitled Warranty 4 Rights of the telephone company If your product is causing harm to the telephone network the telephone company may temporarily dis continue your telephone service If possible they will notify you before they interrupt service If advance notice isn t practical you ll be notified as soon as pos...

Page 16: ... 1999 Williams Sound Corp MAN 096A Williams Sound Corp Distributed by HITEC 8160 S Madison St Burr Ridge IL 60527 U S A 800 288 8303 ...

Reviews: