background image

22

201843

DIRECT-VENT PROPANE/LP GAS HEATER

THE COMFORT PRODUCTS PEOPLE

ILLUSTRATED
PARTS LIST

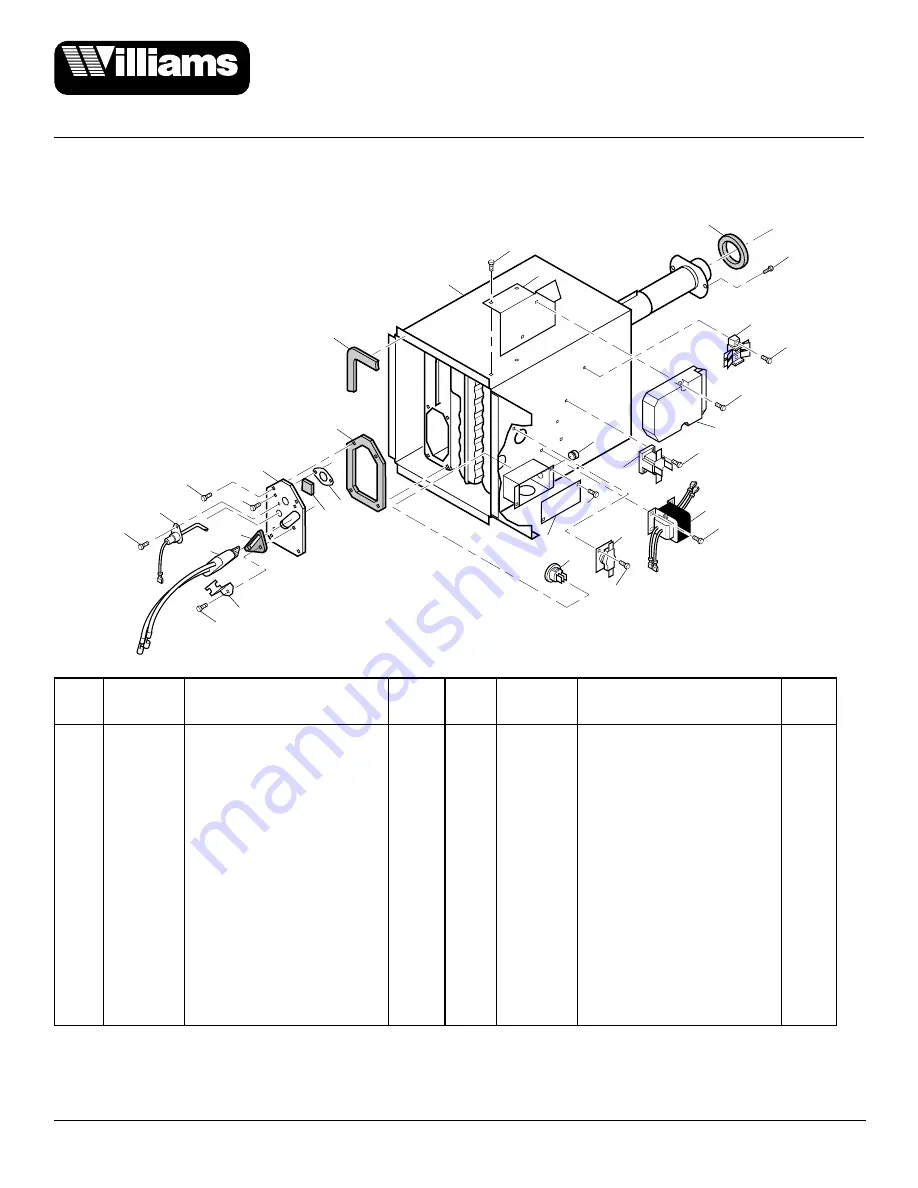
COMBUSTION CHAMBER
ASSEMBLY
25,000 BTU/HR MODEL

This list contains replaceable parts used in your furnace. When ordering parts, follow the
instructions listed under Replacement Parts on page 19 of this manual.

KEY

PART

NO.

NUMBER DESCRIPTION

QTY.

1

121357

Screw, #6 x 5/8" **

4

2

231955

Wire Harness and
   Ignition Control

1

3

062461

Ignition Control Mounting
   Bracket

1

4

121372

Screw, #6 x 1/2" **

2

5

230625

Time Delay Relay

1

6

230218

Bushing

1

7

120158

Screw, #8 x 3/8" **

4

8

230825

Limit Switch

1

9

231144

Terminal Block

1

10

121224

Screw, #10 x 3/4" **

2

11

070487

Gasket

1

12

231143

Transformer Assembly

1

13

121252

Screw, #10 x 3/8" **

6

14

020983

Combustion Chamber/
   Heat Shield Assembly

1

15

070606

Heat Shield Gasket

1

16

070398

Burner Access Door Gasket

1

17

290141

Cover Plate

1

18

310026

Glass Disc

1

19

030893

Burner Access Door

1

20

230844

Bushing with Terminals

1

21

231950

Flame Sensing Probe

1

22

121502

Screw, #6 x 3/8" **

2

23

090211

Junction Box Cover

1

24

121388

Screw, #10 x 1/2" **

4

25

063018

Glo-Bar Retainer

1

26

100980-01 Glo-Bar

1

27

070909

Glo-Bar Gasket

1

KEY

PART

NO.

NUMBER DESCRIPTION

QTY.

1

2

3

4

5

6

7

1

9

10

11

12

13

14

15

16

17

18

19

7

21

22

22

24

26

25

27

23

13

20

8

13

** Standard hardware, available at your local hardware store.

Summary of Contents for 2503531

Page 1: ...tion adjustment alteration service or maintenance can cause injury or property dam age Refertothismanual for correct installation and operational proce dures Forassistanceor additional information con...

Page 2: ...s Propane LP gas is odor less An odor making agent is added to pro pane LP gas The odor helps you detect a propane LPgasleak However theodoradded to propane LP gas can fade Propane LP gas may be prese...

Page 3: ...65 98 For purposes of input adjustment SPECIFICATIONS Install and use furnace with care Follow all localcodes Intheabsenceoflocalcodes use the latest edition of the following National Fuel Gas Code AN...

Page 4: ...Ifyouare installing thermostat in a wall make sure there are no pipes or wiring in the hollow wallabovethefurnace Thethermostatwires will pass through this wall from the attic Mounting hardware neede...

Page 5: ...000 BTU Hr Model Use a proper sized drill bit Drill holes through wall and into studs at marked locations 40 000 BTU Hr Model Use a proper sized drill bit On wall stud side of opening drill holes thro...

Page 6: ...r anything else that would interfere with install ing thermostat Do not mount thermo stat to stud If there are any obstruc tions choose a new location 3 Provide two 18 gauge insulated stranded wires f...

Page 7: ...t Wires to Thermostat Wall Anchors CAUTION Use only new black iron or steel pipe Copper tubing may be acceptable in cer tain areas Check local codes Use pipe large enough in diam eter to allow proper...

Page 8: ...plug 9 Slide furnace back into furnace cabi net Make sure exhaust tube gaskets are in place Make sure exhaust and intake vent tubes extend into vent caps on back of cabinet Replace two screws by exhau...

Page 9: ...0 BTU Hr 15 000 BTU Hr for other gas appliances 55 000 BTU Hr total 55 000 2500 22 Locate 22 or higher on chart below According to the chart below you should use 40 feet or less of 3 8 pipe 125 feet o...

Page 10: ...Figure 15 CAUTION Usepipejointseal ant that is resistant to liquid pe troleum LP gas Slab Floor Installation Equipment Shutoff Valve Test Gauge Connection To Gas Supply 3 Min Sediment Trap Gas Piping...

Page 11: ...0 cycle grounded outlet at furnace location 2 The furnace has a three pronged grounded plug Use only a grounded three prong outlet IMPORTANT Some local codes require rigid or semi rigid conduit or met...

Page 12: ...e burner Do not try to light the burner by hand 8 Plug in furnace 9 Set thermostat to desired setting If thermostat is set above room tem perature the blower will come on 10 Allow approximately 45 sec...

Page 13: ...forces the combus tion products out of the exhaust tube s The Combustion air blower is sealed so that air does not pass between it and the circulating room air blower 3 When the blower motor reaches...

Page 14: ...p and water mixture Wipe cabinet and front cover to remove dust Use a vacuum cleaner to remove dust from front cover louvers EXHAUST AND INTAKE VENTS Make sure the exhaust and intake vents are not blo...

Page 15: ...h is sailing in far enough to open the solenoid valve and to energize the ignition control If the switch is not sailing in clean any dust or dirt from the actuator pin Other reasons for the switch not...

Page 16: ...ct it WARNINGS Never connect unit or ignition circuit to 230 volts Never operate unit with glo bar touching burner or any other ground Damage to ignition control will occur Be sure sensor probe never...

Page 17: ...en 2 A Check for voltage 24 volts A C at valve 40 seconds after glo bar begins to glow If voltage present but valve not opening replace valve B If no voltage at valve check brown wire at ignition cont...

Page 18: ...ing probe Be sure probe is positioned in the burner flame and glowing cherry red Check wire and wire connections at probe and ignition control B If wire and wire connections okay check for voltage acr...

Page 19: ...ail Switch Note White 115 V A C White Open WIRING DIAGRAMS Figure 21 Wiring Diagram 40 000 BTU Hr Model Figure 20 Wiring Diagram 25 000 BTU Hr Model Note Use only original replacement parts Thiswillpr...

Page 20: ...inet Insulation top 1 191244 Operating Instructions Decal English 1 191246 Operating Instructions Decal French 1 531010 Warning Decal 1 191263 Nameplate 1 Parts available not shown You must order name...

Page 21: ...91241 Front Cover Trim 1 4 030642 Front Cover Assembly 1 5 100896 Cabinet Assembly 1 6 070511 Cabinet Insulation right and left sides 1 7 120158 Screw 8 x 3 8 2 8 160912 Thermostat includes 2 screws 1...

Page 22: ...25 Limit Switch 1 9 231144 Terminal Block 1 10 121224 Screw 10 x 3 4 2 11 070487 Gasket 1 12 231143 Transformer Assembly 1 13 121252 Screw 10 x 3 8 6 14 020983 Combustion Chamber Heat Shield Assembly...

Page 23: ...070607 Heat Shield Gasket 1 14 020982 Combustion Chamber Heat Shield Assembly 1 15 061663 Wire Clamp 2 16 121252 Screw 10 x 3 8 12 17 230560 Limit Switch 1 KEY PART NO NUMBER DESCRIPTION QTY 18 06256...

Page 24: ...19 of this manual 1 2 3 4 5 6 7 8 9 10 11 12 KEY PART NO NUMBER DESCRIPTION QTY 1 120717 Hex Nut 10 24 2 2 121459 Screw 10 24 x 1 2 2 3 010701 Burner Assembly 1 4 180215 Main Burner Orifice 1 5 12138...

Page 25: ...DESCRIPTION QTY 1 120717 Hex Nut 10 24 4 2 010621 Left Burner Assembly 1 3 010623 Right Burner Assembly 1 4 070591 Manifold Gasket 1 5 171167 Manifold Assembly 1 6 180188 Main Burner Orifice 2 7 1213...

Page 26: ...390260 Blower Housing room air 1 8 121421 Hex Lock Nut 10 24 3 9 050751 Crossover Tube 1 10 121388 Screw 10 x 1 2 4 11 070385 Crossover Tube Gasket 2 12 121227 Screw 10 24 x 1 2 2 13 070362 Universal...

Page 27: ...Cover Assy 1 12 121388 Screw 10 x 1 2 3 13 070420 Combustion Air Crossover Gasket 1 14 390318 Combustion Air and Motor Cover Assembly 1 KEY PART NO NUMBER DESCRIPTION QTY 15 121227 Screw 10 24 x 1 2 2...

Page 28: ...ller in accordance with all local codes and instructions furnished with the unit This warranty does not apply to parts that are not in original condition because of normal wear and tear or parts that...

Reviews: