background image

5

USER GUIDE

12. 

Remove any pressure in the vessel by pressing 
the button on the VPRV. Remove lid, sediment 
bottle and drain BrewKeg50

TM

13. 

Rinse sediment bottle in cold water thoroughly. 

14. 

Rinse lid in cold water and place upside down 
on bench. 

15. 

Open butterfly valve and rinse out BrewKeg50

TM


again to remove all the detergent residue. 

16. 

Close butterfly valve. 

17. 

Fill BrewKeg50

TM

 with 4L (1 gal.) of boiling water. 

18. 

Install lid with silicon seal properly and shake 
upright, inverted and on its side for at least 
10

 seconds. 

19. 

Connect CO

2

 briefly to pressurise if required 

before connecting beer tap lines to flush 
with remaining boiling water from inside the 
BrewKeg50

TM

. (Run through beer lines until 

it runs hot). 

20. 

Remove any pressure in the vessel by pressing 
the button on the VPRV. 

21. 

Remove lid and place upside down on bench 
before draining the BrewKeg50

TM

22. 

 Re-assemble the sediment bottle components 
and attach two halves of sediment bottle together.

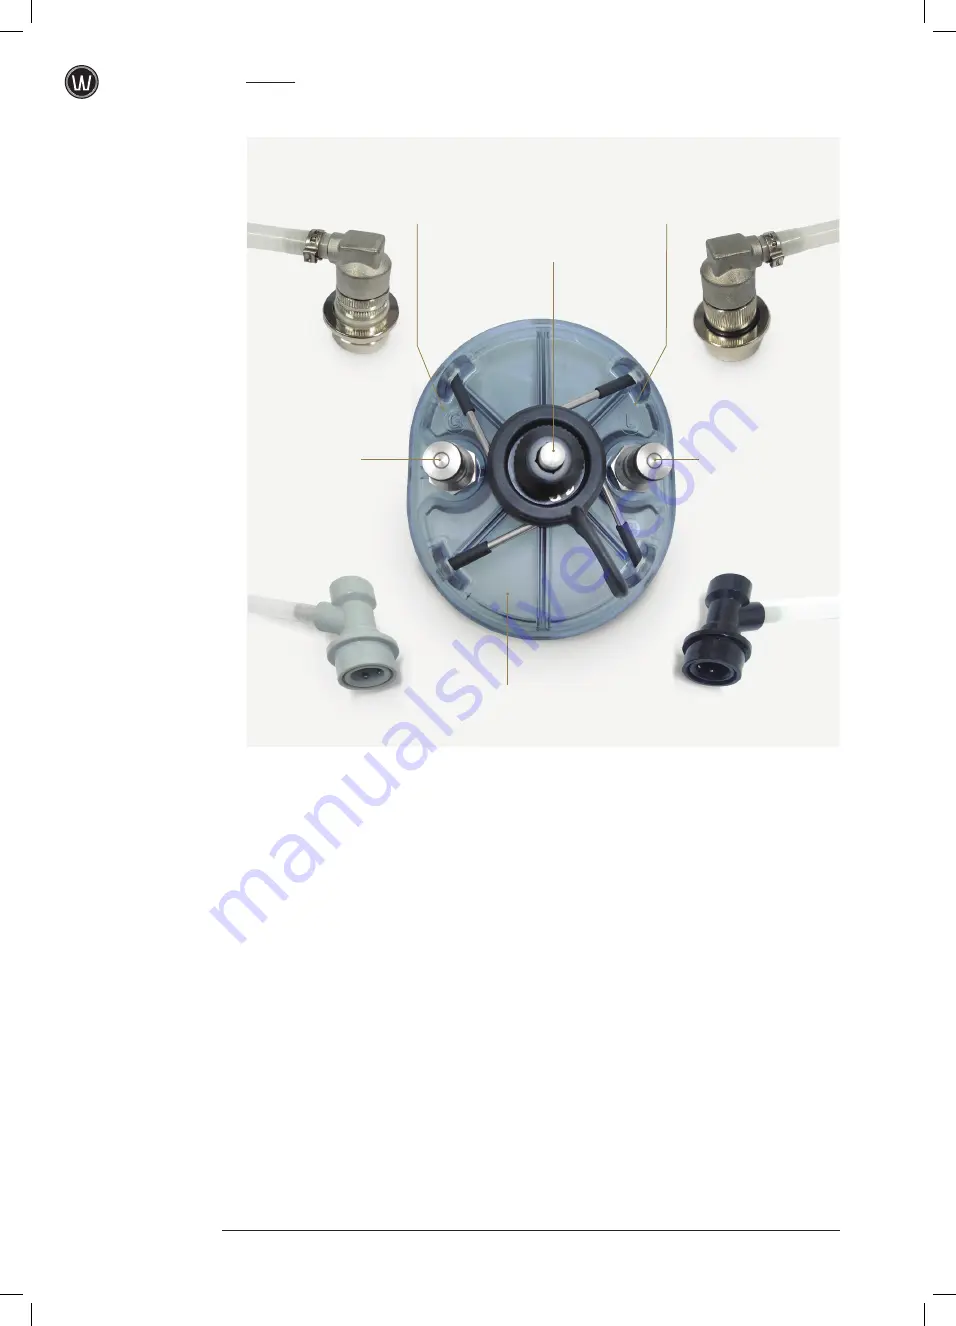
Fig 2: Assembled BrewKeg

TM

 Lid

BEVERAGE-OUT PORT 
(WITHOUT NOTCHES 
ON ITS BASE HEX, WITH 
TUBE EXTENDING INTO 
THE VESSEL)

BREWKEG

TM

 LID.

GAS-IN PORT 
(WITH NOTCHES 
ON ITS BASE HEX)

‘L’ IS FOR LIQUID OUT. 
THE BLACK DISCONNECT 
CONNECTS TO IT

‘G’ IS FOR GAS IN. 
THE GREY DISCONNECT 
CONNECTS TO IT

VARIABLE PRESSURE 
RELIEF VALVE (VPRV)

Summary of Contents for BrewKeg50

Page 1: ...rewing equipment Registration is easy and is helpful for warranty and support queries OVERVIEW 01 BREWKEG50 TM USER GUIDE 02 Video Resources 02 Equipment 02 Process Summary 03 BREWING INSTRUCTIONS Cle...

Page 2: ...1 USER GUIDE OVERVIEW BrewKeg50 TM Structure STAINLESS STEEL VESSEL VESSEL BUTTERFLY VALVE DRAINING SEDIMENT BOTTLE VESSEL LID Optional Wheelset Accessory 1...

Page 3: ...your way through all relevant videos NOTE you may find that in some instances the videos do not match exactly the instructions within this guide It is worth noting that there are multiple ways to achi...

Page 4: ...VPRV to approx 2 5 turns and set temperature to ideally 25 C 77 F or within the range of 18 28 C 64 82 F in your fridge or room ADJUST 01 Maintain temperature for 4 days 02 Check and adjust the pressu...

Page 5: ...r into the underside of the closed bottom valve fitting to sanitise 05 Return to upright position and re rinse with cold water Open the bottom valve to drain excess water 06 Re assemble lid beer tube...

Page 6: ...briefly to pressurise if required before connecting beer tap lines to flush with remaining boiling water from inside the BrewKeg50TM Run through beer lines until it runs hot 20 Remove any pressure in...

Page 7: ...30 C 77 F 86 F and no higher than 40 C 104 F F Stir well G Open butterfly valve to introduce mixed ingredients to sediment bottle H Re top up with cold water to the 50L 13 2 gal mark on the side of t...

Page 8: ...your spatula handle to provide a guide as you fill the BrewKeg50TM I Stir thoroughly J Open butterfly valve to introduce mixed ingredients to sediment bottle K Re top up with cold water to the 50L 13...

Page 9: ...certain yeast strains so 4 days is a guideline A lack of yeast activity appearing in the sediment bottle is the key indication as to whether a fermentation is complete 04 Check your sediment bottle f...

Page 10: ...ou should hear the bubbling Keep the Liquid Disconnect Black attached until the pressure in the BrewKeg50TM is the same as the gas bottle 1 1 bar 16psi then disconnect from the BrewKeg50TM 15 To flush...

Page 11: ...jug or container iv Holding the external part of the drain valve black part turn it clockwise to open and then back and forth by 1 4 to 1 8 turns continuously You will see the sediment begin to exit t...

Page 12: ...to higher temperatures where the yeast might re activate and create pressure 02 Connect the black fitting of your draft beer tap to the liquid out post on the BrewKeg50TM marked with an L NOTE Ensure...

Page 13: ...target around about 6 6 4g L CO2 in their beers Beverage Typical Serving Temperature British Ales 1 7 C 34 45 F Porter Stout 1 8 C 34 46 F Belgian Ales 6 10 C 43 50 F American Ales 7 13 C 45 55 F Euro...

Page 14: ...sel pressure to 0 5 bar 7 25psi below the dispense pressure not the fermented pressure to introduce the Clarification Agent Carbonation for Warmer Beverages Carbonation g L CO2 Pressure on CO2 Supply...

Page 15: ...s you brew more you may find you come up with your own tweaks to what is written here or develop radically different methods that suit you better As long as you and your friends are happy with the fin...

Page 16: ......

Reviews:

Related manuals for BrewKeg50