background image

S e c t i o n   2   –   I n   Yo u r   R o o m

Summary of Contents for Maxx Series 3

Page 1: ...M A X X S e r i e s 3 O w n e r s M a n u a l...

Page 2: ...En g in eer in g an d t h e Sales a nd Ma r ke ti ng Departments The information co n t ain ed h erein is su bject t o ch an ge w ithout n oti ce Current Revision 3 0 If you are in n eed o f a mo re r...

Page 3: ...o n 2 2 R oom R e f l e c t i o n s 1 7 S l a p E c h o 1 8 S t a n d i n g W av e s 2 0 C o m b F i l t e r E ff e c t 2 1 S e c t i o n 2 3 R e so n a n c e s 2 2 S t r u c t u r a l R e s o n a n c...

Page 4: ...9 S e c t i o n 4 3 M o u n t i n g t h e L o w e r T w e e t e r M i d M o d u l e 4 3 M a t e r i a l s R e q u i r e d 4 3 M o u n t i n g P r o c e d u r e 4 3 I n s t a l l t h e L o w e r T w e...

Page 5: ...7 S ys t e m S p e c i f i c a t i o n s 6 7 S e c t i o n 7 1 S p e c i f i c a t i o n s 6 9 S e c t i o n 7 2 M A X X D i m e n s i o n s 7 0 S e c t i o n 8 P r o p a g a t i o n d e l ay T a b l...

Page 6: ...n A u d i o S p e c i a l t i e s L i m i t e d W a r r a n t y 7 9 C o n d i t i o n s 7 9 R e m e d y 8 0 W a r r a n t y L i m i t e d t o O r i g i n a l P u r c h a s e r 8 0 D e m o n s t r a t...

Page 7: ...S e c t i o n 1 I n t r o d u c t i o n...

Page 8: ...M A X X S e r i e s 3 O w n e r s M a n u a l 8 Wi l s o n A u d i o S p e c i a l t i e s...

Page 9: ...MAXX Series 2 platform was inca pable of further improvement Among the technical innovations of the MAXX Series 3 All new midrange driver evolved from the revolutionary Alexandria Series 2 midrange u...

Page 10: ...mplex overlay of frequencies amplitudes and phase relationships With current tech nology no single transducer can repro duce the full range of music at realistic sound pressure levels while maintain i...

Page 11: ...e Certain other loudspeaker makers recognize the need to correctly align their drivers but they do Figure 2 MAXX s Modules Move Aspherically to Correct Propagation Delay Figure 2a Typical loudspeakers...

Page 12: ...phase coherence exacerbated by large speaker sys tems Typical of the creative process the solution itself is an analogy to the field of op tics and the design of wide angle lenses The means of maintai...

Page 13: ...S e c t i o n 2 I n Yo u r R o o m...

Page 14: ...M A X X S e r i e s 3 O w n e r s M a n u a l 14 Wi l s o n A u d i o S p e c i a l t i e s...

Page 15: ...acoustics and their interactions with loudspeakers While we will also outline some detailed suggestions on the setup of the MAXXs we strongly suggest that you have your local Wilson Audio dealer perfo...

Page 16: ...this transition you have entered the inner edge of the Zone of Neutrality Place a piece of tape on the floor to mark this location Although it will vary from room to room the zone in most rooms begin...

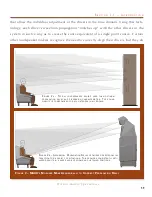
Page 17: ...round the room Adjacent to very large windows and open doors the inner edge of the Zone of Neutrality moves closer to the wall and the Zone of Neutrality be comes wider If you were to extend the inner...

Page 18: ...rates back and forth until it is finally dissipated over time You can test for slap echo in any room by clapping your hands sharply in the middle of the room and listening for the characteristic sound...

Page 19: ...rials that can be used to ameliorate slap echo RPG Absorbor Air duct board Cork panels Large ceiling to floor drapes Carpeting to wall surfaces In many domestic listening environments heavy stuffed fu...

Page 20: ...ension and size A room that supports severe standing waves creates difficulty in setup In these rooms the speaker will sound radically different as it is moved around The effects of standing waves on...

Page 21: ...wave frequencies excited by the dimensions in the other channel Comb Filter Effect The comb filter effect is a special type of standing wave noticeable primarily at higher frequencies and shorter wav...

Page 22: ...nd is usually masked by the music In many wood frame rooms the most common type of structural resonance problem is booming of walls and floors You can test for these very easily by tapping the wall wi...

Page 23: ...t of loudspeakers in the room can dramatically reduce the speakers destructive interaction with low fre quency modes ASC Tube Traps are effective in reducing some of this low frequency room coloration...

Page 24: ...re sitting Addition ally these long rooms are often quite lean in the bass near the center of the room Rectangu lar rooms are still preferred to square rooms because by hav ing two sets of dissimilar...

Page 25: ...mum seating position in a home theater and build the rest of the seating positions around this posi tion If your optimum position is located on a couch you should center the loudspeakers on the middle...

Page 26: ...ose to the sidewalls will suffer from a strong primary reflection This can cause out of phase cancellations or comb fil tering which will cancel some frequencies and change the tonal balance of the mu...

Page 27: ...ld not be positioned too far from the listener if maximum resolution of low level detail is required If possible the speakers should be positioned somewhat out into the room slightly asymmetrically vi...

Page 28: ...Wi l s o n A u d i o S p e c i a l t i e s M A X X S e r i e s 3 O w n e r s M a n u a l...

Page 29: ...S e c t i o n 3 U n c r a t i n g t h e M A X X...

Page 30: ...M A X X S e r i e s 3 O w n e r s M a n u a l 30 Wi l s o n A u d i o S p e c i a l t i e s...

Page 31: ...eft and one for your right channel modules Place the ODD numbered modules in the LEFT channel section and the EVEN in the RIGHT channel section Prior to assembly stage the modules away from the area w...

Page 32: ...casters on the woofer are toward the floor 3 While one person holds the crate roll the woofer enclosure out of the crate Be very careful not to scratch the module during this process 4 Finally move th...

Page 33: ...you can inventory your items 1 Owners manual 2 Woofer modules left right channel 2 Lower Tweeter Midrange Modules left right channel 2 Upper Midrange modules left right channel 2 Woofer grills 2 Lower...

Page 34: ...kes 2 F spikes 2 G spikes 2 2 spikes 2 3 spikes 4 MAXX 3 Tether Bolts 4 MAXX 3 Tether Caps 2 Alignment Blocks installed 2 1 2 Alignment Block Allen Bolt 1 Polishing cloths 8 Large Brass spike pads Com...

Page 35: ...S e c t i o n 4 A s s e m b l y...

Page 36: ...M A X X S e r i e s 3 O w n e r s M a n u a l 36 Wi l s o n A u d i o S p e c i a l t i e s...

Page 37: ...up and tuning will follow the assembly of your MAXXs Removing the Protective Film Wilson Audio has applied a protective film with a special adhesive to protect the paint surface of your loudspeakers P...

Page 38: ...tion see Section 2 MAXX Propagation delay Alignment Tables from Section 8 Propagation delay Alignment Propagation delay alignment accuracy of the MAXX has been established and veri fied by Wilson Audi...

Page 39: ...Tables in Section 8 By measuring the ear height and the distance from the speaker to the listening position you will be able to align the system for your listening position Alignment Procedure Locate...

Page 40: ...pecific numbered indent that determines its individual propa gation delay position within the modular array Each alignment plate contains numbered indents The alignment tables contain the information...

Page 41: ...idrange Module the first labeled Number 1 Lower Tweeter Midrange Module Spike Length is a table deter mining the rear spike length The second is a table labeled Num ber 2 Lower Tweeter Midrange Module...

Page 42: ...is a table labeled Number 5 Upper Midrange Module Spike Detent Location deter mining the step block location see Figure 10 11 Make a mark on the chart labeled Num ber 4 Upper Mid range Module Spike L...

Page 43: ...r of gravity will be somewhat forward and unbalanced until the tether bolts are secured Have an assistant stabilize them while you install rear spikes and bolts The front to back location of each modu...

Page 44: ...e see Figure 8 There are alignment tracks that accommodate the spikes Take caution not to scratch the painted surface with the alignment spike as you install the Lower Tweeter Midrange Module Refer to...

Page 45: ...r spike in the proper detent See Figure 11 as deter mined in the previous step Make sure that the front spikes stay in the front track so the paint surface does not get scratched Section 4 5 Connectin...

Page 46: ...and connect it to the Tweeter s binding post which is on the right side of the Low er Tweeter Midrange Module See Figure 12 Locate the cable marked Upper Mid Locate the binding post on the rear of the...

Page 47: ...the slide tray if its flat surfaces are oriented properly Slide the bolt forward so it rests vertically beneath the hole While holding the bolt in place thread the tether cap nut onto the bolt and lo...

Page 48: ...udspeaker system Screw the spikes into the diode until the nut is against the diode Be careful that the nut does not turn while inserting and threading spikes into the diode Note Do not tighten these...

Page 49: ...to In stall Spikes Materials Required Note This is a two person job Do not attempt this by yourself The MAXXs weigh over 400 LBS and may seriously injure someone if tipped over 8 sets of assembled sp...

Page 50: ...ckwise After the front of the MAXX is high enough you will need approxi mately one and half inches of clearance beneath the caster use the swivel caster wrench to loosen the casters Remove the casters...

Page 51: ...horter than the caster Use cau tion Note It is very important at this point that an able assistant stabilize the front of the MAXX until the rear spikes are attached and the unit is lowered Repeat the...

Page 52: ...to the resistor plate see Figure 17 These resistors serve several functions Note Only Wilson Audio replacement resistors should be used in your MAXXs Chang ing the value or brand of resistor will hav...

Page 53: ...l sound its best after its components have been broken in for some period of use Wilson Audio breaks in all woofers and mid range drivers for a 12 hour period All drivers are then tested calibrated an...

Page 54: ...M A X X S e r i e s 3 O w n e r s M a n u a l 54 Wi l s o n A u d i o S p e c i a l t i e s...

Page 55: ...S e c t i o n 5 C a r e o f M A X X...

Page 56: ...M A X X S e r i e s 3 O w n e r s M a n u a l 56 Wi l s o n A u d i o S p e c i a l t i e s...

Page 57: ...m we have applied a removable layer of protective film over the finish We recommend that this film be left in place until the speakers are in their final location in your listening room Once you have...

Page 58: ...ed To maintain the high luster of the finish periodic polishing may be desired over the years We recommend a nonabrasive carnauba based wax and a soft cloth Care of the Grill Periodically you will wan...

Page 59: ...y In the construction of the MAXX Series 3 Wilson Audio uses two types of composites dubbed X material and M material These strategic combina tions of X and M materials are used in the two midrange mo...

Page 60: ...e maintaining an internal acoustical integrity Wilson s exhaustive research into the effects of materials enclosure construc tion strategies and adhesives has yielded a product that maintains the stri...

Page 61: ...S e c t i o n 6 T r o u b l e s h o o t i n g...

Page 62: ...M A X X S e r i e s 3 O w n e r s M a n u a l 62 Wi l s o n A u d i o S p e c i a l t i e s 62...

Page 63: ...e d r i v e r i s n o t w o r k i n g o r i s o u t o f p h a s e t h e M A X X w i l l n o t i m a g e p r o p e r l y D o u b l e c h e c k y o u r c o n n e c t i o n s f o r r e d t o r e d a n d...

Page 64: ...h o u l d n o w b e o p e r a t i n g c o r r e c t l y C h e c k t o s e e i f y o u r s p e a k e r c a b l e s a r e p r o p e r l y s e c u r e d L o o k f o r f r ay e d e n d s l o o s e c o n n...

Page 65: ...e c t t h e s p e a k e r c a b l e l e a d s t o t h e a m p l i f i e r a n d t u r n t h e a m p l i f i e r o n a g a i n Yo u h av e a s h o r t i n y o u r s p e a k e r c a b l e s C h e c k f...

Page 66: ...Wi l s o n A u d i o S p e c i a l t i e s 66...

Page 67: ...S e c t i o n 7 S y s t e m S p e c i f i c a t i o n s...

Page 68: ...M A X X S e r i e s 3 O w n e r s M a n u a l 68 Wi l s o n A u d i o S p e c i a l t i e s...

Page 69: ...ency Response Dimensions Height Width Depth System Weight Per Channel System Shipping Weight approx Rear Ported Rear Ported Rear Ported Sealed Tweeter Drive Unit One 13 inch 33 02 cm One 11 inch 27 94...

Page 70: ...M A X X S e r i e s 3 O w n e r s M a n u a l 70 Wi l s o n A u d i o S p e c i a l t i e s Section 7 2 MAXX Dimensions Figure 26...

Page 71: ...S e c t i o n 8 P r o pa g a t i o n d e l a y Ta b l e s...

Page 72: ...M A X X S e r i e s 3 O w n e r s M a n u a l 72 Wi l s o n A u d i o S p e c i a l t i e s...

Page 73: ...e No Spike No Spike No Spike No Spike No Spike 40 3 3 3 3 2 2 No Spike No Spike No Spike No Spike No Spike No Spike 38 3 3 3 3 3 3 2 2 No Spike No Spike No Spike No Spike 36 3 3 3 3 3 3 3 2 2 No Spike...

Page 74: ...ht 8 9 10 11 12 14 16 18 20 22 24 26 48 4 4 4 4 4 4 4 4 4 4 4 4 46 7 7 6 6 6 6 6 6 5 5 5 5 44 1 1 9 8 8 7 7 7 7 6 6 6 42 1 3 2 2 10 9 8 8 8 7 7 7 40 4 3 2 1 3 2 10 9 9 8 8 8 38 5 5 4 3 2 1 3 2 10 9 9...

Page 75: ...C C C C 38 G F E E E D D D C C C C 36 G F F F E E D D C C C C Listening Distance Number 4 Upper Midrange Module Spike Length Ear Height 8 9 10 11 12 14 16 18 20 22 24 26 48 2 3 4 5 5 6 7 8 8 9 9 9 46...

Page 76: ...M A X X S e r i e s 3 O w n e r s M a n u a l 76 Wi l s o n A u d i o S p e c i a l t i e s...

Page 77: ...S e c t i o n 9 Wa r r a n t y S e c t i o n...

Page 78: ...M A X X S e r i e s 3 O w n e r s M a n u a l 78 Wi l s o n A u d i o S p e c i a l t i e s...

Page 79: ...ed by the Wilson Audio dealer that sold the product to the customer FAILURE TO COMPLY WITH EITHER REQUIREMENT NO 1 OR REQUIREMENT NO 2 WILL RESULT IN THE WARRANTY PERIOD BEING LIMITED TO A PERIOD OF 9...

Page 80: ...rvice or repair of the product without charge for parts or labor which ser vice or repair at the Dealer s option shall take place either at the location where the product is installed or at the Dealer...

Page 81: ...if the product had originally been bought for immediate resale to the retail customer Wilson Audio products are warranted for a period of 90 days unless extended to 5 years as provided above by return...

Page 82: ...M A X X S e r i e s 3 O w n e r s M a n u a l 82 Wi l s o n A u d i o S p e c i a l t i e s...

Reviews: