background image

®


32

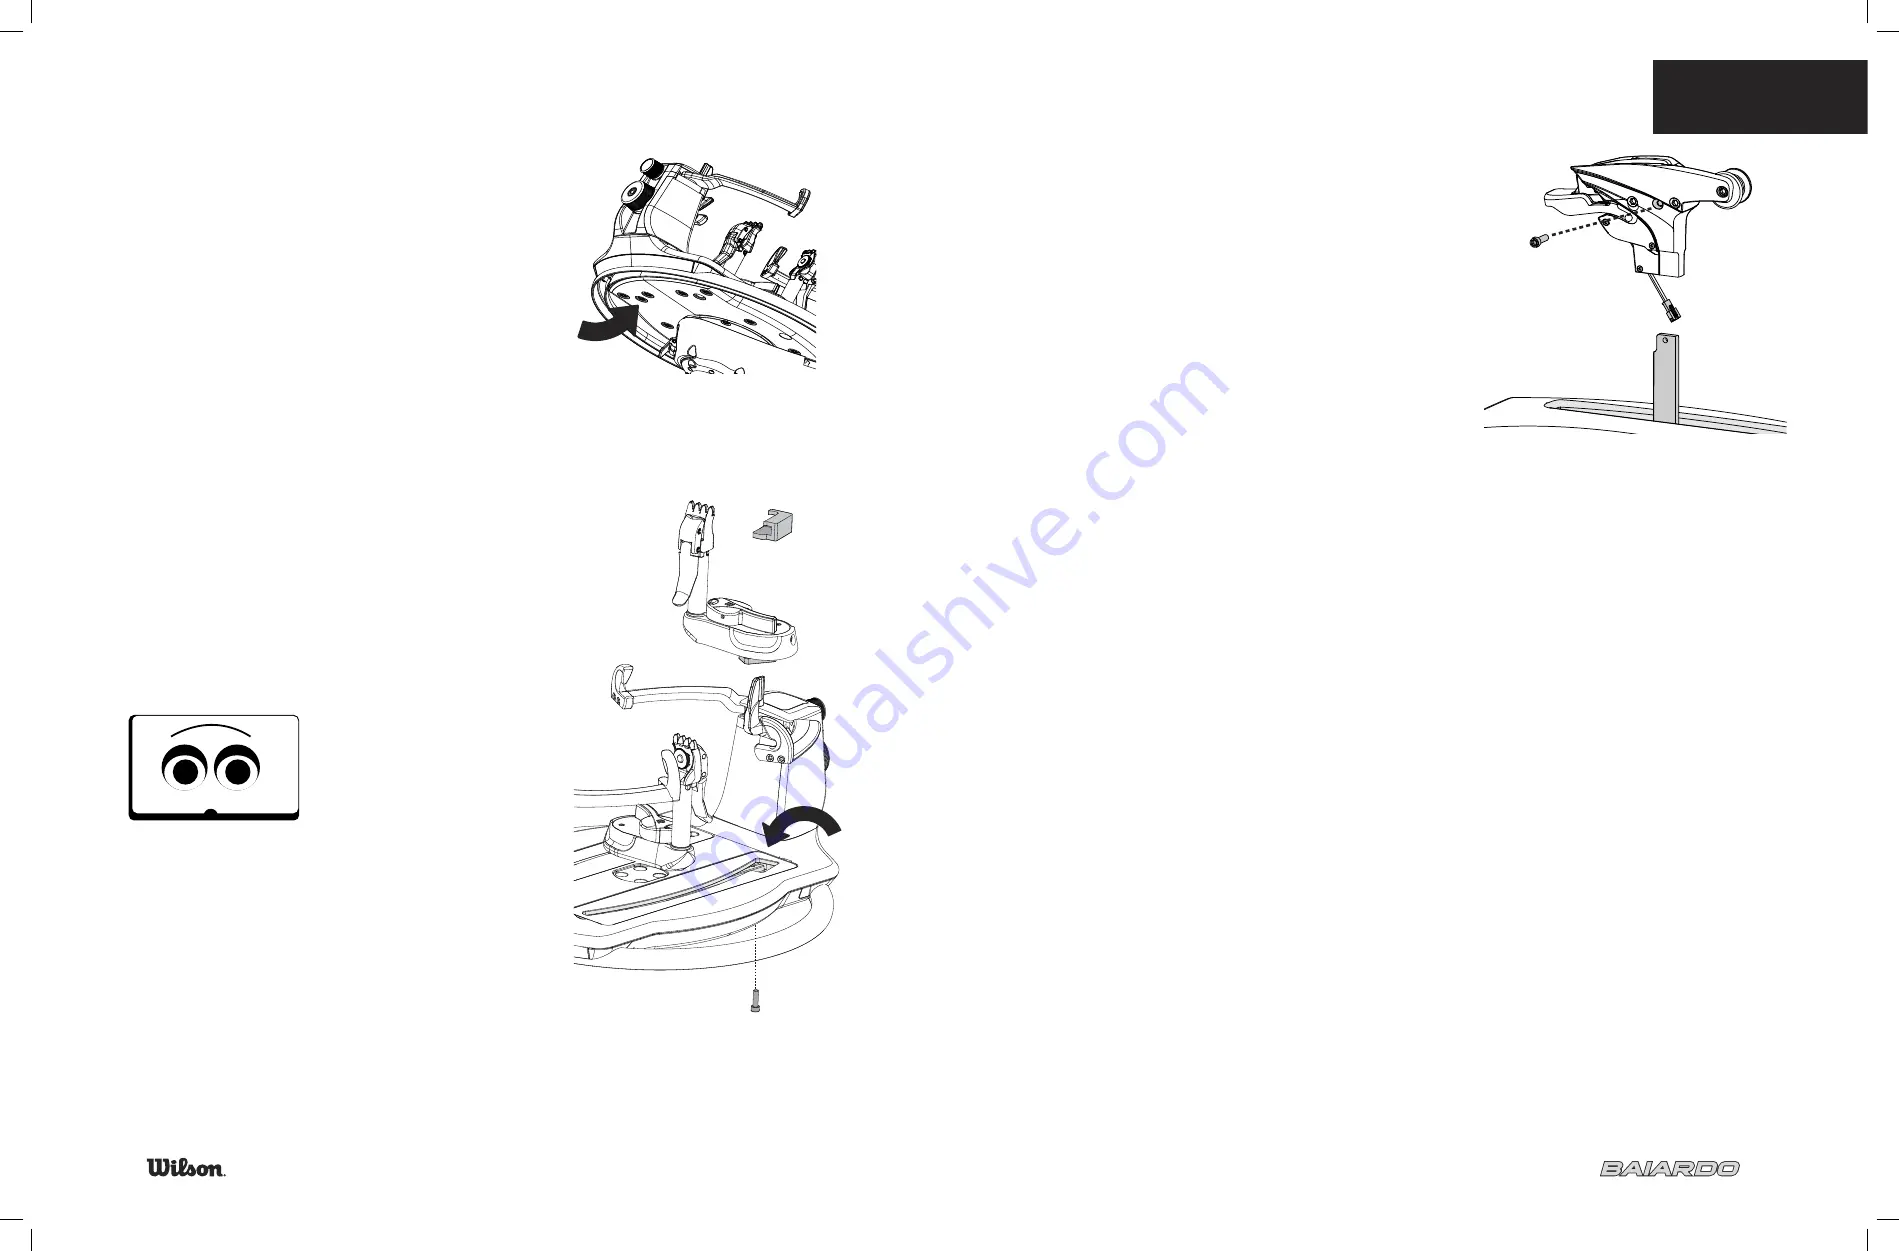
REPLACING THE CLAMP BASE

1. Remove the screw directly under the black glide rail plug

2. Remove the black glide rail plug from top of glide rail

3. Gently slide the clamp base out of the glide rail

4. On the NEW clamp base, note the curved line on the 
  underside of the brass block

5. Insert the new clamp SO THAT THE CURVED LINE ON THE BOTTOM 
  OF THE BRASS BLOCK MATCHES THE CURVE OF THE GLIDE RAIL. 
  If you do not match the curves, the clamp base can seriously damage 
  the inside of the glide rail! 

6. Replace the black glide rail plug

7.  Insert and tighten the screw below the turntable

9.1 SERVICE


33

REPLACING PULLER HEAD

1. Remove middle screw on back side of puller head

2. Gently lift puller head straight up paying attention to wire 

3. Disconnect connector

4. Remove puller head

5. Take new puller head from box

6. Gently replace puller head

7. Attach connector

8. Replace middle screw on back side of puller

9. Hide connector in below bristles

Summary of Contents for BAIARDO

Page 1: ... box weight Main material Included stringing tools Included assembly tools 56 kg 124 lbs 104 cm 41 in 132 cm 52 in 106 cm 41 in 7 degrees External switching 100 240 volts L119 x W55 x H48 cm L47 x W21 5 x H19 in 41 kg 90 lbs L79 x W51 x H29 cm L31 x W20 x H11 5 in 23 kg 50 lbs Aluminum 25 recycled Diamond dusted starter clamp Needle nose pliers Cutter Awl All necessary hex keys For futher informat...

Page 2: ...rvice 9 31 33 Trouble Shooting 10 34 35 Warranty and Declaration of Compliance 11 36 Congratulations on purchasing the world s most advanced stringing machine Baiardo is the first machine designed around the stringer and has many unique and patent pending features such as Wilson s B E S T system Biomechanically Efficient Stringing Technology makes Baiardo the most comfortable machine in the world ...

Page 3: ...always turned off before cleaning it or servicing one of its components Unplug the power cable from the mains socket Never wash the machine using water a hose or high pressure cleaning Cleaning and maintenance should be done only as detailed in this manual or at www wilson com baiardo Assembling the Machine To assemble the machine follow all steps listed on the included set up guide in order To ac...

Page 4: ... reduce the number Leave finger in contact with the screen to scroll up or down rapidly Touch the check mark to confirm a selection Touch the X to cancel an action Touch the arrow to return to previous screen HARD KEYS HARD KEYS TOUCH SCREEN 5 1 START UP 5 Start Up The red Power switch is located on the right underside of the machine DO NOT lean on machine during start up and diagnostics CHANGING ...

Page 5: ...shooting page 34 or www wilson com baiardo Example of Error Code Screen 6 2 BASICS 7 Basics MOUNTING SYSTEM 6 point mounting system prevents frame distortion There is no distinction between head and throat Fits tennis racquetball squash racquets Different size inner support pads are included to adjust fit Badminton requires use of the included adapter kit Do not over tighten BADMINTON ADAPTERS Ada...

Page 6: ...will not drop off the string push button to release ADJUSTING THE CLAMP AND CLAMP BASE caution small adjustments are best Turn knob by clamp teeth to apply proper pressure to string Clamp base is factory set to proper setting Over time the clamp base may require adjustment Make slight adjustments of not more than 1 8 turn 6 4 ADJUSTMENTS 9 ADJUSTING THE PULLER HEAD The adjustment screw can increas...

Page 7: ...pport is out Insert the badminton inner supports and turn the adjustment knobs clockwise until set at desired position Place the 4 included sleeves over the outer supports as shown ON OFF 7 1 OPERATING THE MACHINE 11 Operating the Machine HOME SCREEN The first screen that is displayed after diagnostics is the Home Screen This screen gives you four options Wilson s innovative system that allows the...

Page 8: ...enter the initials Enter between 1 and 4 letters Touch the letter key with letter you wish to enter Continue to touch letter key to scroll to next letter Cursor advances after 3 seconds or touch next initial location to advance quickly Touch the check mark to confirm Select desired units Can be easily changed later NOTE If you select KG must know your height in metric CM If you select LB you must ...

Page 9: ...nitials of the stringer 15 B E S T STRINGING SCREEN TENSION DISPLAY The large numbers in the top of the screen display the tension the machine is set to pull at TOOLS Change machine settings including pre stretch kg lbs sound on off puller speed and cross string MOUNTING For ideal height and tilt when mounting racquets MAIN STRINGS For ideal height and tilt when installing main strings CROSS STRIN...

Page 10: ...highlighted Adjust the height and tilt of the machine and select the check mark to save your settings Baiardo will remember these new settings for you You may continue to fine tune the height and tilt as many times as you wish NOTE To restore Baiardo s recommended settings see Update Stringer page 14 CAUTION this will effect all settings 17 CROSS STRINGS Will automatically adjust to an ergonomical...

Page 11: ...ent is reached select the check mark to save the settings When you select the cross strings icon the machine will automatically adjust the tension by the percent you entered NOTE Large number is cross string tension Small number is main string tension PRE STRETCH Adjust the amount of pre stretch by a percentage Adjust from 0 to 30 When the correct percent is reached select the check mark to save t...

Page 12: ...ct no sound off Touch check mark to confirm 21 TRADITIONAL STRINGING MODE To use the traditional stringing mode select icon NOTE No customized user settings will be remembered 7 4 TRADITIONAL STRINGING MODE TENSION DISPLAY The large numbers in the top of the screen display the tension the machine is set to pull at TOOLS Change machine settings including pre stretch kg lbs sound on off puller speed...

Page 13: ...rease When ready to pull last string touch icon The machine will increase tension set amount for ONE pull Touch here to decrease machine tilt Touch here to increase machine tilt 7 4 TRADITIONAL STRINGING MODE 23 TOOLS Once you make all your selections press the check mark to save No settings are remembered as in B E S T system Increase machine height Decrease machine height Decrease pre stretch In...

Page 14: ...ger This icon is reserved for future upgrades to the software Calibrate the machine to an external measuring device Change the password Return to the Home Screen 7 5 OWNER S OPTIONS 25 REMOVE STRINGER Select which stringer you would like to have removed and select the check mark to confirm CHANGE PASSWORD Enter the password you prefer and select the check mark to save Password must be 4 characters...

Page 15: ... and 40 KG You may change to LB or KG by touching KG After you adjust all settings the computer will automatically calibrate your machine based on the 4 numbers you gave it Your machine will now be calibrated to your device Select here to restore calibration to factory settings Select here to manually calibrate machine 26 7 5 OWNER S OPTIONS MORE OPTIONS Select the more options icon Show Wilson To...

Page 16: ...ct the total of pulls icon The information will be displayed NOTE Use Total of pulls for recommended maintenance schedule 7 6 SHUTTING DOWN THE MACHINE 29 SHUTTING DOWN THE MACHINE To shut down the machine select the Power icon If you wish to shut down the machine select the YES Touch check mark to confirm Turn off the power switch on the underside of the machine when prompted If you do not wish t...

Page 17: ...e the touch screen with a CLEAN DRY cloth DO NOT put water or other liquids on the touch screen 9 1 SERVICE 31 SERVICE REPLACING THE ELECTRONICS BOX If the electronics box becomes defective it can easily be removed and replaced Please follow the below steps 1 Remove the two screws with the included hex wrench on the underside of the machine as shown 2 Use the hex wrench to gently push up through h...

Page 18: ...S THE CURVE OF THE GLIDE RAIL If you do not match the curves the clamp base can seriously damage the inside of the glide rail 6 Replace the black glide rail plug 7 Insert and tighten the screw below the turntable 9 1 SERVICE 33 REPLACING PULLER HEAD 1 Remove middle screw on back side of puller head 2 Gently lift puller head straight up paying attention to wire 3 Disconnect connector 4 Remove pulle...

Page 19: ...ws in floor plate String slips through clamp teeth Adjust clamp see page 8 Clean inner surface of clamp to remove build up of lubrication from string 10 1 TROUBLE SHOOTING 35 PROBLEM SOLUTIONS String slips through puller Adjust puller see page 9 Clean inner surface of puller to remove build up of lubrication from string Clamp base slips on glide rail when locked Adjust clamp base see page 8 Clean ...

Page 20: ... from state to state Some states do not allow limitations on how long an implied warranty lasts so the above limitation may not apply to you OBTAINING WARRANTY SERVICE AND PARTS Please review this manual or the online help resources referred to in this documentation posted at www wilson com baiardo before seeking warranty service If the part is still not functioning properly after making use of th...

Reviews: