3
OPTION 1
ADHESIVE BRACKET
1. Clean the area where the bracket is to be mounted with the
alcohol wipe provided. Allow to dry.
2. Peel the backing to expose the adhesive and press the bracket
onto the desired location in the vehicle. Note: be sure the tab is
positioned
vertically
, not horizontally.
3. Allow the adhesive to cure for 24 hours before you attach the
U-Booster™.
4. Once the cradle is attached, you can adjust the angle of the
adhesive bracket by applying gentle pressure to the top or bottom
of the U-Booster™. This option is designed to swivel when the
knurled nut is loosened, for greater adjustability of the U-Booster™
viewing angle. To lock bracket into position tighten large nut.
OPTION 2
ADHESIVE/SCREW SWIVEL BRACKET
This mount allows for adhesive mounting as well as more
permanent screw mounting. This option is designed to swivel
when the knurled nut is loosened, for greater adjustability of the
U-Booster™ viewing angle. For adhesive mounting, follow steps 1,
2 and 3 in option 1.
For screw mounting
, use an ice pick or an awl to punch through
the adhesive and expose the four screw holes in the bracket. You
must provide the screws of an appropriate size for your particular
application. Using the bracket as a template, mark the locations
for the screws as shown, drill pilot holes, attach the bracket with
adhesive, and tighten all screws.
O
A
2
Vehicle Installation
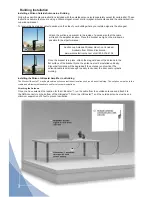
1. Place Magnetic Roof Top Antenna
To receive the best cell signal, select a location for the outside antenna that is preferably in the center of the vehicle’s
roof, 12 inches away from any other antennas and free of obstructions, at least 8-12 inches from the rear or side
windows or sunroof.
The outside antenna must be installed vertically. Signal
performance will be degraded if the antenna is not
vertical.
The antenna cable is small yet strong enough that it may
be shut in most vehicle doors without damaging the cable.
For a more professional-looking installation, the antenna
cable may be run under the door seal. Carefully pull down
the door seal. Run the cable under the seal and push
the seal back into place. This prevents constant wear
and tear on the cable as the door opens and closes. The
antenna cable is small enough to easily tuck under the
door seal or plastic molding.
Magnet-Mount
Antenna Shown
Carefully
Pull Down
Door Seal
Run Cable
Under Seal
2. Attach the Mounting Bracket
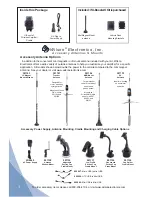
Two mounting brackets are provided for attaching the U-Booster™ to your vehicle’s dash. Choose the appropriate
one for your application. See bracket specifi c mounting options below.
3. Attach the U-Booster™
Once you have installed your selected mount in the desired location, and waited 24 hours for adhesive to cure, attach
the cradle by aligning the rectangular hole on its back with the tab on the mount, grasping the sides of the cradle, slide
it downward approximately ¼ inch into place.


