background image


© by WilTec Wildanger Technik GmbH  

Item 62308 

Page 7


http://www.WilTec.de


http://www.aoyue.eu   


05 2021

-1


http://www.teichtip.de


Maintenance and troubleshooting


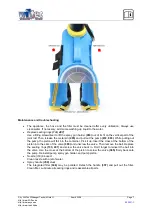
The  appliance,  the  hose  and  the  filter  must  be  cleaned  after  every  utilisation.  Always  use 
clean water. If necessary, add some washing-up liquid to the water. 


Replace sealing rings (133, 497):


Use a fitting screwdriver to lift the spray gun holder 

(953)

 out of its fit on the vertical part of the 

joint rod. Then release the metal pin 

(495)

 and pull out the pump 

(672, 995)

. While pulling out 

the pump, the piston will fall into the container. Pick it up. Insert the cross at the bottom of the 
piston into the slots of the valve 

(365)

 and unscrew the valve. Then remove the ball. Replace 

the sealing rings 

(133, 497)

 and screw the valve back in. Don't forget to reinsert the ball into 

the valve. Use the cross at the bottom of the piston to screw the  valve 

(365)

 firmly back onto 

the pump. Reinstall pump, spray gun holder, and pump piston. 


Nozzle (100) blocked:


Clean nozzle with a jet of water. 


Spray handle (358) stuck:


The  integrated  filter 

(346)

  may  be  polluted.  Detach  the  handle 

(357)

  and  pull  out  the  filter. 

Clean filter. Lubricate all sealing rings and reassemble all parts. 


Summary of Contents for 62308

Page 1: ...vary depending on model Please read and follow the operating instructions and safety information prior to initial operation Technical changes reserved Illustrations functional steps and technical data...

Page 2: ...ttps www wiltec de contacts The most recent version of this manual in several languages can be found in our online shop https www wiltec de docsearch Our postal address is WilTec Wildanger Technik Gmb...

Page 3: ...roduction Thank you for choosing to purchase this quality product To minimise the risk of injury we ask you to always take some basic safety precautions when using this product Please read this operat...

Page 4: ...ot included 126 Handle 676 Pressure controller 133 Rubber seal 700 Elbow complete 167 O ring AN 14 701 Spray bend 290 Hose coupling 703 Hose complete 291 Nut 704 Container cap 318 Belt fixing 710 Cyli...

Page 5: ...ose 703 to the spray gun 892 and the pump 672 995 Attach the carrying belts to the bottom of the container Use the yellow belt fixing 318 to secure them see fig ures 1 4 For transport reasons the belt...

Page 6: ...the vertical part of the joint rod 2 Remove the metal pin 495 and separate fastening clip 338 on the bottom side of the con tainer from the pump lever Use a screwdriver if necessary 3 Pull the pump le...

Page 7: ...he pump 672 995 While pulling out the pump the piston will fall into the container Pick it up Insert the cross at the bottom of the piston into the slots of the valve 365 and unscrew the valve Then re...

Page 8: ...s precisely when using the product Use only suitable and appropriately labelled equipment for mixing and preparing the fluid After preparing wash your hands and face carefully Empty packaging or packa...

Page 9: ...k dangerous or toxic substanc es For each product observe the local regulations and the permitted period of application If possible do not use at high temperatures Be careful near electrical equipment...

Reviews: