background image

7

3.  SET AIR TEMPERATURE:

•  Press the air temperature button and the display will show “tSP”. 

It will then show adjustable temperature. 

•  Use the 

UP / DOWN 

arrow keys to select the desired air 

temperature from 86°F to 194°F (30°C to 90°C).

•  Wait 15 seconds and the number will be stored, then the display 

will return to current temperature.

4.  SET HUMIDITY:  

•  Fill water resorvoir tank with 1 gal (4 Qts) of  DISTILLED WATER or 

PURIFIED WATER ONLY. 

NOTE: Product failure due to limescale or sediment buildup is not 

covered under warranty.

•  Refill water as needed for desired humidity.  A full tank should 

last 3-6 hours depending on use.

•  Press the humidity button two times for the display screen to 

show “hSP”.  The display will then show adjustable humidity.  

•  Use the 

UP / DOWN

 arrow keys to select between 1 (Least 

humid) and 5 (Most humid).

•  Wait 15 seconds and the number will be stored. The display will 

return to current air temperature.

NOTE: The unit controller will default to the last temperature/
humidity setting upon start up.

5.  Once preheated, open door. The round rack will stop rotating 

and can then be manually turned as needed for access.

6.  Place food product (eg: pizza, pretzels, etc.) on any/all of the 

four tiers on the round rack.

NOTE:

  Drain the unit before moving it to a new location.

Operation 

1.  Remove all food and debris from the interior of the unit.
2.  Remove the rack from the unit 

(See Removing Round Rack). 

3.  Place a bucket/bowl to catch the water, under the drain located 

inside top cabinet.

4.  Turn the drain handle a half turn and allow unit to empty.
5.  Close drain before adding new water.
6.  Cleaning solution may be run through the water tank. Excess 

water is needed to flush the cleaning solution through the line 

and tank until water flows clear (See Cleaning Instructions).

Draining the Unit

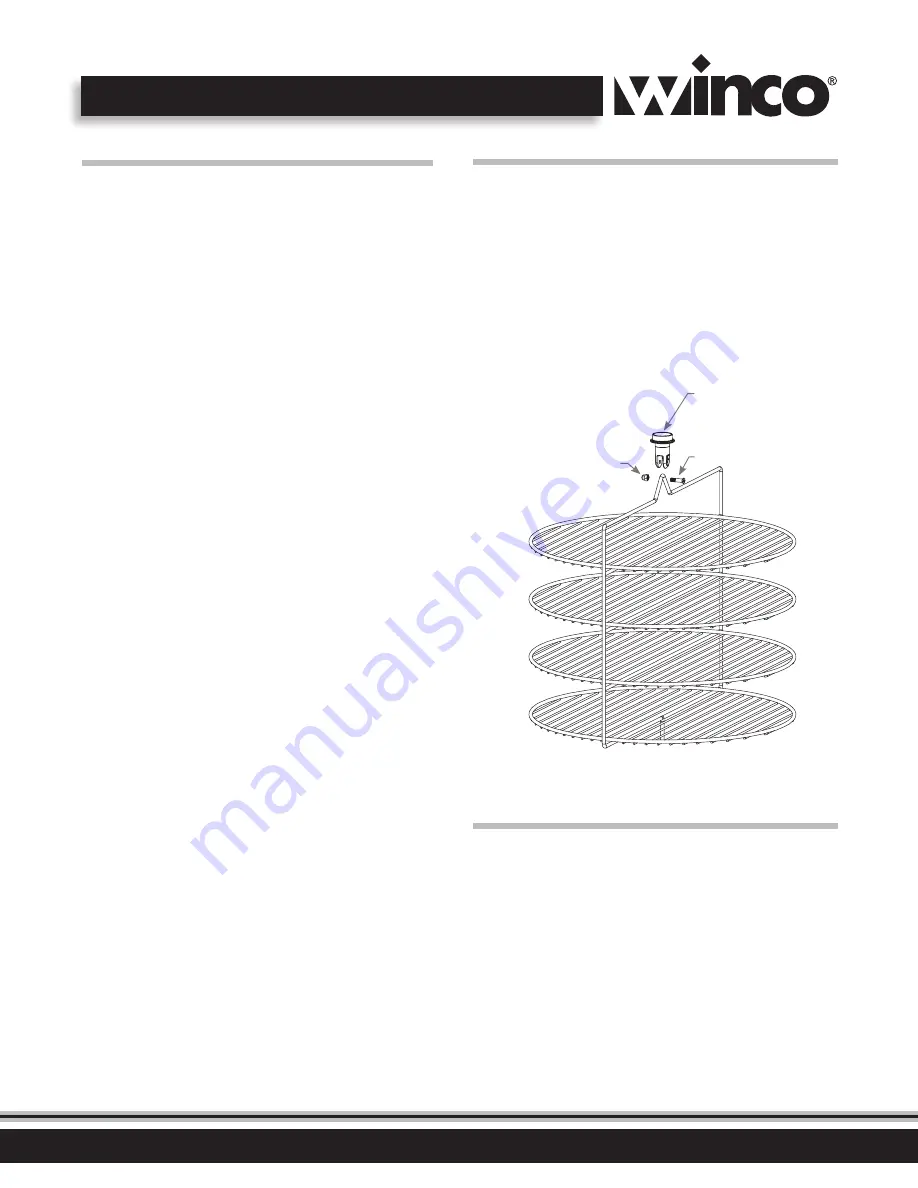
Bolt

Nut

Clutch

Removing the Round Rack

Tools needed: Philips Head Screwdriver

1.  Clean any food off the rack.
2.  Using a Phillips Head screwdriver, unscrew the bolt at top of 

rack to disengage from the clutch assembly.

3.  Place nut and bolt aside for safe keeping.
4.  Push rack upward slightly to free it from the bottom center 

alignment guide.

5.  Tilt the round rack toward door opening and remove it from 

the unit.

Summary of Contents for EDM-1K

Page 1: ...used as intended and with proper care and maintenance you will experience years of reliable operation from this equipment To ensure best results it is important that you read and follow the instructio...

Page 2: ...AUTION SIGNS WARNINGS AND OPERATING INSTRUCTIONS ARE CLEARLY POSTED NEAR EACH UNIT SO THAT ANYONE USING THE EQUIPMENT WILL USE IT CORRECTLY AND NOT INJURE THEMSELVES OR HARM THE EQUIPMENT ATTENTION CE...

Page 3: ...THE ORIGINAL BOX AND PACKAGING FOR USE IN PACKAGING AND SHIPPING THE EQUIPMENT IF SERVICES ARE NEEDED NOTE Please remember that this manual and the warning labels do not replace the need to be alert...

Page 4: ...ions to follow to help promote safe use of this equipment FOR YOUR SAFETY Donotstoreorusegasolineorotherflammablevapors andliquidsinthevicinityofthisoranyotherappliance ESURE DE SECURITE Nepasentrepos...

Page 5: ...rrepresentativeorthemanufacturerfirst 2 DONOTtouchanysurfacesthatmaybehot 3 Unplugfromoutletwhennotinusepriortoinstallingorremoving partsandbeforecleaning Allowforthedevicetocoolfirstbefore handling 4...

Page 6: ...FOR EITHER FAHRENHEIT OR CELSIUS Removethetopcover Fig A unscrewthePhillipsHeadscrews Removethecoveronreardigitaldisplay Fig B unscrewthe PhillipsHeadscrewstoexposethecircuitboard Fig C Movedipswitch1...

Page 7: ...g upon start up 5 Once preheated open door The round rack will stop rotating and can then be manually turned as needed for access 6 Place food product eg pizza pretzels etc on any all of the four tier...

Page 8: ...g Unplugtheunitwhennotinoperation Allowmerchandisertocoolbeforeattemptingtoclean Theinterioroftheheateddisplaymerchandisershouldbecleaned periodicallywithwarm soapywaterandsoftcloth Theexterioroftheun...

Page 9: ...185 F 85 C 5 high Onion RIngs 1 175 F 80 C 1 low Pizza Thick Crust 1 185 F 85 C 4 medium high Pizza Thin Crust 1 180 F 82 C 5 high Pretzels 3 140 F 60 C 4 medium high Sandwiches Wrapped 2 180 F 82 C...

Page 10: ...erforcorrectvoltage Must be done by an authorized service provider Highlimitthermaldiskistripped open Turnunitoffandallowittocooldownandreset Verylowhumidityinunit Waterisloworempty Addwater Humidityi...

Page 11: ...horized service agent IfyouhaveanyquestionsorproblemsDONOTsendunittoWINCO withoutfirstcontactingourcustomerservicedepartment See LimitedWarranty sectiononpage14fordetails Electrical Diagram MODEL EDM...

Page 12: ...Exploded View MODEL EDM 1K 1 2 4 5 7 3 6 8 13 15 16 18 19 22 23 24 25 26 27 28 30 29 31 17 20 9 10 11 12 14 32 Motor Assembly 21...

Page 13: ...ing EDM1 P15 Motor Clutch Assembly 16 Motor EDM1 P16 17 Spring EDM1 P17 18 UpperClutch EDM1 P18 19 LowerClutch EDM1 P18L 20 MetalBearing EDM1 P19 21 Motor ClutchAssembly EDM1 P31 Description Part 22 D...

Page 14: ...CIDENTAL OR CONSEQUENTIAL DAMAGES TO BUYER OR ANY THIRD PARTY INCLUDING WITHOUT LIMITATION LOSS OF PROPERTY PERSONAL INJURY LOSS OF BUSINESS OR PROFITS OR OTHER ECONOMIC LOSSES OR STATUTORY OR EXEMPLA...

Page 15: ...R OBLIGATION OR LIABILITY IN CONNECTION WITH SAID EQUIPMENT Examplesofitemsnotcoveredunderwarranty butnotlimitedtojusttheseitems 1 ActsofGod fire waterdamage burglary accident theft 2 Freightdamage 3...

Page 16: ...Model EDM 1K www wincous com...

Reviews: