background image

Page 4 of 6                                                                                                                                                       Instal Instr Electric Cooktop CTE P Rev B.doc 


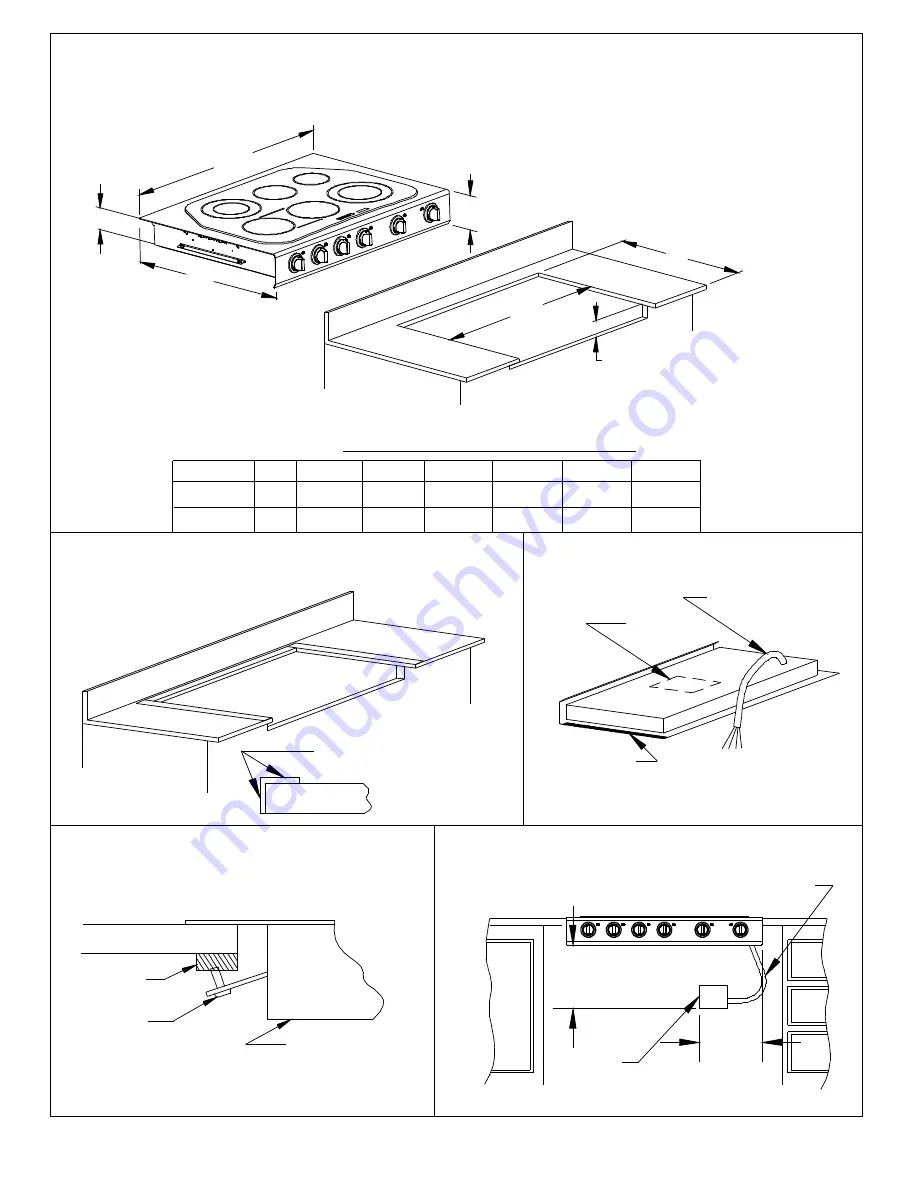
TAPE TOP & VERTICAL
SIDES OF CUTOUT

CONDUIT

FOAM
TAPE
EACH
SIDE

J-BOX

CONDUIT

FIG - 5

FIG - 3

FIG - 4

FIG - 2

COOKTOP

ROUGH-IN BOX

COUNTERTOP

WOOD

BLOCK

SCREW

DOWN

HOLD

12"

12"

DATA
PLATE

D

B

A

F

H

E

G

MODEL

CTE36P

CTE48P

A

48

36

B

25-9/16

25-9/16

D

E

F

G

H

Dimensional Specifications (inches)

4-1/4

4-1/4

5-1/16

5-1/16

33-7/8

45-3/8

4-1/2

4-1/2

24-3/4

24-3/4

CUT-OUT DIMENSIONS CHANGE - SEE ATTACHED END PLATE

INSTALLATION INSTRUCTION (Notching the Countertop).

CAUTION: IF END PLATES ARE USED THE FOLLOWING


Summary of Contents for CTE36P

Page 1: ...el And Lock Service Disconnecting Means To Prevent Power From Being Switched On Accidentally When The Service Disconnecting Means Cannot Be Locked Securely Fasten a Prominent Warning Device Such As A Tag To The Service Panel POWER SUPPLY Power supply is dual rated 240 VAC or 208 VAC 3 wire 60 Hz 50Amp circuit breaker required for all models JUNCTION BOX Plan the installation of the unit so that th...

Page 2: ...top edges to the countertop Turn the cooktop upside down and apply the tape to bottom side and back edges of stainless steel frame The tape should be approximately 1 16 inch from the edge of the stainless steel frame See FIG 3 Fastening Cooktop After centering the cooktop in the countertop opening install the 2 screws provided in the side brackets of the countertop Position a wood block between th...

Page 3: ...RAL AND FIBER BOARDS SURFACE BURNING CHARACTERISTICS This mark is followed by the flame spread and smoke ratings These designations are shown as FHC Flame Spread Smoke Developed Material with 0 flame spread rating are flame retardant Local codes may allow other flame spread ratings The minimum horizontal clearance from the sides and back of the cooktop to the adjacent vertical combustible walls is...

Page 4: ...IN BOX COUNTERTOP WOOD BLOCK SCREW DOWN HOLD 12 12 DATA PLATE D B A F H E G MODEL CTE36P CTE48P A 48 36 B 25 9 16 25 9 16 D E F G H Dimensional Specifications inches 4 1 4 4 1 4 5 1 16 5 1 16 33 7 8 45 3 8 4 1 2 4 1 2 24 3 4 24 3 4 CUT OUT DIMENSIONS CHANGE SEE ATTACHED END PLATE INSTALLATION INSTRUCTION Notching the Countertop CAUTION IF END PLATES ARE USED THE FOLLOWING ...

Page 5: ... surface of the End Plates should fit against the front face of the cabinet frame Dimension K Fig 6 will depend on your countertop design If dimension K is greater than 1 inches the countertop will project beyond the front of the cooktop Fig 7 shows a typical installation with a countertop that has a dimension K less than 1 inches Fig 8 shows a typical installation with countertop that has a dimen...

Page 6: ... FIG 6 CUTOUT FOR COOKTOP USING END PLATE FIG 9 RIGHT HAND END PLATE SHOWN WITH END PLATE COOKTOP SIDE VIEW FIG 8 K WITH END PLATE COOKTOP SIDE VIEW FIG 7 K SIDE VIEW P MODELS FIG 10 OF CABINET FRAME FRONT FACE COUNTER TOP OF CABINET FRAME FRONT FACE COUNTER TOP BURNER BOX COOKTOP GALVANIZED COVERING FOAM TAPE REMOVE PROTECTIVE 23 15 16 20 7 8 1 5 8 5 1 16 25 9 16 4 1 16 4 13 16 END PLATE DIM K SE...

Reviews: