Page 7
For technical questions, please call 1-888-866-5797.
Item 62603
SAFET
y
Op
ERA
TION
M
AINTENAN
c
E
SETU
p
Note:
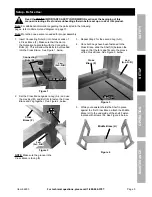
When setting down the assembled Legs onto
the Table Top, verify both Legs and Table Top are
facing the correct direction. (Note the small “Front”
labels placed on the items. These labels can be
removed after assembly.) See Figure 9, below.
Table Top (c)
Leg
(A-L, A-R)
Figure 9
Note:
Verify that the Drawer guide slots on
the Sliding Partition face the same way as
the Drawer guide slots on the Legs.
12. Use the Hex Key and Bolts (J) to fasten the
tops of the Legs to the Table Top underside,
three Bolts per side. See Figure 10, below.
Table
Top (c)
Leg
(A-L, A-R)
Bolt (J)
Figure 10
13. With assistance, set the assembled
frame right-side up where desired.
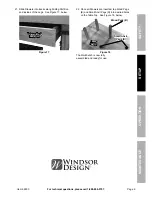
14. Remove the Vise Screw and Washer (V) from the
middle thread of the Vise (E). See Figure 11, below.
Vise (E)
Vise Screw/
Washer
(V)
Figure 11
15. Once the Vise Screw and Washer are removed,
slide the Vise into the three holes on the side
of the Workbench. See Figure 12, below.
Hex Key
(M)
Vise (E)
Figure 12
16. Use the Vise handle to thread in the Vise all
the way and re-install the Vise Screw and
Washer. This will keep the Vise locked on
place on the side of the Workbench.


