


SKU 93225
For technical questions please call 1-800-444-3353.
Page 4
8.
The Lamppost Clock may be set into the ground with stakes, but for stability it is
recommended that the Clock be mounted to a cement surface. If you have not mounted a
product like this into concrete before, it is recommended that a qualified technician install
and cement the Base of the Clock into place.
Warning: Because of the weight of the
Clock it is not recommended to insert Stakes (1) into a ground surface such as dirt or
grass; the product will not be stable. High winds and extreme weather conditions may
result in the Lamppost Clock becoming unstable.
CAUTION: Under these conditions the
Lamppost Clock may tip over resulting in personal injury and /or property damage.
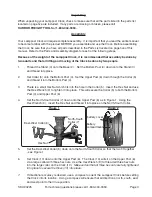
9.
Insert the Stakes (1) into the Base (2); thread them in from the bottom.
Inserting the Batteries
Slide out each battery cover located on the side of the Clock (10) - see Figure 2. Insert one
type “AA” battery into each battery compartment so that the polarity matches that marked
inside the battery compartment, positive (+) and negative (-)-see Figure 2. Once the battery
is in place, slide the battery cover back into place.
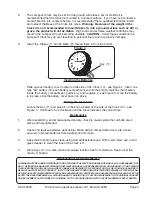
Setting the Clock Time
Locate the Key (11) and place it on the knob located on the side of the Clock (10) - see
Figure 3. Continue to turn clockwise until the Clock indicates the correct time.
Maintenance
1.
After assembling, and at reasonable intervals, check to make certain that all bolts are in
place and fully tightened.
2.
Check and replace batteries periodically. Make certain compartment doors are closed
securely to protect batteries from weather and moisture.
3.
Keep the Clock and glass clean using mild antibacterial soap. With a soft towel, use a mild
glass cleaner to clean the face of the Clock (10).
4.
Store Keys (11) in a safe, clean and secure location free from moisture. Keep out of the
reach of children.
PLEASE READ THE FOLLOWING CAREFULLY
THE MANUFACTURER AND/OR DISTRIBUTOR HAS PROVIDED THE PARTS DIAGRAM IN THIS MANUAL AS A REFERENCE TOOL
ONLY. NEITHER THE MANUFACTURER NOR DISTRIBUTOR MAKES ANY REPRESENTATION OR WARRANTY OF ANY KIND TO
THE BUYER THAT HE OR SHE IS QUALIFIED TO MAKE ANY REPAIRS TO THE PRODUCT OR THAT HE OR SHE IS QUALIFIED TO
REPLACE ANY PARTS OF THE PRODUCT. IN FACT, THE MANUFACTURER AND/OR DISTRIBUTOR EXPRESSLY STATES THAT ALL
REPAIRS AND PARTS REPLACEMENTS SHOULD BE UNDERTAKEN BY CERTIFIED AND LICENSED TECHNICIANS AND NOT BY THE
BUYER. THE BUYER ASSUMES ALL RISK AND LIABILITY ARISING OUT OF HIS OR HER REPAIRS TO THE ORIGINAL PRODUCT
OR REPLACEMENT PARTS THERETO, OR ARISING OUT OF HIS OR HER INSTALLATION OF REPLACEMENT PARTS THERETO.
Figure 3
Key (11)


