background image

10

Maintenance

Periodic Maintenance

(Every six to twelve months):

1. Check filter for wear, replace dirt saturated filters that do 

not respond to normal cleaning.

2. Inspect gasket seals and replace those which have 

begun to leak.

3. Examine carbon motor brushes and commutator.

Servicing the Filter

The filter is accessed by lifting the head assembly off the tank.

Polyester filter is easily removed by simply lifting the filter basket out of the tank.

Cartridge filters – Remove the filter retainer by turning the black knob 90 degrees counter-clockwise.

Cartridge filter will then slide off of float assembly.

NOTE: Be sure to frequently clean the filter. Allow filter to dry after being used for wet pick-up. Filters used for wet 
pick-up including stripper must be thoroughly cleaned before being allowed to dry. Worn filters can affect vacuum 
performance. Replace the filter when it becomes worn out and normal cleaning will not restore vac performance.

Servicing the Vac Motor

Motor Replacement

1. Disconnect power cord from power source.

2. To access the vac motor, remove the screws that attach the main cover to the head assembly and set the cover 

to one side.

3. Disconnect the motor ’s 2 red lead wires from the main switch.

4. Disconnect green/yellow wire by removing screw from motor core.

5. Remove the four motor mounting screws.

6. Remove motor plate and set aside.

7. Take out the motor and remove the upper and lower gaskets.

8. Inspect gaskets. If they shown any wear or tear in the material, replace.

9. Install gaskets onto new motor. Make sure gaskets are properly seated.

10. Install the new motor. Make sure foam mufflers are positioned properly.

11. Attach motor plate to motor.

12. Connect green/yellow wire to motor core.

13. Connect motor ’s 2 red lead wires to main switch.

14. Re-assemble vac cover.

15. Test for proper operation.

86369590  Titan Vacuum

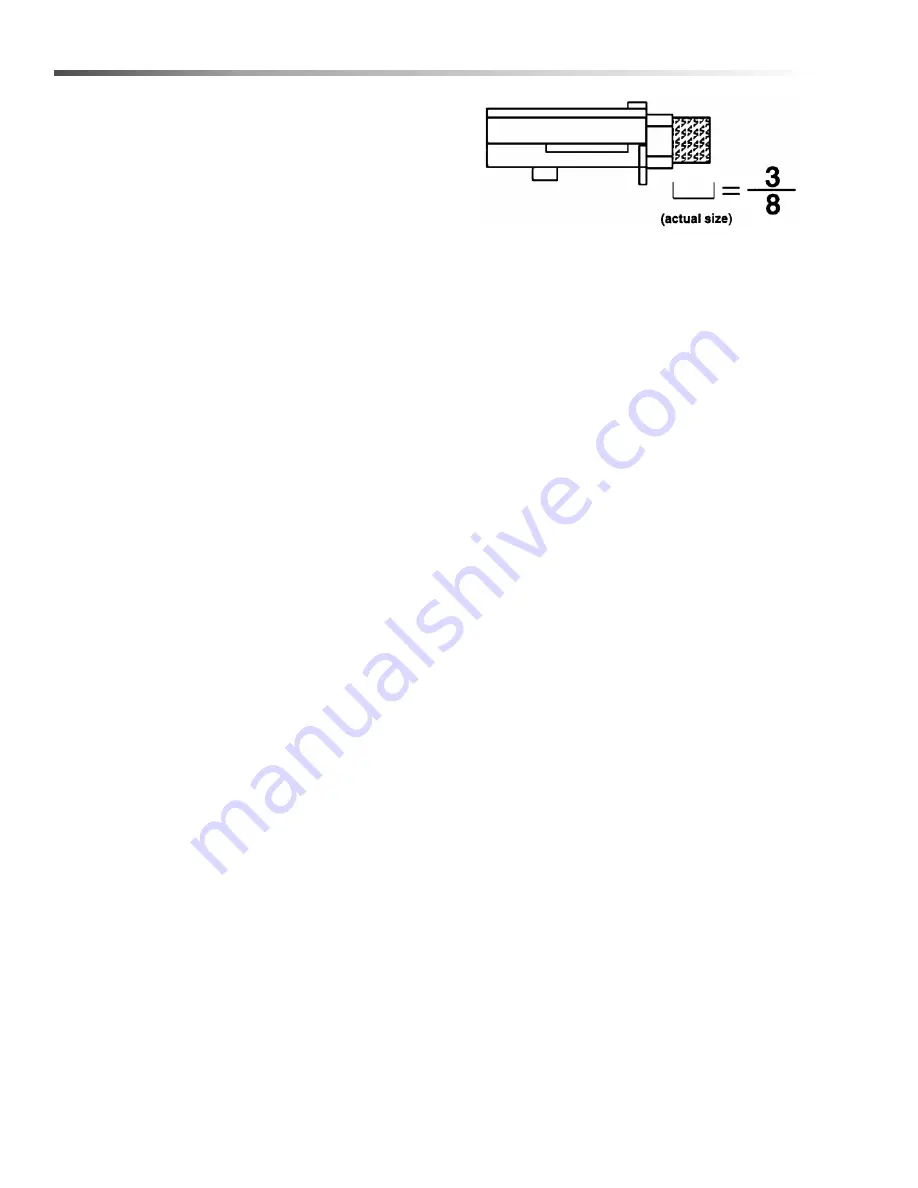
Replace both carbon brushes when either is less 
than 3/8" long.

(P/N 8.616-352.0) 120V, (P/N 8.616-353.0) 230V

Summary of Contents for 10130060

Page 1: ...Read these instructions before using the machine 86369590 B 12 11 12 Operating instructions ENG MODELS T708 10130060 T708IE 10130070 T716 10130080 T716IE 10130090 T720TP 10130100 Wet Dry Vacuums IPX4 ...

Page 2: ... pick up Warranty Registration Thank you for purchasing a Windsor product Warranty registration is quick and easy Your registration will allow us to serve you better over the lifetime of the product To register your product go to www windsorind com WarrantyRegistration aspx For customer assistance 1 800 444 7654 ...

Page 3: ...aintenance Periodic Maintenance 10 Servicing the Filter 10 Servicing the Vac Motor 10 Servicing The Vac Motor 11 Parts Vacuum Motor Assembly T708 T708IE 14 Vacuum Motor Assembly T716 T720TP 16 Filter Group T708 18 Filter T716 T720TP 20 Tank T708 22 Tank T716 24 Tank and Cart T720TP 26 Front Mounted Squeegee TSQ16 28 Front Mounted Squeegee TSQ20 30 Accessories 32 Suggested Spare Parts 33 86369590 T...

Page 4: ...ts in good working condition The PARTS LIST section contains assembled parts illustrations and corresponding parts list The parts lists include a number of columns of information REF column refers to the reference number on the parts illustration PART NO column lists the part number for the part ALT NO reference number QTY column lists the quantity of the part used in that area of the machine DESC...

Page 5: ...embled Inspect the machine carefully before operation Use only as described in this manual Use only the manufacturer s recommended attachments Do not use this machine with or near fuels grain dust solvents thinners or other flammable materials Do not pick up flammable fluids dust or vapors Do not vacuum anything that is burning or smoking such as cigarettes matches or hot ashes This machine is not...

Page 6: ... to an Authorized service center Do not put any object into openings Do not use with any opening blocked keep free of dust lint hair and anything that may reduce air flow Do not use the machine without the dust bag and or filters in place Use extra caution when cleaning on stairs Always use a 3 wire electrical system connected to the electrical ground Whenever possible connect the machine to an ou...

Page 7: ...t in a risk of electric shock Check with a qualified electrician or service person if you are in doubt as to whether the outlet is properly grounded Do not modify the plug provided with the appliance if it will not fit the outlet have a proper outlet installed by a qualified electrician This Product Is For Commercial Use Only Electrical The amp hertz and voltage are listed on the data label found ...

Page 8: ...n Important Instructions Before use the equipment must be correctly assembled with all its components Check that electrical outlet is correct for use with the plug on the machine Before connecting check that the specified motor voltage corresponds to the main voltage available Never use the equipment near inflammable explosive or toxic substances sparks from the motor could cause dangerous reactio...

Page 9: ...oduce foam which will damage the vac motors The vac shut off may not be sensitive to all foams Be sure to check that the tank is not filling with foam Use a defoaming agent to avoid pulling foam through vac motor Should vac motor become wet remove source of overflow and immedi ately run vac motor open to dry At the end of each working day 1 After each use rinse tank with fresh water Periodi cally ...

Page 10: ... it becomes worn out and normal cleaning will not restore vac performance Servicing the Vac Motor Motor Replacement 1 Disconnect power cord from power source 2 To access the vac motor remove the screws that attach the main cover to the head assembly and set the cover to one side 3 Disconnect the motor s 2 red lead wires from the main switch 4 Disconnect green yellow wire by removing screw from mot...

Page 11: ...mbly by removing the 2 screws that attach it to the vac motor See Figure 3 6 Inspect armature commutator If it is extremely pitted grooved or not concentric then the motor will need to be replaced or sent to a qualified service center 7 Slide the yellow brush housing from plastic holder See Figure 4 8 Reverse steps 7 through 4 to install new brush and housing part number S8TOEG845 120 V S8TOGB839 ...

Page 12: ...12 86369590 Titan Vacuum Notes ...

Page 13: ...13 PARTS 86369590 Titan Vacuum Parts ...

Page 14: ...14 Vacuum Motor Assembly T708 T708IE 86369590 Titan Vacuum ...

Page 15: ...2 SCREW 5 X 20 9 8 616 389 0 S81054 2 SCREW 5 X 30 10 8 616 287 0 S83734AUB LAB 1 COVER 11 8 616 415 0 S80326 1 SWITCH ON OFF 12 8 616 312 0 S83937 1 FILTER Ø95 13 8 616 388 0 S81050 6 SCREW 5 X 35 14 8 616 285 0 S82738AUG6 1 COVER MOTOR GRAY 15 8 616 321 0 S83969 1 GASKET 16 8 616 378 0 S80310 1 RING 17 8 616 311 0 S83900 1 FILTER 18 8 616 348 0 S82591AUG6 1 MOTOR RING GRAY 19 8 616 320 0 S83901 ...

Page 16: ...16 Vacuum Motor Assembly 86369590 Titan Vacuum ...

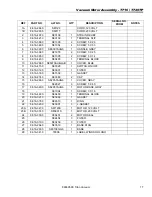
Page 17: ...0 S86070AUB LAB 1 COVER BLUE 11 8 616 415 0 S80326 1 SWITCH ON OFF 12 8 616 312 0 S83937 1 FILTER 13 8 616 318 0 S81502 1 GASKET 14 8 616 274 0 S83383 2 CAP 15 8 616 286 0 S82957AUG6 1 COVER GRAY 16 S82627 9 SCREW 5 X 40 17 8 616 349 0 S82937AUG6 1 MOTOR BASE GRAY 18 S81004 1 SCREW 3 X 19 19 8 616 422 0 S80450 1 TERMINAL BLOCK 20 8 616 321 0 S83969 1 GASKET 21 8 616 378 0 S80310 1 RING 22 8 616 32...

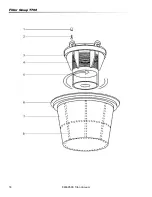
Page 18: ...18 Filter Group T708 86369590 Titan Vacuum ...

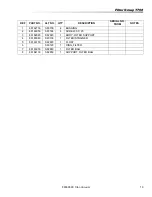
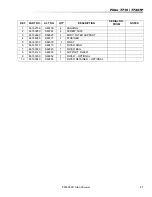
Page 19: ...N SERIAL NO FROM NOTES 1 86162730 S83706 4 BUSHING 2 86163950 S83724 4 SCREW 5 X 25 3 86162690 S82823 1 BODY FILTER SUPPORT 4 86163080 S83138 1 FILTER STRAINER 5 86163150 S82676 1 FLOAT 6 S80123 1 RING FILTER 7 86163050 S82860 1 FILTER BAG 8 86164130 S82859 1 SUPPORT FILTER BAG ...

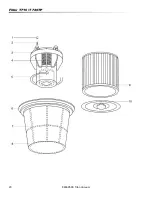
Page 20: ...20 Filter T716 T720TP 86369590 Titan Vacuum ...

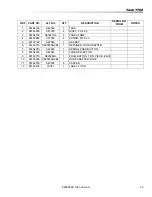
Page 21: ...6 4 BUSHING 2 86163950 S83724 4 SCREW 5X25 3 86162690 S82823 1 BODY FILTER SUPPORT 4 86164080 S83117 1 STRAINER 5 86163150 S82676 1 FLOAT 6 86163010 S80473 1 FILTER RING 7 86163020 S82845 1 FILTER BAG 8 86164120 S82833 1 SUPPORT FILTER 9 86163030 S82852 1 FILTER OPTIONAL 10 86163040 S82855 1 FILTER RETAINER OPTIONAL ...

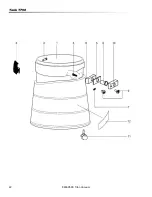
Page 22: ...22 Tank T708 86369590 Titan Vacuum ...

Page 23: ...160 S81847G6 2 TANK CLAMP 4 86163880 S81050 4 SCREW M5 X 35 5 86163190 S82846 1 GASKET 6 86163770 S82585AG6BL 1 RETAINER TANK ADAPTER 7 86164010 S82608 1 SPRING PUSH BUTTON 8 86164180 S82593 1 TANK DEFLECTOR 9 86163710 S82594BL 1 PUSH BUTTON TWO PIECE BLUE 10 86163360 S82583AG6BL 1 HOSE ADAPTER BLUE 11 86162760 S80558 6 CASTER 12 86163400 T9007 1 LABEL TITAN ...

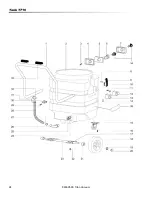
Page 24: ...24 Tank T716 86369590 Titan Vacuum ...

Page 25: ... 14 86163810 S81302 2 RIVET M5 X 19 15 86164310 S82559 2 WHEEL CASTER 16 86163930 S82680 8 SCREW M8 X 15 17 86164110 S82556 2 SUPPORT AXLE 18 86164300 S80904 2 WHEEL 19 86162750 S82557 2 CAP END 20 86162600 S83835 2 AXLE CAP 21 86164000 S82607 2 SPACER WHEEL 22 86163860 S81006 8 SCREW M5 X 20 23 86162580 S82555 1 AXLE 24 86163570 S80834 1 NUT FLANGE 1 1 4 25 86163170 S80256 1 GASKET 26 86162980 S8...

Page 26: ...26 Tank and Cart T720TP 86369590 Titan Vacuum ...

Page 27: ...6162560 S82652AG6 1 HOSE ADAPTER 10 86164180 S82593 1 DEFLECTOR TANK 11 86163190 S82846 1 GASKET 12 S82586AG6 1 RETAINER TANK ADAPTER 13 86163880 S81050 4 SCREW M5 X 35 14 86163710 S82594BL 1 PUSH BUTTON TWO PIECE BLUE 15 86163400 T9007 1 LABEL TITAN 16 86162620 S82185 1 BASE 17 86163650 S80976 2 PLASTIC PAD 18 86163560 S80478 2 NUT M10 19 86164260 S81012 2 WASHER M10 20 86164290 S80479 2 WHEEL CA...

Page 28: ...28 Front Mounted Squeegee TSQ16 86369590 Titan Vacuum ...

Page 29: ... NYLOCK NUT 1 4 20 7 86163960 BD735602 2 SLOTTED BLADE 8 86163980 BD735601 2 SOLID BLADE 9 86162650 BD715509 2 BLADE SUPPORT 10 BD735604 4 BLADE END SCREW 10 32 X 1 2 L SS 11 BD735605 4 BLADE END SCREW NUT 10 32 NYLOCK 12 BD735603 18 BLADE ATTACH T SCREW 10 32 X 5 8 L SS 13 BD735612 6 MOUNTING BOLTS 1 4 20 X 3 4 L 14 BD735609 6 NYLOCK NUT 1 4 20 15 86163440 BD705201 2 LIFTING ARM 16 86163420 BD705...

Page 30: ...30 Front Mounted Squeegee TSQ20 86369590 Titan Vacuum ...

Page 31: ...TED BLADE 10 86163980 BD735601 2 SOLID BLADE 11 86162650 BD715509 2 BLADE SUPPORT 12 BD735603 4 BLADE ATTACH T SCREW 10 32 X 5 8 L SS 13 BD735609 4 NYLOCK NUT 1 4 20 14 BD735612 4 MOUNTING BOLTS 1 4 20 X 3 4 L 15R 86163460 BD705225R 1 LIFTING ARM RIGHT SIDE 15L 86163450 BD705225L 1 LIFTING ARM LEFT SIDE 16 BD735613 2 BOLT LIFTING ARM CLAMP 5 16 18 X 1 L 17 86162780 BD705209 2 CLAMP LIFTING ARM 18 ...

Page 32: ...ANDARD FOR 708 MODEL 86163020 S82845 FILTER BAG STANDARD FOR T716 AND T720TP 86163030 S82852 FILTER CARTRIDGE PAPER OPTIONAL FOR T716 AND T720TP 86163000 S76061 FILTER CARTRIDGE WASHABLE PAPER OPTIONAL FOR T716 AND T720TP 86163070 S82995 FILTER CARTRIDGE HEPA EQUIVALENT OPTIONAL FOR T716 AND T720TP 86163060 S82881 FILTER CARTRIDGE HEPA EQUIVALENT OPTIONAL FOR T708 86163040 S82855 CARTRIDGE FILTER ...

Page 33: ...ROM NOTES 86163520 S8TOEG845 MOTOR BRUSH 120 VOLT MOTOR 86163530 S8TOGB839 MOTOR BRUSH 230 VOLT MOTOR 86164150 S80326 SWITCH ON OFF 86163050 S82860 POLYESTER FILTER T708 86163020 S82845 POLYESTER FILTER T716 AND T720TP 86164080 S83117 STRAINER 86369590 Titan Vacuum ...

Reviews: