


86333220 CS20
49
Maintenance
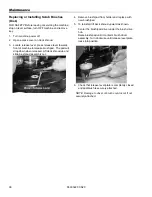
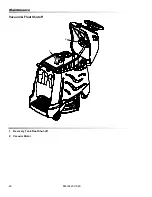
Recovery Tank Float Shut-off
When water is no longer being vacuumed from the floor
and the vacuum fan is operating, the ball float has
engaged. The vacuum motor will not vacuum water
with recovery tank full. The recovery tank must be
drained.
1. The float shut-off screen can be cleaned in or out
of the machine.
2. To clean the float shut-off while it is inside the
machine wipe material off screen then rinse. Check
that the ball is also clean and moves freely.
3. To remove the float shut-off, grasp the screen with
one hand and the connected tube with the other.
Tilt and pull the float screen assembly to pull it off
the barb on the tube.
4. To install, place one hand on the tube, and then tilt
and push the float screen assembly over the barb
on the tube.
Vacuum Motor Carbon Brush Replacement
FOR SAFETY:
before leaving or servicing machine,
stop on a level surface, turn off machine and
disconnect power.
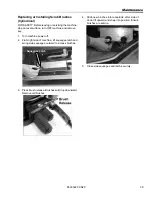
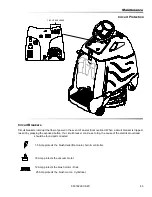
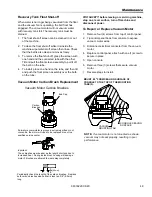
To Repair or Replace Vacuum Motor
1. Remove four (4) screws from top of control panel.
2. Tip control panel back from console to expose
vacuum motor wires.
3. Disconnect electrical connector from the vacuum
motor.
4. Replace control panel, attach with one (1) screw to
secure in place.
5. Open console.
6. Remove three (3) screws that secure vacuum
motor.
7. Reverse steps to install.
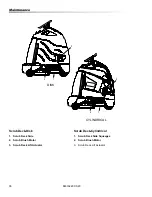
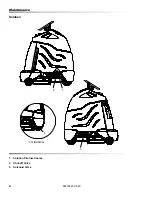
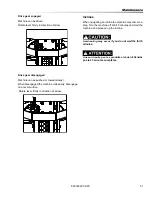
NOTE:
If vacuum motor is not mounted as shown,
vacuum may not seal properly, resulting in poor
performance.
MOUNT .80" FROM SEALING SURFACE OF
CONSOLE TO THE TOP OF THE MOUNTING
TABS (3).
VACUUM
CONSOLE SEALING
.80"
MOUNTING TAB
SURFACE
3
8
[9.5mm]
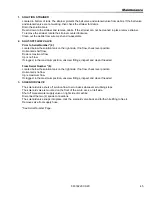
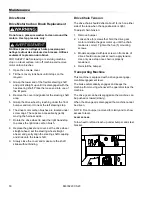
Vacuum Motor Carbon Brushes
Carbon
Brushes
End Cap
If armature commutator is grooved, extremely pitted or not
concentric, the motor will need to be replaced or sent to a
qualified service center.
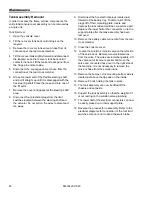
Inportant:
These brushes wear quicker as the length shortens due to
increased heat. Spring inside brush housing will damage
motor if brushes are allowed to wear away completely.
Periodically check the length of the carbon brushes. Replace
both carbon brushes when either is less tan 3/8" (9.5mm)
long.
Summary of Contents for chariot iScrub 20 CS20
Page 14: ...14 86333220 CS20 Operations Drive Controls 1 2 3 4 5 6 7 8 9 10...
Page 57: ...86333220 CS20 Parts...
Page 58: ...58 86333220 CS20 Bumper 1 2 5 6 3 4 3 7...
Page 60: ...60 86333220 CS20 Bumper Deluxe Cylindrical 1 2 5 6 3 4 3 7 5 3 4 8...
Page 66: ...66 86333220 CS20 Control Panel 2 17 9 16 3B 15 14 13 12 11 10 9 8 7 6 5 4 2 1 3A...
Page 68: ...68 86333220 CS20 Decals Disk 6 5 1 2 3 4...
Page 70: ...70 86333220 CS20 Decals Deluxe Cylindrical 2 1 3A 3A 4 3B 3B...
Page 76: ...76 86333220 CS20 Drive Mounting 1 2 3 4 5 6 7 4 7...
Page 78: ...78 86333220 CS20 Frame Rear Wheels 1 2 3 4 5 6 7 8 9...
Page 80: ...80 86333220 CS20 On Board Battery Charger Disk 6 8 1 2 15 3 4 5 6 7 9 10 11 13 14 7 6 10 12 8...
Page 84: ...84 86333220 CS20 Pedal Platform 3 4 5 6 7 8 9 10 11 1 2 2 2 2...
Page 86: ...86 86333220 CS20 Pedal Platform Mounting...
Page 90: ...90 86333220 CS20 Scrub Brush Pad Driver 8 4 9 6 5 7 5 3 2C 2A 2B 7 5 8 4 9 6 1 10A 10F...
Page 94: ...94 86333220 CS20 Scrub Brush Deck Mounting Disk 1 2 3 4 5 6...
Page 98: ...98 86333220 CS20 Scrub Deck Cylindrical...
Page 102: ...102 86333220 CS20 Scrub Brush Deck Mounting Cylindrical 1 2 3 4 8 7 6 5 9 10 11...
Page 104: ...104 86333220 CS20 Scrub Deck Lift 1 2 3 4A 5 6 7 8 12 7 10 9 11 A TORQUE 50 IN OZ A 13 4B...
Page 114: ...114 86333220 CS20 Squeegee Linkage Cylindrical 1 2 3 4 5 6 7 8 9 10 11 12 13 14 16 15 17 18 19...
Page 116: ...116 86333220 CS20 Steering 4 5B 1B 2 6B 7 1A 2 3 4 5A 6A...
Page 118: ...118 86333220 CS20 Vacuum 1 2 3 4 5 6 7 8 See maintenance section for motor mounting details...
Page 120: ...120 86333220 CS20 Wiring Battery 1A 2A 3 4 5 MAIN WIRING HARNESS 6 1B 2B...


