


2.
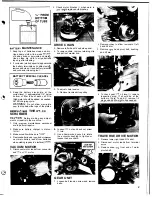
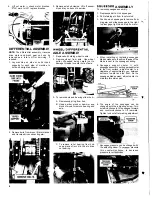
After installing new belt check for clear-
between traverse pulley and brush
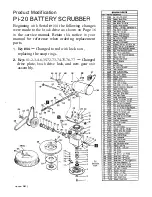
BRUSH ANGLE
Operating the machine with
excessive pressure on the squeegee will
cause abnormal wear on the squeegee
blades.
BRUSH DRIVE BELT
1.
Remove traverse drive belt by rolling belt
off pulley.
2.
Loosen belt tension adjusting screw and
remove brush drive belt. After readjust-
ing belt tension, make sure lock nut on
adjusting screw
tight.
TRAVERSE DRIVE BELT
1.
With operating handle in neutral position,
roll belt off pulley. Replace as required.
drive belt. The pulley should not be in
contact
the belt when the traverse
handle is in the neutral position.
brush slowly to the floor. When the rear
of the brush “A” touches the floor, the
To adjust clearance:
A.
Remove left side panel.
front of the brush
should be about
3/16”
from the
Loosen
nuts on link rod. Adjust
bracket on link rod
so
pulley
not
will allow the brush to rest com-
contact belt. Retighten lock nuts on
pletely on the floor.
link rod.
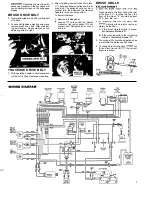
A.
If
the brush vibrates while in
tlon
Increase dirtanu
“B”.
B.
If the machine pulls to the left during
dlrtanu
“B”.
3.
The springs
(C)
should be adjusted
so
as
to maintain the distances
as
shown.
4. To
change brush inclination,
nut
(D)
and turn tie-rod
(E)
the correct
angle
reached.
A
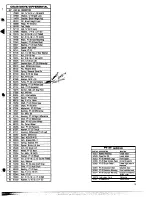
Summary of Contents for PowerTec20
Page 1: ......
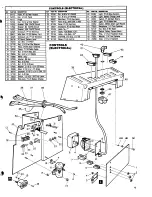
Page 9: ...1 7 AI 1 6 9...
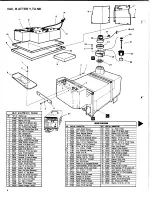
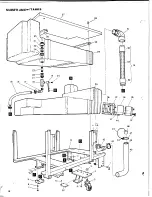
Page 10: ...MAINFRAMEWITANKS 38 I 34 37 36 35 39 41 i o 1 3 14 1 46...
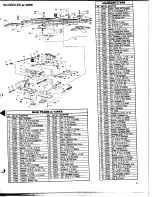
Page 11: ...SQUEEGEE w ARM 59 69 21 1 I __ 11...
Page 13: ...48 4 9 50...
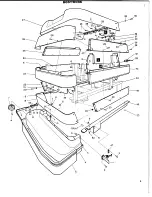
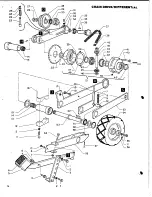
Page 14: ...14 2 1 IAL 39...


