background image

MACHINE OPERATION


SABER (SC)   86038350   01/29/07 

3-12 

 
EMPTYING AND CLEANING TANKS 


1. 

Park the machine next to a floor drain.  Drain 
hoses are on the rear of the machine. 


2. 

Turn the machine power off. 

 
SOLUTION TANK 

1. 

Unhook the small drain hose from the retainer. 
Unscrew the T-handle plug enough to loosen 
it, then lower the hose in the direction of the 
drain. Slowly remove the plug from drain 
hose. 


2. 

Remove the solution tank cover. 


3. 

Flush the solution tank out with clean water 
and run several gallons of clean water through 
systems. Do not use water hotter than 140°F 
(60°C) to clean the tank, damage may occur. 

NOTE:  Never allow solution to remain in tank.  
Damage to tank, seals and valves could occur.


4. 

Replace the drain plug and secure the drain 
hose in the bracket. 


RECOVERY TANK 

1.

  Unhook the large drain hose from the retainer. 

Unscrew the T-handle on the plug enough to 
loosen it, then lower the hose in the direction 
of the drain. Do not stand in front of the end 
the of hose. Recovered solution will come out 
with force. Slowly remove the plug from the 
drain hose. 


2.

  Raise the solution tank to access the recovery 

tank. Make sure the support arm is fully 
engaged. Remove the vacuum motor and rear 
access cover. Flush the recovery tank out with 
clean water. Do not use water hotter than 
140°F (60°C) to clean the tank, damage may 
occur. 


3. 

Clean off the float and check for free 
movement of the float ball. The float is 
attached to the bottom of the vacuum motor. 


4. 

Replace


the drain plug and secure the drain 

hose in the bracket. 


5. 

If the machine is to be stored, leave solution 
tank in the raised position.


Summary of Contents for Saber Compact 10052190

Page 1: ...diese Anleitungen bevor Sie die Maschine in Gebrauch nehmen MODELS SC20 SCC20 10052190 10052230 SC20T SCC20T 10052200 10052240 SCX20T SCXC20T 10052370 10052420 Operating Instructions Bedienungsanleit...

Page 2: ...__________ OVERVIEW The Saber Compact is a battery powered hard floor scrubber intended for commercial use The appliance applies a cleaning solution onto a hard floor scrubs the floor with a brush or...

Page 3: ...andle Group Non Traction 5 1 Control Tower Group Traction 5 3 Decal Group 5 5 Electrical Panel Group Non Traction 5 7 Electrical Panel Group Traction 5 9 Hour Meter 5 11 Recovery Tank Group 5 13 Scrub...

Page 4: ...rushes Squeegee Service Schedule Machine Troubleshooting The PARTS LIST section contains assembled parts illustrations and corresponding parts list The parts lists include a number of columns of infor...

Page 5: ...hotels schools hospitals factories shops and offices for more than normal housekeeping purposes Maintenance and repairs must be done by qualified personnel If foam or liquid comes out of machine swit...

Page 6: ...is information carefully Know when these conditions can exist Locate all safety devices on the machine Please take the necessary steps to train the machine operating personnel FOR SAFETY DO NOT OPERAT...

Page 7: ...achine If at any time the labels become illegible promptly replace them SAFETY DECAL 86252530 PRV NO 81494 BATTERY CAUTION 86252520 PRV NO 80885 CAUTION Explosive Gas is Given Off By Batteries During...

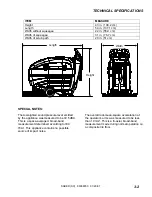
Page 8: ...Gravity feed fully variable with automatic shut off in neutral Solution tank capacity 13 gal 50 l Recovery tank capacity 16 gal 60 l Scrub brush diameter 20 in 51 cm Scrub brush pressure non traction...

Page 9: ...ted sound pressure level emitted by the appliance was measured to be 72 5 dBA This is a space averaged broad band measurement determined according to IEC 704 I This appliance contains no possible sour...

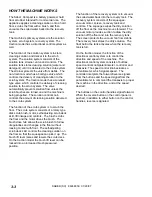
Page 10: ...or drives the brush The brush drive hub allows the scrub brush to follow irregularities and changes in the floor without loosing contact with floor The self adjusting scrub deck skirt controls the cle...

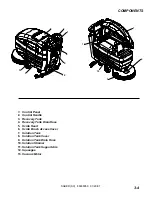
Page 11: ...ol Handle 3 Recovery Tank 4 Recovery Tank Drain Hose 5 Scrub Head 6 Scrub Brush Access Cover 7 Solution Tank 8 Solution Tank Cover 9 Solution Tank Drain Hose 10 Solution Strainer 11 Solution Tank Supp...

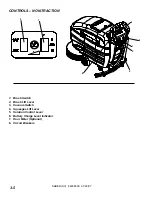
Page 12: ...SABER SC 86038350 01 29 07 3 5 1 Brush Switch 2 Brush Lift Lever 3 Vacuum Switch 4 Squeegee Lift Lever 5 Solution Control Lever 6 Battery Charge Level Indicator 7 Hour Meter Optional 8 Circuit Breake...

Page 13: ...INDICATOR Indicates the charge level of the batteries The meter display is divided into 10 vertical bars Bars illuminated on the far right indicate full charge Bars flashing near the left side indicat...

Page 14: ...rush Lift Lever 4 Vacuum Switch 5 Squeegee Lift Lever 6 Key Switch 7 Propel Buttons Normally Forward 8 Reverse Propel Button 9 Speed Control Knob 10 Battery Charge Level Indicator 11 Emergency Shut Of...

Page 15: ...ed position To raise the brush lift the lever from its lowered position and lock into highest notch 4 VACUUM SWITCH Controls the vacuum motor To start vacuum motor press the top of the switch To stop...

Page 16: ...ull charge if the batteries are disconnected then reconnected After a few minutes of operation the meter will give the correct charge level 11 EMERGENCY SHUT OFF SWITCH OPTIONAL Shuts off machine To s...

Page 17: ...Remove solution tank cover 3 Fill the solution tank with clean water leaving enough room for the required amount of cleaning solution The solution tank capacity is 13 gallons 50 liters The water must...

Page 18: ...activated flow will automatically resume TO STOP SCRUBBING 1 Release the directional control button s if your machine is traction model 2 Turn the scrub brush off 3 Raise the scrub brush 4 Raise the s...

Page 19: ...eplace the drain plug and secure the drain hose in the bracket RECOVERY TANK 1 Unhook the large drain hose from the retainer Unscrew the T handle on the plug enough to loosen it then lower the hose in...

Page 20: ...y cell before and after charging the batteries Never add acid to the batteries use distilled water Do not allow water level to fall below the battery plates Portions of plates exposed to air will be d...

Page 21: ...specific reading 0 004 4 points for each 10 F 6 C below 80 F 27 C TO CHARGE THE BATTERIES When servicing machine avoid contact with battery acid Batteries emit hydrogen gas Explosion or fire can resul...

Page 22: ...atteries during charging cycle 2 Connect charger s AC power cord to AC mains The charger s YELLOW AC LED will light Note When charger is energized all machine function will shut down 3 After several s...

Page 23: ...Nylon bristles are used in a variety of applications on coated or uncoated surfaces White Pads Polishing are used for dry polishing to achieve a high gloss appearance or surface washing on highly pol...

Page 24: ...Nylon bristles are used in a variety of applications on coated or uncoated surfaces White Pads Polishing are used for dry polishing to achieve a high gloss appearance or surface washing on highly pol...

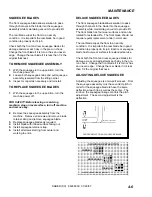
Page 25: ...equired 4 Install blade with ribbed surface facing out 5 Install squeegee retainer strap 6 Install all screws starting from center and working to ends DELUXE SQUEEGEE BLADES The front squeegee blade a...

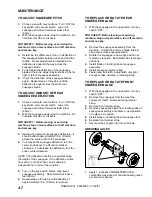
Page 26: ...rier bracket clockwise To decrease the deflection turn the knob counterclockwise NOTE The deflection should be consistent along the length of the squeegee If the deflection varies from end to end the...

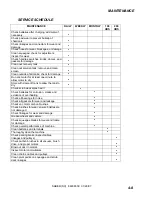
Page 27: ...tor to dry Store with dome off tank to allow the tank to dry Check scrub deck splash skirt Check batteries for corrosion cracks and evidence of overheating Check all bearings for noise Check all gaske...

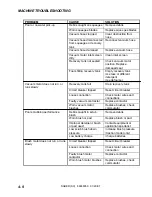
Page 28: ...n or runs slowly Recovery tank full Drain recovery tank Circuit breaker tripped Reset circuit breaker Loose connection Check motor wires and connections Faulty vacuum contractor Replace contactor Worn...

Page 29: ...traction model only Clean or replace No power to machine Battery disconnected Check all battery cable connections Emergency shut off activated traction model only Reset Battery connections corroded Cl...

Reviews: