background image

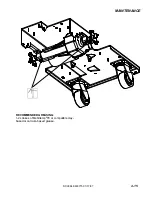
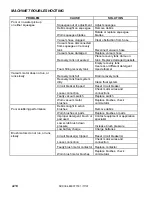
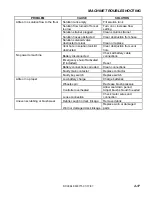
MACHINE TROUBLESHOOTING 

SCX364 86037150 1/17/07 

4-16   


PROBLEM CAUSE SOLUTION 

Poor or no water pick-up 
on either squeegee 

Squeegee out of adjustment 

Adjust squeegee 


Debris caught on squeegee 

Remove debris 


Worn squeegee blades 

Rotate or replace squeegee 
blades 


Vacuum hose clogged 

Clear obstruction from hose 


Vacuum hose disconnected 
from squeegee or recovery 
tank 

Reconnect vacuum hose 


Vacuum hose damaged 

Replace vacuum hose 


Recovery tank not sealed 

Place recovery tank dome on 
tank.  Replace damaged gaskets. 


Foam filling recovery tank 

Empty recovery tank 
Use less or different detergent 
Use defoamer 

Vacuum motor does not run, or 
runs slowly 

Recovery tank full 

Drain recovery tank 


Recovery tank float system 
dirty 

Clean float system 


Circuit breaker tripped 

Reset circuit breaker 


Loose connection 

Check motor wires and 
connections 


Faulty vacuum switch 

Replace switch 


Worn vacuum motor 
brushes 

Replace brushes, check 
commutator 

Poor scrubbing performance 

Debris caught in scrub 
brushes 

Remove debris 


Worn brushes or pads 

Replace brushes or pads 


Improper detergent, brush or 
pad used 

Contact equipment or application 
specialist 


Low scrub brush down 
pressure 

Increase brush pressure 


Low battery charge 

Charge batteries 

Brush motors do not run, or runs 
slowly 

Circuit breaker(s) tripped 

Reset circuit breaker(s) 

 Loose 

connection 

Check motor wires and 
connection 


Faulty brush motor contactor

Replace contactor 


Worn brush motor brushes 

Replace brushes, check 
commutator 


Summary of Contents for Saber Cutter SCX364

Page 1: ...Read these instructions before using the machine MODELS SCX364 10052410 Operating Instructions ENG Instrucciones de funcionamiento SPA 86037150 02 20 09 PRV NO 980090 AK WALK BEHIND SCRUBBER IPX4...

Page 2: ..._ OVERVIEW The Saber Cutter is a battery powered self propelled hard floor scrubber intended for commercial use The appliance applies a cleaning solution onto a hard floor scrubs the floor with brushe...

Page 3: ...Brushes 4 8 Float Shut Off 4 8 Solution Strainer 4 9 Brush Motor Replacement 4 9 Traction Motor Brush Replacement 4 10 Circuit Breakers 4 10 Vacuum Motors 4 11 Actuator Scrub Deck 4 12 Front Squeegee...

Page 4: ...The PARTS LIST section contains assembled parts illustrations and corresponding parts list The parts lists include a number of columns of information REF column refers to the reference number on the p...

Page 5: ...ctories shops and offices for more than normal housekeeping purposes Maintenance and repairs must be done by qualified personnel If foam or liquid comes out of machine switch off immediately Disconnec...

Page 6: ...he equipment Read this information carefully Know when these conditions can exist Locate all safety devices on the machine Please take the necessary steps to train the machine operating personnel FOR...

Page 7: ...ion of safety labels on the machine If at any time the labels become illegible promptly replace them 2 GRADE WARNING CIRCUIT BREAKER DECAL 86243530 PRV NO 500565 SEE MANUAL BATTERY CAUTION 86252530 PR...

Page 8: ...cm Scrub brush pressure Actuated 0 lbs to 150 lbs 0 kg to 68 kg Scrub brush speed 165 rpm Tires 2 x 10 in 25 4 cm non marking foam filled Casters 2 X 4 in 10 2 cm polyurethane solid non marking Found...

Page 9: ...nd pressure level at the operator s ear was measured to be 68 dBA This was a nearfield broad band measurement taken in a typical industrial environment on a tile floor This appliance contains no possi...

Page 10: ...hanges in the floor without loosing contact with floor The scrub deck skirt controls the cleaning solution on the floor so that the squeegee can pick it up The brush lift mechanisms are controls used...

Page 11: ...2 Vacuum Motor 13 Recovery Tank Dome 14 Scrub Head Swinging 15 Side Squeegee 16 Park Brake Optional 4 9 10 8 16 1 13 3 11 12 6 15 14 5 2 7 1 Control Panel 2 Front Cover 3 Recovery Tank 4 Recovery Tank...

Page 12: ...CONTROLS SCX364 86037150 1 17 07 3 5 4 10 11 12 14 15 8 7 6 3 13 16 1 9 5 2 17...

Page 13: ...OPTIONAL Shuts off machine To shut off machine push the switch To restart machine rotate the switch clockwise 3 SPEED CONTROL KNOB Controls the speed of the machine To increase speed rotate knob cloc...

Page 14: ...to the scrub deck without resetting each time the scrubbing operation is interrupted 9 VACUUM SWITCH Controls the vacuum motor To start vacuum motor press the bottom of the switch To stop vacuum moto...

Page 15: ...ocks front wheels to prevent unintentional movement To set parking brake push down to lock notch To release parking brake push down and over out of the lock down notch 15 HOUR METER Records the number...

Page 16: ...y brakes if your machine is equipped with this option FILLING SOLUTION TANK FOR SAFETY Before leaving or servicing machine stop on level surface turn off machine and remove key 1 Turn the machine powe...

Page 17: ...pick up 1 Turn the machine power on 2 Lower the squeegee 3 Turn the vacuum on 4 Select the scrub path width that you wish to clean with 5 Lower the scrub brushes to the floor 6 Turn the scrub brushes...

Page 18: ...power off and set parking brake if your machine is equipped with this option SOLUTION TANK 1 Loosen small drain hose from the retainer then lower hose in direction of the drain 2 Remove the solution t...

Page 19: ...allow motor to dry Store with dome off tank to allow the tank to dry Check scrub deck skirt Check batteries for corrosion cracks and evidence of overheating Check all bearings for noise Check all gask...

Page 20: ...egee 3 Scrub Brushes 4 Float Shut Off 5 Solution Strainer 6 Brush Motor 5 7 2 8 4 1 11 12 9 3 10 13 6 7 Traction Motor 8 Circuit Breakers 9 Scrubhead Fixed and Swinging 10 Vacuum Motor 11 Actuator Scr...

Page 21: ...l in each battery cell before and after charging the batteries Never add acid to the batteries use distilled water Do not allow water level to fall below the battery plates Portions of plates exposed...

Page 22: ...an result Keep sparks and open flame away Keep covers open when charging Wear eye protection and protective clothing when working with batteries Charge batteries in a well ventilated area Leave the ba...

Page 23: ...charge indicated by the flashing GREEN 100 LED 4 Charging cycle is complete when 100 LED is continuously GREEN 5 Disconnect charger s AC power cord 6 Raise battery cover and check the battery electro...

Page 24: ...t pitch in order for the squeegee blade to have the same deflection at each tip as well as the center The knob on the squeegee linkage controls the pitch adjustment The second adjustment is the deflec...

Page 25: ...tion of the squeegee blades again Repeat steps 1 through 4 until the deflection is equal across the entire rear squeegee blade TO ADJUST AMOUNT OF REAR SQUEEGEE DEFLECTION 1 Choose a smooth level surf...

Page 26: ...es They will quickly remove ground in dirt black heel marks and spills When used with the proper stripper this pad leaves the floor clean and ready for finishing The scrub brushes should be checked be...

Page 27: ...With the scrub deck in the up position disconnect brush motor wiring connector from harness 2 Remove scrub brushes or pad drivers 3 Remove retaining bolt lock washer flat washer and star drive from b...

Page 28: ...ad 6 When all new brushes are installed Place all in retracted position held into brush holder by spring tension 7 Carefully replace brush cap 8 CIRCUIT BREAKERS Circuit breakers interrupt the flow of...

Page 29: ...the motor will need to be replaced or sent to a qualified service center Important These brushes wear quicker as the length shortens due to increased heat Spring inside brush housing will damage moto...

Page 30: ...connection to lift linkage 6 Connect actuator to lift linkage 7 Check travel of actuator during operation 12 ACTUATOR SCRUB DECK IN OUT REMOVAL REPLACEMENT FOR SAFETY Before leaving or servicing mach...

Page 31: ...uum hose from squeegee and loosen both mounting knobs 3 Pull squeegee assembly rearward from the lifting carrier 4 Inspect or repair as necessary and reinstall TO REPLACE OR ROTATE REAR SQUEEGEE BLADE...

Page 32: ...egee deflection It should deflect 1 4 in 6 25mm across the entire width of the squeegee 4 To increase the squeegee deflection loosen the two knobs on the linkage and lower the squeegee and bracket the...

Page 33: ...MAINTENANCE SCX364 86037150 1 17 07 4 15 RECOMMENDED GREASING 1 2 strokes of Mobiltemp 78 or compatible clay based or calcium based grease...

Page 34: ...runs slowly Recovery tank full Drain recovery tank Recovery tank float system dirty Clean float system Circuit breaker tripped Reset circuit breaker Loose connection Check motor wires and connections...

Page 35: ...ted Clear obstruction from vent hole No power to machine Battery disconnected Check all battery cable connections Emergency shut off activated If included Reset Battery connections corroded Clean conn...

Reviews: