2
Carryout G3 Portable TV Antenna
2
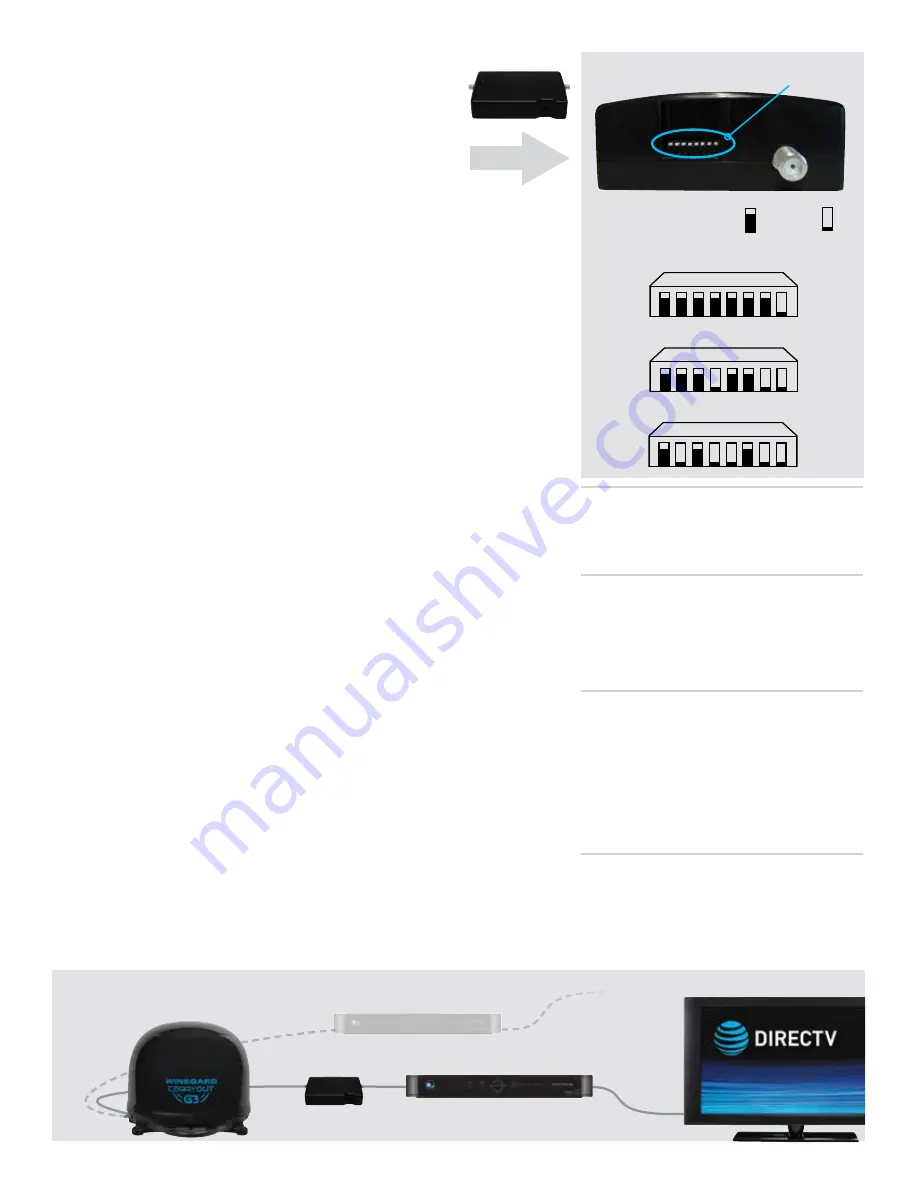
Switch Settings
The Carryout G3 antenna switch settings are located on the Winegard
Power Inserter and are preset for DIRECTV programming.
To set the antenna for DISH or Bell, locate the switches
on the Power Inserter and set according to the diagram at the right.
Installing the Handle
1) Locate the handle in the box. With “WINEGARD” on the handle facing
upwards, align the handle in the base.
2) Thread the two provided screws from hardware bag through the two aligned
holes in the bottom of the handle.
3) Tighten the two screws using a Phillips screwdriver.
Do not overtighten
.
Choosing a Location
1) Choose a location with a clear, unobstructed view of the southern sky. Avoid
obstructions such as trees, hills, vehicles, or buildings—these can block the
signal from the satellite. See NOTE.
2) Make sure the antenna is not placed in the path of people or vehicles;
otherwise, the antenna may be knocked off of the signal if run into, or cables
may be disconnected from the unit.
3) Select a location that will enable the Carryout G3 antenna to sit within three
degrees of level. The antenna may take longer to lock onto signal if the
antenna is not level.
Wiring the Antenna
1) Ensure the power button on the Winegard Power Inserter is in the OFF
position (not pressed in). See NOTE.
2) Connect the included 25’ coaxial cable between the primary port of the
Carryout G3 and the ANTENNA port on the Power Inserter. Tighten coax
connections until finger tight, and tighten a quarter turn more with a wrench.
Do not overtighten
.
3) Connect the included 3’ coaxial cable between the “SAT IN” port of your
satellite receiver and the RECEIVER port of the Winegard Power Inserter.
Tighten coax connections until finger tight, and tighten a quarter turn more
with a wrench.
Do not overtighten
.
4) Plug power adapter into 110/120VAC outlet and connect to power port on
Power Inserter (located next to RECEIVER coax port).
5) Once system is fully connected, press the power button on the Power
Inserter.
6) Give the Carryout G3 antenna approximately 3-5 minutes to complete the
search sequence. Once the Carryout G3 antenna has gone completely quiet,
proceed to configure receiver for desired operation. For DIRECTV, see page 3.
For DISH, page 4.
Power
Inserter
Optional
Hook-up
Receiver required,
sold separately
HDMI
required,
sold separately
Hook up a second receiver and watch
different channels on two TVs!
Coax
Coax
Wiring the Antenna
Power Inserter Switches
NOTE
Satellite signal will not pass through
solid objects. For this reason, it is vital to
select a location with a clear, unobstructed view
of the southern sky.
NOTE
A 25’ coaxial cable is included with the
antenna. To ensure proper operation, use
only the included coaxial cable. Failure to use the
included coax cable or use of the interior/exterior
pre-wiring could hinder proper operation.
Verify operation by running the coax cable directly
between the power inserter and the unit for the
initial setup.
(preset)
Switch Settings — Up or Down
1
2
3
4
5
6
7
8
DIRECTV
1
2
3
4
5
6
7
8
DISH
Bell TV
1
2
3
4
5
6
7
8


