background image

9. Slide the LNB into the feed arm, and re-install the two screws 

(removed earlier) through the underside of the feed arm and LNB. 
Tighten. 

10. Slide the LNB guard up the feed arm and over the LNB. The front of 

the LNB guard should be ~½

 in front of the LNB and should not be 

touching the LNB. 

11. Install the four bolts through the four holes in the LNB guard. Thread a 

nut onto each bolt, and tighten. 

12. Connect the other ends of the sheathed cables to coax port C on the 

top of the turret. Tighten the cable until fingertight, and then use a 

7

/

16

” 

wrench to tighten a quarter turn more.

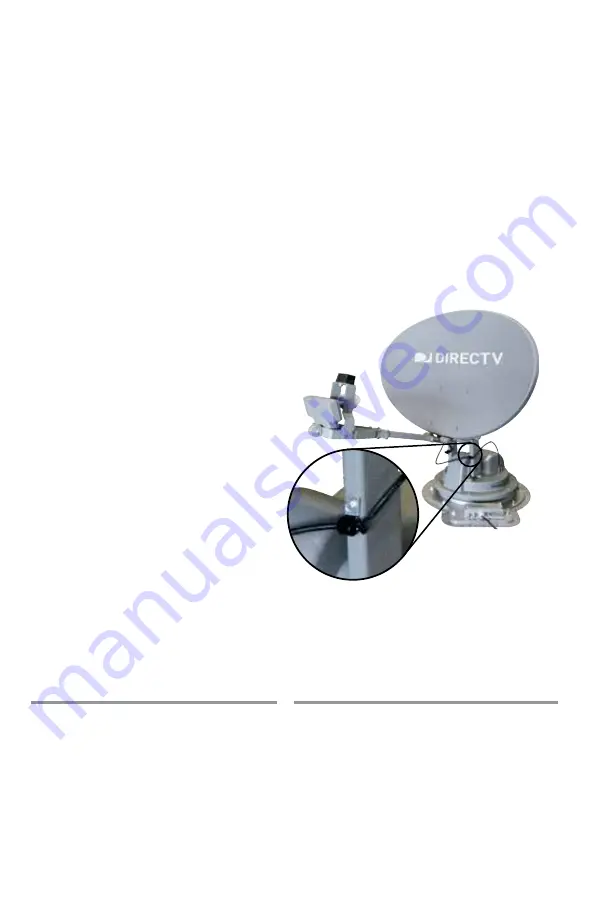
13. Place the p-clamp on the sheathed 

cable, and make sure the hole in 
the p-clamp is positioned above 
the cable. The p-clamp must be 
14

 inches

 from the ends of the 

sheathed cable. This point on the 
cable may already be marked by 
a zip tie, mark, or tape.

14. Align the hole in the p-clamp 

with the hole in the lift arm. 
Install the screw through the 
p-clamp and lift arm, and tighten.

Stowing the Antenna

1. Plug in the interface box. 

2. Press and hold “POWER” for two seconds to turn on the interface box. 

Then, press the Power button again to stow the antenna.

7

P-clamp installed 14” 

from ends of sheathed 

cable, next to zip tie on 

sheathed cable

Disclaimer:

 Although every effort has been made to ensure that the information in this manual is correct 

and complete, no company shall be held liable for any errors or omissions in this manual. Information 

provided in this manual was accurate at time of printing. 

Winegard and TRAV’LER are registered trademarks of Winegard Company. 

DIRECTV is a registered trademark of DIRECTV, LLC. DISH is a registered trademark of DISH Network L.L.C. 

Shaw Direct is a trademark of Shaw Satellite G.P.

Winegard Company • 3000 Kirkwood St. • Burlington, IA 52601-2000

 1-800/788-4417 • FAX 319/754-0787 • www.winegard.com

Printed in U.S.A. • ©2013 Winegard Company Rev2 10-19  2452298

Summary of Contents for TRAV'LER RP-SK41

Page 1: ...llite TV Antenna Replacement Sheathed Cables Instruction Manual Models RP SK41 RP SK42 RP SK45 RP SK47 and RP SK49 For help email help winegard com or call 1 800 788 4417 www winegard com mobile 2452298 2452298 Rev2 10 19 ...

Page 2: ... Carefully slide the LNB out from the integrated adapter Disconnect the three cables from the LNB using a 7 16 wrench 3 Using a 7 16 wrench disconnect the three cables from the coax ports on the top of the turret 4 Using a 5 16 wrench remove the screw holding the p clamp to the lift arm and detach the p clamp from the lift arm Set the screw and p clamp aside you will need these later 5 Once discon...

Page 3: ...id Replacement Cables 1 Remove and set aside the two screws from the wider end of the underside of the integrated adapter 2 Carefully slide the LNB out from the integrated adapter Disconnect the three cables from the LNB using a 7 16 wrench 3 Using a 7 16 wrench disconnect the three cables from the coax ports on the top of the turret 4 Using a 5 16 wrench remove the screw holding the p clamp to th...

Page 4: ...d cables This point on the cable may already be marked by a zip tie mark or tape 11 Align the hole in the p clamp with the hole in the lift arm Install the screw through the p clamp and lift arm and tighten Model RP SK45 DIRECTV Slimline Repl Cables 1 Remove and set aside the four nuts and bolts holding the LNB guard to the feed arm Then slide the LNB guard down the feed arm and toward the reflect...

Page 5: ... front of the LNB guard should be in front of the LNB and should not be touching the LNB 11 Install the four bolts through the four holes in the LNB guard Thread a nut onto each bolt and tighten 12 Connect the other ends of the sheathed cables to coax ports A D on the top of the turret Tighten each cable until fingertight and then use a 7 16 wrench to tighten a quarter turn more 13 Place the p cla...

Page 6: ...side you will need these later 6 Once disconnected remove the sheathed cables 7 Run the replacement sheathed cables through the feed arm 8 Connect the four cables running through the feed arm to the four ports on the LNB The cables can be connected in any order Tighten each cable until fingertight and then use a 7 16 wrench to tighten a quarter turn more 9 Slide the LNB into the feed arm and re in...

Page 7: ...ide the four nuts and bolts holding the LNB guard to the feed arm Then slide the LNB guard down the feed arm and toward the reflector 2 Remove and set aside the two screws holding the LNB to the feed arm 3 Carefully slide the LNB out from the feed arm Disconnect the coax cable from the LNB using a 7 16 wrench 4 Using a 7 16 wrench disconnect the cable from port C on the top of the turret 5 Using a...

Page 8: ... Align the hole in the p clamp with the hole in the lift arm Install the screw through the p clamp and lift arm and tighten Stowing the Antenna 1 Plug in the interface box 2 Press and hold POWER for two seconds to turn on the interface box Then press the Power button again to stow the antenna 7 P clamp installed 14 from ends of sheathed cable next to zip tie on sheathed cable Disclaimer Although e...

Reviews: