background image

4

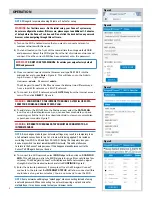
Most functions on the Winegard ConnecT are controlled from the Local 
Network Settings screen. From the


Status Screen, select 

LOCAL NETWORK 

SETTINGS

 from the drop down menu and click 

SELECT

. From here (

Figure 9

),


it is possible to do any of the following:

Change (SSID) Network Name

It is recommended that you change the name of the IDU. This will improve 
the security of your network and make it easier to find with your WiFi 
enabled devices.

Change Network Password

To secure your network, it is suggested that you change the network 
password to something you can remember. The new password must be  
at least eight characters long. 

Security Type

The Winegard ConnecT Security Type has been defaulted to WPA2-PSK 
(AES). Other options are available on this screen.

Guest Network

The Winegard ConnecT provides a simple way to set up an extra network 
that doesn’t have access to the Status Screen. This allows you to provide 
guests with an easier password to use when accessing your network while 
still maintaining a secure system.
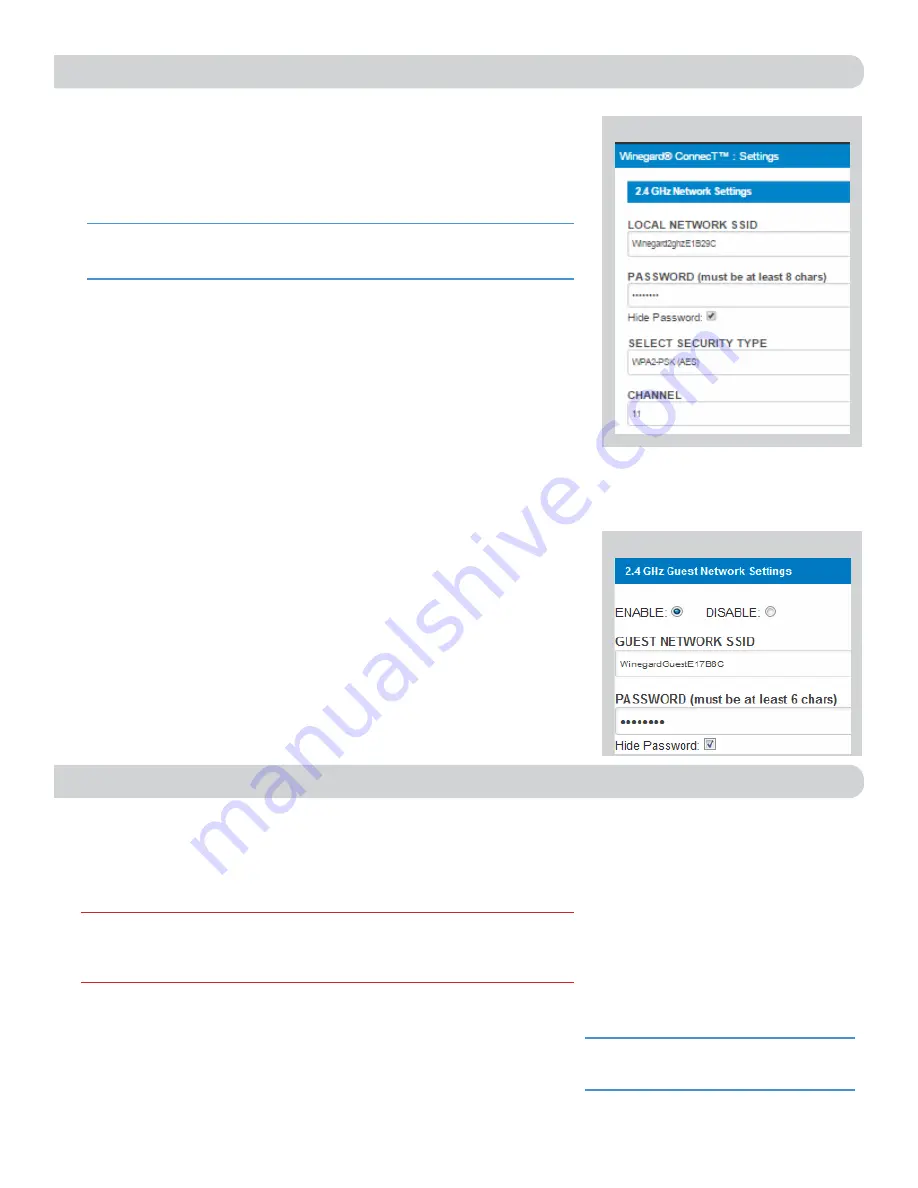
To set up a Guest Network: 

1) 

Click on 

ENABLE. 

Figure 10

2) 

Give the guest network an easily recognizable name. 

Figure 10.

3) 

Enter a password. If you use a simple password, it is recommended  
that the guest network be disabled when not in use. 

Figure 10

.


ADVANCED SETTINGS

Connected Devices

This displays the name of each device currently connected wirelessly  
to the Winegard ConnecT.

Change Network Address 

Change Admin Password

It is not necessary to change the ADMIN PASSWORD, however, to change 
the password click on 

CHANGE ADMIN PASSWORD

 to bring up the 

new password screen. Enter the new password into the area for both 
PASSWORD and RE-ENTER PASSWORD. The password in each of these 

boxes must match.

OPERATION (cont)

Figure 10

NOTE:


Do not use the existing WiFi 

password for the ADMIN PASSWORD. 

NOTE:


Any changes made to your network settings may result in a temporary loss  

of all network connections for up to 1 minute while the changes are applied.

WARNING:

 DO NOT CHANGE THE NETWORK ADDRESS UNLESS INSTRUCTED 

BY WINEGARD TECH SUPPORT. DOING SO MAY CAUSE YOUR SYSTEM TO NOT 
FUNCTION PROPERLY.

Figure 9

Summary of Contents for WF-200M

Page 1: ...e and mounted in a water free environment Register your product at winegard com myantenna WINEGARD ConnecT LONG RANGE HIGH PERFORMANCE WIFI EXTENDER 4G LTE 4G1xM Installation Operation Manual www winegard com connect Manuel disponible en français au www winegard com connect For help email help winegard com or call 1 800 320 9992 2452397 Rev1 11 17 WF 200M DESIGNED TESTED SPECIFICALLY FOR MARINE ...

Page 2: ...n the antenna as the antennas or housing may become damaged The antennas should be tightened to 20 25 inch pounds of torque 3 Assemble the mounting pedestal as shown in Figure 2 Step 1 Place the O ring over the threads on the short end of the pedestal top Make sure the O ring fits snugly into the groove Step 2 Attach the pedestal top and bottom together making sure to line up the slanted pieces so...

Page 3: ...rnet cable exiting the ODU to enter 5 Add a small bead of manufacturer approved sealant not provided to each hole See TIP 6 Drive screws 3 through the pedestal base and into each hole 3 until tight Do not overtighten as it will cause the screw to strip See NOTE 7 After the mount is securely in place slide the Ethernet cable attached to the ODU into the center hole of the mounting pedestal This sho...

Page 4: ...Enter the network password if prompted Once the Winegard ConnecT connects to the internet the INTERNET STATUS will show connected this could take as long as two minutes You are now ready to use the WiFi NOTE Winegard recommends using Chrome or Firefox for set up NOTE Some networks will display a splash page when connecting instead of using a network password When connecting to a network requiring ...

Page 5: ... accessing your network while still maintaining a secure system To set up a Guest Network 1 Click on ENABLE Figure 10 2 Give the guest network an easily recognizable name Figure 10 3 Enter a password If you use a simple password it is recommended that the guest network be disabled when not in use Figure 10 ADVANCED SETTINGS Connected Devices This displays the name of each device currently connecte...

Page 6: ... recommended to check for software updates the first time the system is connected to an Internet signal It is also recommended to check for updates every couple months for fixes and added features 1 From the Status Screen choose UPDATE SOFTWARE from the drop down menu and click SELECT 2 Once on the update software screen click CHECK FOR LATEST VERSION See Figure 11 3 There will be a slight delay w...

Page 7: ...our SSID and password on the Local Networks Settings tab 2 Press and hold the reset button for 30 seconds located on the PoE Figure 4 This will restore the unit to the original factory settings Then you may log in using the factoruSSID and password located on the front of this manual or on the ODU What do I do if 10 11 12 1 does not bring up the login screen One of several things has happened The ...

Page 8: ...f incidental or consequential damages the above limitations or exclusions do not apply Some states do not allow limitations on how long an implied warranty lasts or the exclusion of limitation of incidental or consequential damages so the above limitations or exclusions may not apply to you This warranty gives Customer specific legal rights Customer may also have other rights that may vary from st...

Reviews: