background image

V

ERSION 


01.03.2017 


USER GUIDE


WINE


PC15 


Page 10


3. 

DOOR INSTALLATION  
 
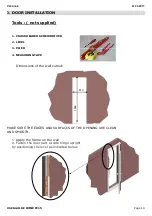
Tools : ( not supplied) 


Dimensions of the wall cutout:  


MAKE SURE THE EDGES AND SURFACES OF THE OPENING ARE CLEAN 
AND SMOOTH. 
 

1. 

Apply the frame on the wall


2.


Fasten the door part at side hinge upright by 

by positioning the level as indicated below.


1. CROSS HEADED SCREW DRIVER 
 
2. LEVEL 
 
3. PLIER 
 
4. MEASURING TAPE 


1

9

4

8


610 

Summary of Contents for WinePC15

Page 1: ...TE OF THE APPLIANCE o Model o Serial N o Date of purchase 01 03 2017 WinePC15 IMPORTANT It is recommended to note the serial number here above It will be necessary for ordering spare parts and for war...

Page 2: ...lls and ceiling Page 9 2 3 3 Insulation of the floor Page 9 2 3 4 Insulation of other elements Page 9 3 Door installation Page 9 4 Installation of the air conditioner Page 12 5 Using the air condition...

Page 3: ...will bring you great storage and best wines aging for an incomparable pleasure Because the customer is at the heart of all our thoughts we want to support you in your first steps and lead you towards...

Page 4: ...de temperature 35 C Cooling capacity 450 W Absorbed energy 390 W Power supply 230 240 V Coolant R 404 a Noise level at 1m at 3m 42 dB 40 dB As the cooling capacity reduces due to the outside temperatu...

Page 5: ...VERSION 2 USER GUIDE WINE PC15 1 2 Dimensional drawing in mm 01 03 2017 Page 5...

Page 6: ...8 white plastic covers 1 cartridge of silicone 1 cylinder keys set Package 2 1 PC15 air conditioner 1 classic hood 8 screws for fixing o 4 for the air conditioner 3 9 x 25 mm o 4 screws 4 x 50 for the...

Page 7: ...racks must be isolated from all possible sources of vibration and stand on the ground rather than be attached to a wall which is more sensitive to vibrations In order to age the wine has to be protect...

Page 8: ...ellar walls including the floor the ceiling and the door as well as to the perfect continuity of the insulation and an installation according to the instructions CHOICE OF INSULATION Wine PC15 MINIMAL...

Page 9: ...cers indicate in their documentations if the insulating materials are appropriate or specially designed for floors Resistance to perforation in particular by the feet of shelves is obtained by using c...

Page 10: ...imensions of the wall cutout MAKE SURE THE EDGES AND SURFACES OF THE OPENING ARE CLEAN AND SMOOTH 1 Apply the frame on the wall 2 Fasten the door part at side hinge upright by by positioning the level...

Page 11: ...squaring of the installation and then fix the other sides of the frame If necessary you can use glue in addition to the screws If the frame is to be fixed to dry walls glue may even be indispensable 6...

Page 12: ...power cable through the wire pass situated on the left side of the door opening 2 Place the air conditioner in the door aperture 3 Check the level of the appliance then fix it on the door with the 4...

Page 13: ...ss on button Use When the setting is correct press on and fix it with the corresponding screws 4 x 2 at the top and 2 at the bottom of the cover tightening them in moderate way The thermostat is visib...

Page 14: ...econds pressure on button 1 The thermostat indicates ON during 1 second 5 3 Automatic defrost The thermostat will run an automatic defrost time several times a day During this operation the compressor...

Page 15: ...ed under the laws of the purchaser s country WINEMASTER offers an additional 2 years contractual warranty against any manufacturing defect During this period of contractual warranty WINEMASTER will re...

Page 16: ...the failure of the air conditioner The warranty is exclusively limited to the product itself provided by WINEMASTER The European Community attaching a great importance to the environment and the wast...

Reviews: