background image

,QVWDOODWLRQ

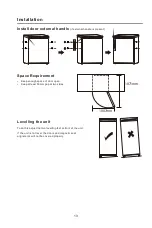
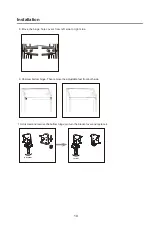
Space

Requirement

y

Select a location without direct exposure to sunlight;

y

Select a location with enough space for the refrigerator doors to open

easily;

y

Select a location with level (or nearly level) flooring;

y

Allow sufficient space to install the refrigerator on a flat surface;

y

Allow clearance to the right, left, back and top when installing. This

will help reduce power consumption and keep your energy bills lower.

y

Keep at lest 50mm gap at two sides and back.

Positioning

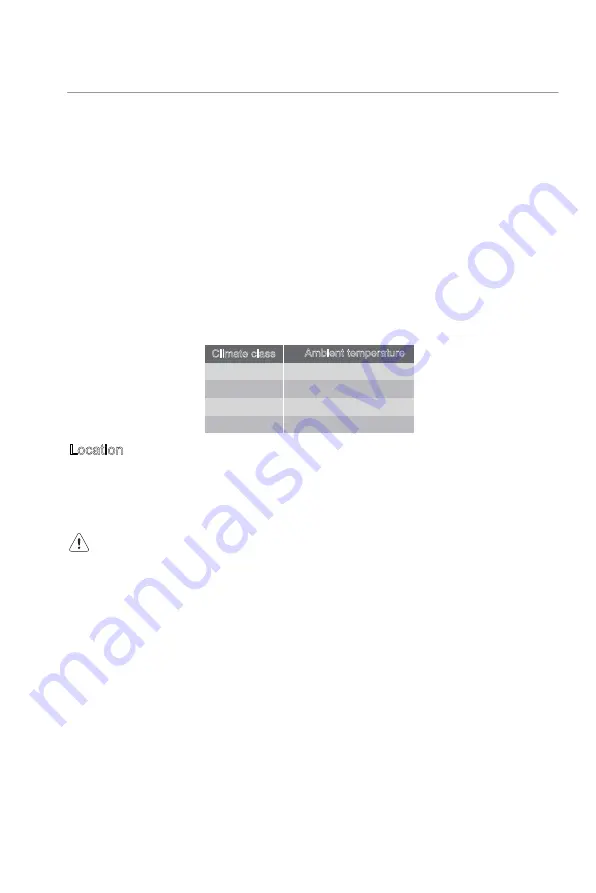
Install this appliance at a location where the ambient temperature corresponds to the climate class 

indicated on the rating plate of the appliance:

Climate class

Ambient temperature

SN
N
ST
T

+10 C to +32

o

o

C

+16 C to +32

o

o

C

+16 C to +38

o

o

C

+16 C to +43

o

o

C

Location

The appliance should be installed well away from sources of heat such as radiators, boilers, direct sunlight 

etc. Ensure that air can circulate freely around the back of the cabinet. To ensure best performance, if the 

appliance is positioned below an overhanging wall unit, the minimum distance between the top of the cabi-

net and the wall unit must be at least 100 mm. Ideally, however, the appliance should not be positioned 

below overhanging wall units. Accurate leveling is ensured by one or more adjustable feet at the base of 

the cabinet.

Warning! 

It must be possible to disconnect the appliance from the mains power supply; the plug must 

therefore be easily accessible after installation.

Electrical connection

Before plugging in, ensure that the voltage and frequency shown on the rating plate correspond to your 

domestic power supply. The appliance must be earthed. The power supply cable plug is provided with a 

contact for this purpose. If the domestic power supply socket is not earthed, connect the appliance to a 

separate earth in compliance with current regulations, consulting a qualified electrician.

The manufacturer declines all responsibility if the above safety precautions are not observed.

This appliance complies with the E.E.C. Directives.

7

Summary of Contents for RN-331DPSW

Page 1: ...QVWUXFWLRQ RPEL ULGJH UHH HU 1R URVW Content 1 Safety Information Page 1 5 2 Overview Page 6 3 Installation Page 7 13 4 User interface Page 14 16 5 Daily Use Page 17 19 del RN 331DPWW RN 331DPSW RN 33...

Page 2: ...1...

Page 3: ...1 2 1 2 2...

Page 4: ...0 3 4 4 5 0 7 8 8 9 3...

Page 5: ...8 5 8 4...

Page 6: ...7 0 3 5...

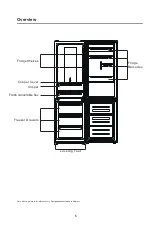
Page 7: ...2YHUYLHZ Note Above picture is for reference only Real appliance probably is different FridgeShelves Fridge Balconies Crisper Crisper Cover Fresh convertible box Freezer Drawers Leveling Feet 6...

Page 8: ...reely around the back of the cabinet To ensure best performance if the appliance is positioned below an overhanging wall unit the minimum distance between the top of the cabi net and the wall unit mus...

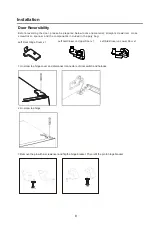
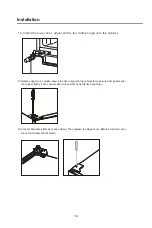
Page 9: ...Upper Door x 1 Left Aid Closer on Lower Door x 1 nscrew top hinge cover and disconnect connectors of door switch and harness 2 Unscrew top hinge 3 Remove the pin with a screwdriver and filp the hinge...

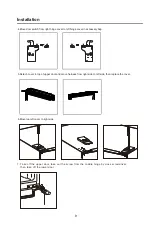
Page 10: ...side to left side then replace the cover 6 Move top left cover to right side 7 Take off the upper door take out the screw from the middle hinge by cross screwdriver then take off the lower door 4 Mov...

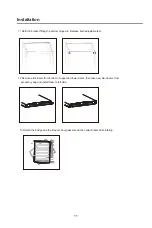
Page 11: ...QVWDOODWLRQ 8 9 Unscrew bottom hinge Then remove the adjustable feet from both side 10 Unscrew and remove the bottom hinge pin turn the bracket over and replace it unscrew screw 10...

Page 12: ...skets and then attach them after rotating 11 Refit the bracket fitting the bottom hinge pin Replace both adjustable feet 12 Remove aid closers from bottom of upper and lower doors then take new aid cl...

Page 13: ...r gasket seal the cabinet tightly Then connect door with cabinet by tightly fixed top hinge 16 Connect harnesses from door and cabinet Then replace top hinge cover Before screw the cover connect termi...

Page 14: ...1007NN 1071NN 6SDFH 5HTXLUHPHQW Keep enough space of door open Keep at least 50mm gap at two sides To do this adjust the two levelling feet at front of the unit If the unit is not level the doors and...

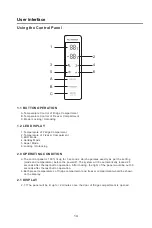
Page 15: ...mparment 3 ECO Mode 4 Holiday Mode 5 Super Mode 6 Locking Unlocking 1 2 LED DISPLAY a The control panel is 100 lit up for 3 seconds which operates exactly as per the setting mode and temperature befor...

Page 16: ...nt This button is workable both in User Defined Mode as well as Holiday Mode After entering the temperature control of the freezer compartment the button flashes By touching the button consecutively t...

Page 17: ...dge will be set at 17 C FRIDGE button will not response any press Press MODE button to exit Holiday mode Press MODE button to select Super mode And it will be confirmed after 5 seconds of flash of Sup...

Page 18: ...od which can be frozen in 24 hrs is shown on the rating plate y the freezing process takes 24 hours No further food to be frozen should be added during this period y only freeze top quality fresh and...

Page 19: ...refrigeration Useful hints y Make all types wrap in polythene bags and place on the glass shelves above the vegetable drawer y For safety store in this way only one or two days at the most y Cooked f...

Page 20: ...nother part of the appliance or the wall If necessary carefully bend the component out of the way Door seal is not air tight Heavy build up of frost on the door seal Carefully warm the leaking section...

Page 21: ...RN 331DPWW RN 331DPSW RN 331NPTW...

Page 22: ......

Page 23: ...3...

Page 24: ...4...

Page 25: ...5...

Page 26: ...6...

Page 27: ...7...

Page 28: ...8...

Page 29: ...9...

Page 30: ...10...

Page 31: ...11...

Page 32: ...12...

Page 33: ...13...

Page 34: ...14...

Page 35: ...15...

Page 36: ...16 90...

Page 37: ...17...

Page 38: ...18...

Page 39: ...19...

Page 40: ...20...

Page 41: ...21...

Page 42: ...22...

Page 43: ...GU GWANGJU KOREA 559 Homa Appliances Co Ltd No 54 North Dongfu Road Nantou Zhongshan Guangdong 528427 China 54 528427 117342 17 125 7 495 744 0397 H 24 A 220 240 50 12 SN N ST T 600x670x1935 640 715 2...

Page 44: ...1 5 6 7 11 12 17 18 RN 331DPWW RN 331DPSW RN 331NPTW...

Page 45: ...8 8 1...

Page 46: ...R600a 1 1 2...

Page 47: ...1 1 1 1 1 2 1 2 3...

Page 48: ...4...

Page 49: ...1 2 5...

Page 50: ...6...

Page 51: ...50 100 7...

Page 52: ...8...

Page 53: ...9...

Page 54: ...10...

Page 55: ...11...

Page 56: ...1 1 A B C 1 2 1 2 3 4 5 6 2 0 a 3 25 30 b 2 1 2 1 1 2 1 2 3 4 5 6 A B C 12...

Page 57: ...2 1 2 2 2 1 3 3 0 3 1 a 2 3 4 5 6 7 8 5 b 5 3 2 16 22 0 5 3 3 a 5 b 3 3 3 4 3 5 25 13...

Page 58: ...4 0 O 5 5 18 O 5 4 1 5 17 5 4 2 5 50 14...

Page 59: ...24 24 2 24 24 15...

Page 60: ...16...

Page 61: ...24 720 7 17...

Page 62: ...WINIADAEWOO R WG 21 52 1 6 1 8 1 8 25 Homa Appllaances Co No 54 North Dongfu Road Nantou Zhongshan Guangdong 5284276 China 54 528427 18 RN 331DPWW RN 331DPSW RN 331NPTW 600x670x1935 640 715 2026 67 73...

Page 63: ...CKDAW F07...
Reviews: