background image


Rugged  Computing     

Users Manual                                                                                                      Rugged Table PCs 

11 

CHAPTER 1 GETTING STARTED 

 
This chapter guides you to get the Rugged Tablet PC ready for operating. 


1.1 Connecting the AC Power     


Our tablet PC can operate either on the external AC power adapter or internal battery power. It 
is suggested that you use AC power when you start up the tablet PC first time. 
 

**Caution   

Use only the AC adapter included with your tablet PC. Using other AC adapters 
may damage the tablet PC. 


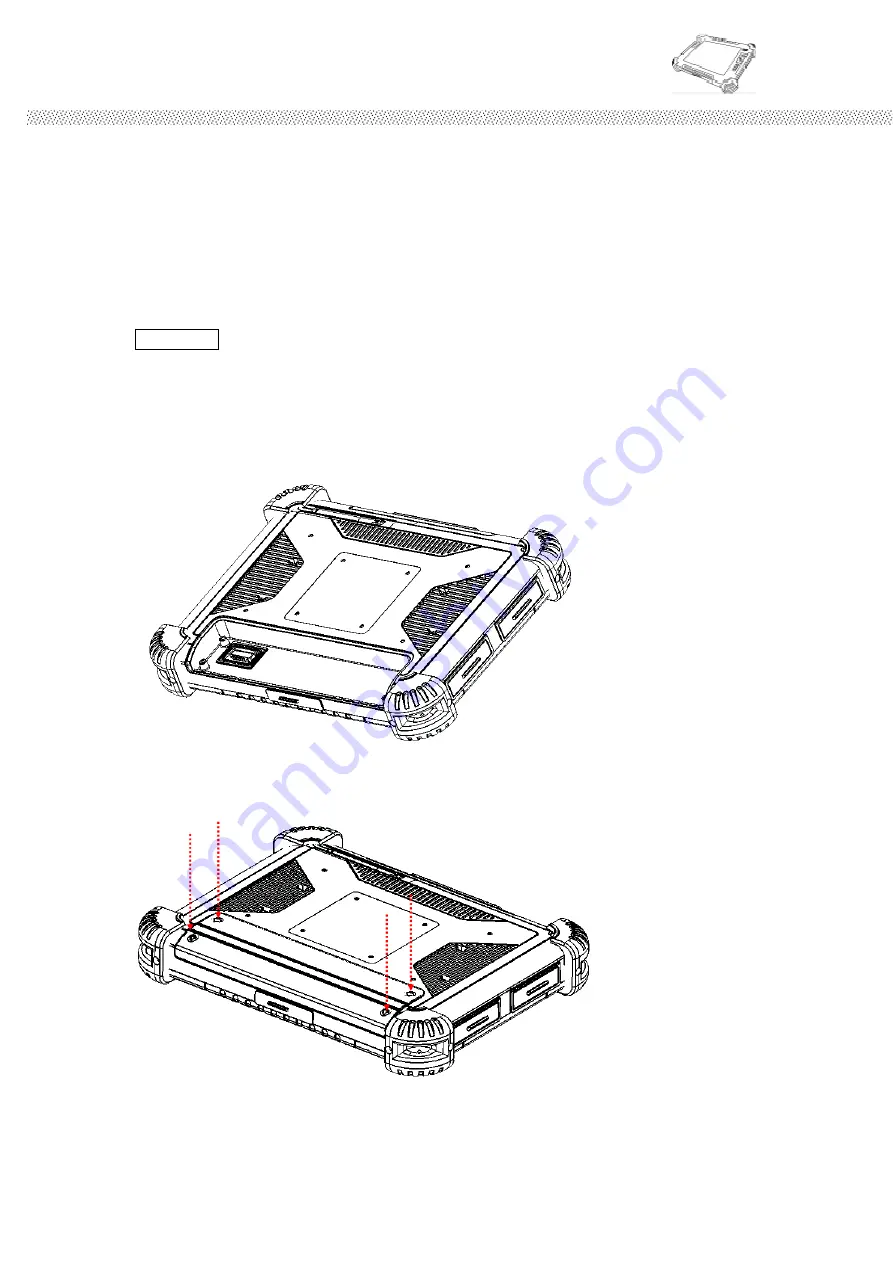
1. Make sure that the tablet PC is turned off. 

2. Place the tablet PC upside down. 


3. Put Battery Pack into the battery slot and screw tightly with four screws. 


Summary of Contents for IA80 Series

Page 1: ...puting Users Manual Rugged Tablet PCs IA80 Rugged Tablet PC USERS MANUAL Version 1 0 R08IA8M RTXXXX 8 4 inch Rugged Tablet PC R10IA8M RTXXXX 10 4 inch Rugged Tablet PC R12IA8M RTXXXX 12 1 inch Rugged...

Page 2: ...E Check in the Revision History in front page of this manual for any update reference TRADEMARKS The Bluetooth word mark and logos are registered trademarks owned by Bluetooth SIG Inc All other brand...

Page 3: ...not allow anything to rest on the power cord Do not locate this product where persons will walk on the cord Never push objects of any kind into this product through cabinet slots as they may touch dan...

Page 4: ...k work right infringement unless otherwise specified Applications that are described in this manual are for illustration purposes only Winmate Communication Inc makes no representation or warranty tha...

Page 5: ...r Peripheral attachments Software OS version application software etc Description of complete problem The exact wording of any error messages In addition free technical support is available from our e...

Page 6: ...s can be damaged by sudden power surges Only experienced electronics personnel should open the PC chassis Caution Always ground yourself to remove any static charge before touching the CPU card Modern...

Page 7: ...ed Tablet PC Users Manual 1 piece of CD for System Driver Utility 1 piece of 19V Adapter w Standard Power Cord Euro U S Std type 1 8m 1 piece of Stylus 1 piece of Slim Handheld Bag Operation System Pa...

Page 8: ...ilable for 10 4 12 1 only 1 piece of Carry Bag the Carry Bag is convenient and easy for user to carry with the Tablet PC 1 piece of Carry Belt can use with Carry Bag or use stand alone to click with t...

Page 9: ...2 1 STARTING AND STOPPING THE TABLET PC 33 2 2 QUICK TO KNOW MENU AND HOTTAB HOTKEY FUNCTION 34 2 2 1 How to use Menu Function 34 2 2 2 How to use HotTab Hotkey Function 36 2 2 3 Connecting to a Wire...

Page 10: ...8 HOTTAB UTILITY DRIVER INSTALLATION 83 CHAPTER 6 CARING YOUR TABLET PC 86 6 1 GENERAL PROTECTION TIPS FOR TABLET PC 86 6 2 CLEANING THE TABLET PC 86 6 3 BATTERY PROTECTION TIPS 87 6 4 TOUCH SCREEN PR...

Page 11: ...Rugged Computing Users Manual Rugged Table PCs 10 CHAPTER 1 Getting Started...

Page 12: ...r on the external AC power adapter or internal battery power It is suggested that you use AC power when you start up the tablet PC first time Caution Use only the AC adapter included with your tablet...

Page 13: ...C adapter 7 When the AC adapter is connected the Battery Pack is also under charging You can check the Battery Status LED indicator to see the currently progress The indicator turns to green when is f...

Page 14: ...e that the tablet PC is either connected to AC power or the battery pack with power 3 Press the power button by 4 seconds to start it 1 2 2 Turning off the Tablet PC To turn off the tablet PC power us...

Page 15: ...LED Indicator From left to right shows the status about Power mode Battery mode Storage and Wi Fi status mode 3 Menu Push Menu function to show Brightness Volume Battery status and WiFi Bluetooth on o...

Page 16: ...r On No light when Power Off Battery Status Green Light Power On with adapter or with 100 fully charged Orange Light Under charging Red Blinking Light Low Battery Check Chapter 3 2 3 2 4 for low batte...

Page 17: ...Rear side Stylus Components Function Description See Other Intro 1 Stylus Slot Easy to take out and plug in the stylus pen The Tablet PC has one stylus pen in accessory Our default stylus is only reco...

Page 18: ...See Other Intro 1 USB Port Two USB2 0 compliance ports for user to connect any USB device 2 Audio Port Audio ouput Microphone input 3 RS232 Port Connect RS232 cable D SUB 9pin to the RS232 port 4 Powe...

Page 19: ...re is no input output port on left side of the Tablet PC Top side Input Output Components Function Description See Other Intro 1 PCIExpress Port One PCIExpress slot for user to connect any PCIExpress...

Page 20: ...ut Components Function Description See Other Intro 1 Docking Slot The Docking slot can connect to docking device as docking cradle the maximum funciotn of the docking connector can support 1x power in...

Page 21: ...D Indicator From left to right shows the status about Power mode Battery mode Storage and Wi Fi status mode 3 Menu Push Menu function to show Brightness Volume Battery status and WiFi Bluetooth on off...

Page 22: ...Under charging Red Blinking Light Low Battery Check Chapter 3 2 3 2 4 for low battery and replacing battery Green light when storage under operation No light when storage stop operation Green light w...

Page 23: ...o the VGA output port and the other side connect to monitor VGA input Left side Input Output Components Function Description See Other Intro 1 LAN Port The product can support 10 100 1000 Mbit Giga LA...

Page 24: ...for user to connect any PCIExpress 34 standard interface device Button side Input Output Components Function Description See Other Intro 1 Docking Slot The Docking slot can connect to docking device...

Page 25: ...ndicator From left to right shows the status about Power mode Battery mode Storage and Wi Fi status mode 3 Menu Push Menu function to show Brightness Volume Battery status and WiFi Bluetooth on off Ch...

Page 26: ...on Green light when Power On No light when Power Off Green Light Power On with adapter or with 100 fully charged Orange Light Under charging Red Blinking Light Low Battery Check Chapter 3 2 3 2 4 for...

Page 27: ...y Our default stylus is only recommended for use in our Tablet PC Right side Input Output Components Function Description See Other Intro 1 RS232 Port Connect RS232 cable D SUB 9pin to the RS232 port...

Page 28: ...N port 2 Audio Port Audio ouput Microphone input 3 USB Two USB2 0 compliance ports for user to connect any USB device 4 Power Jack Connect 19V Adapter to the Power jack Top side Input Output Component...

Page 29: ...ur Tablet PC can support one Multi functional Desktop Docking Station for optional accessory The Desktop Docking Station have one charger for other battery packs and expansion slots as one RS232 and f...

Page 30: ...High Quality SVGA Resolution TFT LCD Panel High Performance Low Power Intel Atom N270 1 6GHz 945GSE Chipset 1 x SO DIMM DDR2 400 533 SDRAM up to 2GB 4 Wire Resistive Touch Screen Integrated with Sunl...

Page 31: ...1x RJ 45 10 100 1000 Mps LAN 2x USB 2 0 1x Audio out Micro in Jack 1x Power Input Jack 8 4 2 x USB 2 0 1 x Audio out Micro in Jack 1 x Power Input Jack 1 x COM Right I O Port 10 4 12 1 1x COM 1x VGA...

Page 32: ...B UL MIL810F for Vibration Shock Drop Temp Power Management Power Input 19V DC Power Consumption 44W 56W typ depends on model Battery Li Ion battery 4800mAh 11 1V Battery Operating Time 3 5 2 5 Hours...

Page 33: ...Rugged Computing Users Manual Rugged Table PCs 32 CHAPTER 2 Operating Tablet PC and HotTab Hotkey Utility...

Page 34: ...the hard disk or compact flash card The computer will automatically load the OS after you turn it on This is normal booting process NOTE The operating system is the platform for all software applicati...

Page 35: ...nctionality Our Tablet PC front panel buttons support very easy way and useful function to adjust Brightness Volume and watch Battery current status For six programmable Hotkey function can also be de...

Page 36: ...e Or Drag by Touch Click Down to decrease volume Or Drag by Touch 3 Push Menu button 3 rd Time Show current Battery status 4 Push Menu button 4 th Time Show current on off of Wireless Bluetooth mode T...

Page 37: ...ntrol the Power button Normal power on indication Action Push Menu button 4 seconds to Unluck back N A We strongly recommend you to check Lock Unlock condition before turn off PC 2 2 2 How to use HotT...

Page 38: ...scription Funtion Adjustment See Other Intro 1 Push F1 Short Default Outlook Express 2 Push F1 Long Default Internet Explorer Long Push 4sec 3 Push F2 Short Default Calculator 4 Push F2 Long Default M...

Page 39: ...tional To connect to a wireless network 1 Choose HotTab AP Menu function and making sure the Wireless function is On 2 By using the defult build in module the Windows Wireless Network Connection will...

Page 40: ...le PCs 39 3 Right click the Ralink utility in Windows system tray and choose Launch Configu Utility 4 The Ralink Utility program will detect all wireless links automatically and show each status choos...

Page 41: ...uting Users Manual Rugged Table PCs 40 5 Log in password if necessary and click OK to enter detail connection quality status 6 Log in password if necessary and click OK to enter detail connection qual...

Page 42: ...hout requiring a cable connection The transmission can go through walls pockets and briefcases as long as two devices are within range around 10 meters Following the easy step to connect to the Blueto...

Page 43: ...Cs 42 3 Choose the bluetooth device you want to connect and left click to choose Connect Then the device will be connected to the module 4 When under connecting left click to check the connection stat...

Page 44: ...Rugged Computing Users Manual Rugged Table PCs 43 CHAPTER 3 Tablet PC Power Management...

Page 45: ...erse procedure may damage the AC adapter or tablet PC 2 Always hold the plug head when you unplug the connector Never pull on the cord 3 The AC adapter is designed for use with your tablet PC only Con...

Page 46: ...u will experience a shorter operating time NOTE 1 Charging will not start if the battery s temperature is below 0 C 32 F It is also recommended not to charge the battery when temperature is above 45 C...

Page 47: ...Station charger connect power code to the electrical outlet and power connector to the Docking Station Put battery pack on rear side of charger slot When the battery is fully charged the Battery Char...

Page 48: ...estimated time depending on how you are using the tablet PC In Windows operating system you can check the approximate battery level using the battery meter function To read the battery level in Window...

Page 49: ...press OK to go next When you Push OK to start Battery Calibration following below indicated to regulate the battery 3 Please plug in an AC adapter to supply power it will recalibrate the gauge of bat...

Page 50: ...PC If you are using the audio subsystem PC card hard or USB flash disk the battery might run out of charge very quickly 2 Always respond to Battery Low by placing your tablet PC on the Standby or Hibe...

Page 51: ...battery pack If you often rely on battery power for a long period of time while traveling you may consider to purchase of an additional battery pack from your dealer and keep it with you in a fully c...

Page 52: ...Rugged Computing Users Manual Rugged Table PCs 51 3 Fit another battery pack into place and secure with four screws...

Page 53: ...anagement works in following state Occurrence Condition Power to the hard disk is turned off When the hard disk has been idle for a set period Power to the display is turned off When the display has b...

Page 54: ...a USB mouse you can save power by disconnecting the mouse and using the optional touchscreen pen If you use a USB flash drive unplug it when you are not using it If you work with an application that...

Page 55: ...Rugged Computing Users Manual Rugged Table PCs 54 CHAPTER 4 Expanding Your Tablet PC...

Page 56: ...etup utility when the below status 1 Error message on sreen indicate to check BIOS setup 2 Restoring the factory default settings 3 Modifing the specific hardware specification 4 Want to opttimize the...

Page 57: ...ged Computing Users Manual Rugged Table PCs 56 4 2 BIOS Functions 4 2 1 Main Menu The main menu contains the information of the Tablet system including BIOS version processor system memory time and da...

Page 58: ...ers Manual Rugged Table PCs 57 4 2 2 Advanced Menu The advanced menu contains the configuration information of CPU IDE SATA ACPI APM Configuration and Battery Calibration see Chapter 3 2 4 for detail...

Page 59: ...Rugged Computing Users Manual Rugged Table PCs 58 2 IDE SATA Configuration...

Page 60: ...Computing Users Manual Rugged Table PCs 59 3 ACPI Configuration 4 ACPI Configuration Sets the Resume On LAN and Resume On RTC Alarm function 1 Resume On LAN Disable or Enable LAB GPI to generate a wak...

Page 61: ...g Users Manual Rugged Table PCs 60 2 Resume On RTC Alarm Note The LAN Resume function only works in AC mode not works in battery mode 5 Battery Calibration The detail of Battery calibration is show in...

Page 62: ...ched for the operating system The bootable devices will be automatically detected during POST and shown here allowing you to set the sequence that the BIOS uses to look for a boot device from which to...

Page 63: ...Rugged Computing Users Manual Rugged Table PCs 62 4 2 4 Security Menu Change Supervisor Password Change User Passwaord and Clear User Password...

Page 64: ...st save and exit so that the changes can take effect Save Canges and Exit saves the changes you have made and exits BIOS Setup utility Discarding Changes and Exit exits BIOS Setup utility without savi...

Page 65: ...Rugged Computing Users Manual Rugged Table PCs 64 CHAPTER 5 Driver Installation...

Page 66: ...guide You can easily install all related drivers if with out operation system by yourself The default system will include operation system and you do need to install any of driver at first time use 5...

Page 67: ...Rugged Computing Users Manual Rugged Table PCs 66 Setp 3 Click on Next to install driver Setp 4 Click on Yes to agree License...

Page 68: ...Rugged Computing Users Manual Rugged Table PCs 67 Setp 5 Click on Next to install driver Setp 6 Click on Next to install driver Step 7 Click on Yes I want to restart this computer now to go on...

Page 69: ...Device The Intel Graphic Drivers should be installed first and it will enable Video Controller VGA compatible Follow the instructions below to complete the installation You will quickly complete the i...

Page 70: ...Rugged Computing Users Manual Rugged Table PCs 69 Step 3 Click on Next to install Driver Step 4 Click on Next to install Driver...

Page 71: ...Rugged Computing Users Manual Rugged Table PCs 70 Step 5 Click on Yes to agree License Step 7 Click on Yes I want to restart this computer now to go on...

Page 72: ...lation Follow the steps below to complete the installation of the Realtek RTL8110SC LAN drivers You will quickly complete the installation Step 1 Insert the Driver Utility CD Open the file document LA...

Page 73: ...Rugged Computing Users Manual Rugged Table PCs 72 Step 3 Click on Next to install driver Step 4 Click on Install to install driver Setp 5 Click on Finish and go on...

Page 74: ...a systems including host soft audio and AMR CNR based designs The ALC655 CODEC provides three pairs of stereo outputs with 5 bit volume control a mono output and multiple stereo and mono inputs along...

Page 75: ...Rugged Computing Users Manual Rugged Table PCs 74 Step 2 Click on Next to install driver Step 3 Click on Yes I want to restart my computer now to finish installation...

Page 76: ...t This is utility for emulating the right and left button of mouse through controlling touch panel Users can toggle between right or left mouse buttons by this utility Configuration support The calibr...

Page 77: ...Rugged Computing Users Manual Rugged Table PCs 76 Step 3 Choose Install PS 2 interface driver and select Next to go on Step 4 Choose No for 4 point calibration and click Next to continue installation...

Page 78: ...ged Computing Users Manual Rugged Table PCs 77 Step 5 Choose Next to go on the installation Step 6 After few seconds of installation click on Finish and choose restart computer to final the installati...

Page 79: ...Configuration Utility After finishing the installation please follow the steps to test the configuration utility Step 1 Click the TouchKit shortcut function in the desktop Step 2 Enter General functio...

Page 80: ...mputing Users Manual Rugged Table PCs 79 Step 3 Correct 4 point locations on screen with the Panel Screen display as follows Step 4 Play Yes to continue if 4 points calibration test is fine and finish...

Page 81: ...Driver Installation Following the step by step to finish the driver installation Step1 Insert the Driver Utility CD Open the file document WLAN_LR802UKG Execute the installation program Step2 Follow...

Page 82: ...er Installations Following the step by step to finish the driver installation Step1 Insert the Driver Utility CD Open the file document BTW 5 5 0 3200_QCom Press Install to execute the installation pr...

Page 83: ...Rugged Computing Users Manual Rugged Table PCs 82 Step3 Follow the step by step and click Next to finish the driver installation...

Page 84: ...our HotTab software application utility user can very easy to control and program their usual hotkey for help their job Step1 Insert the Driver Utility CD Open the file document hottab vXXXX Press th...

Page 85: ...Close to finish the installation Note Microsoft NET Framework 2 0 is necessary before HotTAB utility installation You can download from the following link http www microsoft com downloads details aspx...

Page 86: ...Rugged Computing Users Manual Rugged Table PCs 85 CHAPTER 6 Caring Your Tablet PC...

Page 87: ...ing on product specifications Avoid placing the tablet PC in a high humidity highly change temperatures mechanical vibration direct sunlight or heavy dust environment Keeping the tablet PC at least 15...

Page 88: ...charge the battery pack more than once a day Charging the battery pack with the system s power off is recommended To maintain the battery pack s operating efficiency store it in a cool dark place remo...

Page 89: ...een the two devices are not over 10 meters or that there are no walls or other obstructions between the devices Make sure that the other device is not in Hidden mode Make sure that both devices are co...

Page 90: ...with the device Check the cables or power cords for correct connections For an external device that has its own power switch make sure that the power is turned on F Hard Drive Problem Condition Check...

Page 91: ...does not resume from Standby or Hibernation mode The tablet PC automatically enters Standby or Hibernation mode when the battery pack is empty Do any one of the following Connect the AC adapter to th...

Page 92: ...ake sure that the volume control is not set too low Increase volume by pressing the button Make sure that the tablet PC is not in Standby mode If using an external speaker make sure that the speaker i...

Page 93: ...g is the same for every wireless LAN device in the network Your tablet PC is not recognizing changes Restart the tablet PC Make sure that the IP address or subnet mask setting is correct I cannot comm...

Reviews: