background image


28 

Chapter 4: Operating the Device 

4.4.7.1 Device Configuring and Setting 

1.Click on Windows 


 and search for 

EZConfig-Scanning

 from the Start menu. 


2.Click on 

EZConfig-Scanning v4_IE

 and allow the blocked content if browser is blocking the content. 

3

.Click on “Connected Device” icon and wait for system to discover the device (Honeywell N660X). 


Summary of Contents for M116P Series

Page 1: ...s carefully before using this product and save this manual for future use M116P Series x86 Rugged Tablet Intel Pentium N4200 1 1 GHz turbo to 2 5 GHz Windows 10 IoT Enterprise User Guide Version 1 0 D...

Page 2: ...1 4 2 SHORTCUTS 22 4 3 USING CAMERA 23 4 4 BUILT IN DEVICES ON OFF 24 4 4 1 Using the Wireless LAN Wi Fi 24 4 4 2 Using the Wireless WAN 4G LTE 24 4 4 3 Using the GPS 25 4 4 4 Turn on off the GPS Exte...

Page 3: ...2 Contents 5 7 3 Perform Bluetooth Pairing 57 CHAPTER 6 TROUBLESHOOTING 59 6 1 BASIC TROUBLESHOOTING 59 APPENDIX 61 APPENDIX A PRODUCT SPECIFICATIONS 61...

Page 4: ...nformation Important An important note indicates information that is important for you to know Caution A Caution alert indicates potential damage to hardware and explains how to avoid the potential pr...

Page 5: ...as Deteriorated Replace It with a New Battery Continued use of a damaged battery pack may result in heat generation ignition or battery rupture FR Lorsque la pile est d t rior e la remplacer par une n...

Page 6: ...prise obsol te Use only accessories specified by the manufacturer FR Utiliser uniquement les accessoires sp cifi s par le fabricant This product should not be used near water such as bathtubs sinks s...

Page 7: ...r essuyer l ext rieur du produit Gently wipe the display with a soft lint free cloth Do not use alcohol or detergent on the product FR Essuyer d licatement l cran avec un chiffon doux non pelucheux Ne...

Page 8: ...equency energy and if not installed and used in accordance with the instruction manual may cause harmful interference to radio communications Operation of this equipment in a residential area is likel...

Page 9: ...swappable battery design Multiple wireless connectivity options and data capture modules allows users to complete their tasks reliably from warehouses to vehicle mounted to field service external use...

Page 10: ...001G Vehicle Dock Part No 98DT00A0001H Vehicle Charger Part No 9226065W19V0 Smart Card Reader Part No 98K000A0003U UHF RFID Reader Part No 98K000A0004J High Capacity Battery Part No 98K000A0003S Hand...

Page 11: ...t Computer from drops Front LED Indicator Details No Item Description 8 String Hole Use to attach a wrist strap or other accessories 9 Micro HDMI HDMI output to external display 10 Micro SDXC slot Mem...

Page 12: ...p 10280 mAh Li Polymer Battery 2S2P 22 Service Window Provide access to 4G LTE Module 23 Waterproof I O Cover Protects I O ports from water and dust Top Bottom No Item Description 24 Optional Barcode...

Page 13: ...scenario a single physical button or a combination of physical buttons provide different keyboard key strokes which are specified below In POST before Windows boots up Buttons Keystroke F1 F6 to ente...

Page 14: ...acing up 2 Push the Battery Lock Latch it to the Unlocked position 3 Pull up and hold the Battery Release Slider that is spring loaded 4 Lift the battery out using the opening on the side of battery c...

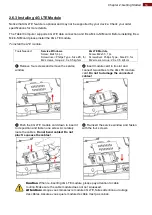
Page 15: ...ver Philips Type Size 0 for M2 screws torque 2 0 0 5 kgf cm Remove four screws and remove the service window Insert module card to its slot and connect two cables to the 4G LTE module card Do not to d...

Page 16: ...on or removing battery procedure Attention D branchez tous les cordons connect s la tablette avant l installation ou la proc dure de retrait de la batterie Remove the battery as described in the previ...

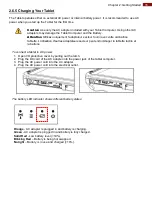
Page 17: ...utilisation d autres adaptateurs secteur peut endommager la tablette tactile et la batterie To connect a tablet to AC power 1 Open I O protective cover by pulling out the latch 2 Plug the DC cord of t...

Page 18: ...bezel to initiate recovery process Press and hold the power button for 3 seconds until the blue LED power indicator light up Note Do not press the power button repeatedly Do not perform the following...

Page 19: ...l tement charg e avant de d marrer la tablette tactile pour la premi re fois avec la batterie interne Public network Select this location if you do not recognize all the computers on the network For e...

Page 20: ...then try to connect to network Tap Skip this step to continue without a wireless connection as you can then set up the network later 5 On the Get going fast screen click Use Express settings for the...

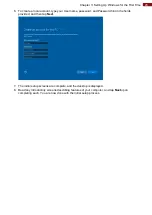
Page 21: ...name password and Password hint in the fields provided and then tap Next 7 The initial setup screens are complete and the desktop is displayed 8 Read any introductory screens describing features of yo...

Page 22: ...have ordered the module before using the SDK 4 1 Hottab Introduction Hottab provides quick access to the tablet s functions and features such as setting up shortcuts using camera powering on off built...

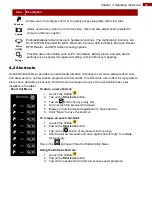
Page 23: ...configure on screen software short cuts and allow users to quickly access programs with a few tabs The Shortcuts menu offers 8 empty slots to store user s desired quick access Shortcuts can be mapped...

Page 24: ...ite tap on the Camera icon to enable it orange 5 Click on the back arrow on top to go back to Hottab main menu 6 Tap on the Camera icon to open Camera menu No Item Description 1 Review Review 2 Settin...

Page 25: ...ge 5 Click the wireless network connection status icon in the Windows notification area A list of available wireless networks is displayed 6 Double click a network to connect to it Provide required au...

Page 26: ...white tap on the GPS icon to enable it orange 5 Now the GPS feature is ready to be used with an application utilizing the GPS 4 4 4 Turn on off the GPS External Antenna The vehicle dock of M116P Table...

Page 27: ...e tap on Add a Bluetooth Device Windows will search any Bluetooth device automatically 7 Choose the Bluetooth device to connect and follow onscreen prompt to continue the pair procedure and use the Bl...

Page 28: ...he Barcode Reader 1 Launch the Hottab Utility 2 Tap on the Device ON OFF button 3 Check the status color of the Barcode icon Item Status Color Description Barcode Orange Barcode Reader is enabled Read...

Page 29: ...ting 1 Click on Windows and search for EZConfig Scanning from the Start menu 2 Click on EZConfig Scanning v4_IE and allow the blocked content if browser is blocking the content 3 Click on Connected De...

Page 30: ...Honeywell N660X is discovered please click Configure Device button as shown 4 4 7 2 Scanning Mode Settings 1 Click Device Settings under the Input Output settings section 2 Select the desire scanning...

Page 31: ...Presentation Mode may not work properly Streaming Presentation Mode When in Streaming Presentation mode the scan engine s aimer goes out after a short time but the scan illumination remains on all th...

Page 32: ...2 5 Disable Code 2 5 Disable Codabar Enable Code 93 Enable Code 11 Disable MSI Disable Telepen Disable Trioptic Code Disable Postal Code Disable Planet Code Disable Korea Psot Disable China Post Disa...

Page 33: ...eset to default button If the Disconnection happened please scan barcodes below in the following steps Step1 Scan the USB HID barcode Step 2 Then scan the USB keyboard barcode Step 3 Run EZConfig Scan...

Page 34: ...or select desire characters in the Control chars Printable chars and Extended ASCII as shown below 3 When you finish creating Prefix Suffix please click on Save to Device on the side bar 4 For checkin...

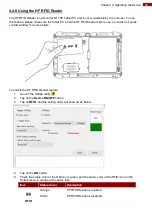
Page 35: ...ur sales contact window for more details To enable the HF RFID Reader feature 1 Launch the Hottab Utility 2 Tap on the Device ON OFF button 3 Tap on RFID and the setting utility will show up as below...

Page 36: ...to scan tags 1 When the RFID tag is detected from RFID antenna the data will be read automatically 2 User can define the RFID scanning frequency from the drop down menu shown as below The frequency ca...

Page 37: ...tions are available Keyboard Wedge Under this setting the data scanned is sent like keyboard data The scanned data can be output directly to the demo area below this window or user can also open other...

Page 38: ...s to append an TAB which is followed by the characters Regex Filter Press on Presets button user can define how many characters to show after the data scanned Replace User can define specific characte...

Page 39: ...ction can do this change Disconnect User can tap on the Disconnect button to stop the connection with built in HF RFID reader To recover the connection please turn off the module from setting UI and t...

Page 40: ...ing the touchscreen with gloves on Supports input by Glove Rubber tip passive stylus Bare fingertips To change touch mode Launch the Hottab Utility Choose Device ON OFF and then click Touch Set icon 4...

Page 41: ...different touchscreen modes When touchscreen mode is switched an icon will temporarily overlay on the lower center of the screen to indicate current touchscreen mode 4 4 11 Using the Expansion Module...

Page 42: ...Status Color Description Ext Module Orange Expansion Module is enabled White Ext Module is disabled 4 4 12 UHF RFID Reader Module The UHF RFID Reader is optional for M116P Tablet PC Note Download the...

Page 43: ...status color of the ON icon is green Trigger Setting Auto Scan The default setting for UHF RFID trigger is Auto Scan Under this setting the UHF RFID Reader will always be ready to scan tags 1 When the...

Page 44: ...a beep sound will come with the data scanning Region Based on different regional regulations about UHF RFID frequencies user can switch frequency to NA North America 902 928 MHz or EU3 Europe 865 868...

Page 45: ...like keyboard data The scanned data can be output directly to the demo area below this window or user can also open other utility such as Office Word or Notepad files for data input Important Please...

Page 46: ...egex Substitutionis scanned the data will be replaced with the one filled in Replace with Reset to default To remove all the set up and back to default mode RFID Output Setting Note For more informati...

Page 47: ...ing the Device Disconnect Connect User can tap on the Disconnect button to stop the connection with UHF RFID Reader To recover the connection please turn off the module from setting UI and then turn o...

Page 48: ...ain how you can adjust the built in windows display scaling setting and resolution setting Note The Tablet computer is shipped with display scaling set at Larger 150 We recommend the users set the sca...

Page 49: ...ly instead of changing the display scaling setting user may choose to change the overall resolution setting to make screen elements bigger 1 Tap and hold anywhere on the desktop for 3 seconds and rele...

Page 50: ...ping When the backup battery is fully charged the tablet can sustain up to 5 minutes of runtime for battery hot swapping Caution Charge the built in back up battery every two months to keep battery he...

Page 51: ...M116P Tablet Computer Warning Before starting the recovery process be sure to backup all user data as all data will be lost after the recovery process Attention Avant de d marrer le processus de r cu...

Page 52: ...up before recovery and click on Yes to continue 5 Wait till the recovery process to complete During the recovery process a command prompt will show up to indicate the percent of recovery process 6 Af...

Page 53: ...puter uses Hottab utility for built in peripherals control All the COM port numbers have been defined in the OS image coming with the package COM Port Device COM 1 Reserved COM 2 Reserved COM 3 HF RFI...

Page 54: ...ck OK 4 Double check Device Manager to make sure the COM Port number has been re defined successfully and then restart the system 5 6 GigaLAN Port Definition Notice that GigaLAN port is an optional fe...

Page 55: ...h barcode scanner to initial Bluetooth Serial Port Profile pairing request 5 7 1 Setup Computer for Bluetooth Pairing To start the pairing process first perform the following steps to ensure the compu...

Page 56: ...the computer is set to Allow Bluetooth devices to find this computer as shown below Click OK to continue 5 In the Bluetooth Settings menu go to COM Ports tab COM port has to be setup for the wireless...

Page 57: ...s 6 You are in Add COM Port window Choose Incoming device initiates the connection and click OK 7 The computer will automatically assign COM Port to the Bluetooth connection In the screenshot below CO...

Page 58: ...rocess to start 5 7 3 Perform Bluetooth Pairing After you finish setting up both the Computer and Barcode Scanner you are ready to start pairing 1 Open a program that is used for paring 2 Perform scan...

Page 59: ...r to ensure that Bluetooth Device is successfully pared to the Computer follow the steps below 1 Locate the Bluetooth icon in the Notification Area Select Show Bluetooth Devices You can access this me...

Page 60: ...om objects causing interference I cannot connect to another wireless LAN device Make sure that wireless LAN feature is powered on Make sure that the SSID setting is the same for every wireless LAN dev...

Page 61: ...anner emits laser beam but does not read barcode presented to it Adjust the distance between barcode scanner of the device and the barcode being scanned Make sure the barcode code type is enabled in t...

Page 62: ...Gyro E compass Wireless Communications WLAN 802 11 a b g n ac WiFi 802 11 a b g n ac WiFi Bluetooth Bluetooth 5 0 Bluetooth 5 0 GNSS GPS GLONASS GPS GLONASS WWAN Optional 4G LTE Optional 4G LTE Inter...

Page 63: ...nal 7 4V typ 10280 mAh Li Polymer Battery 2S2P Hot swappable 7 7V typ 5900 mAh Li Polymer Battery 2S1P Optional 7 4V typ 10280 mAh Li Polymer Battery 2S2P Battery Operating Time Std Battery 8 hours 6...

Page 64: ...Winmate Inc 9F No 111 6 Shing De Rd San Chung District New Taipei City 24158 Taiwan R O C www winmate com Copyright 2018 Winmate Inc All rights reserved...

Reviews: