background image


- 33 - 

8.  Windows may take some time to finalize your settings. 


9.  On the 

Windows Sign-in 

screen, enter the user name and password that you 

set up earlier, and then press 

Enter


Summary of Contents for M133 Series

Page 1: ...e using this product and save this manual for future use Rugged Tablet PC M133 Series Windows 10 IoT Enterprise Windows Embedded 8 1 Industry Pro Windows 7 Professional for Embedded System OS Deployme...

Page 2: ...1 Document Revision History Version Date Note 1 0 09 Mar 2017 Initial document release 1 1 17 Apr 2017 Add Graphics Settings...

Page 3: ...dded 8 1 Industry Pro 41 4 3 Windows 7 Professional for Embedded System 42 4 4 WMMIO Driver Installation For Windows 7 8 10 52 CHAPTER 5 UTILITY INSTALLATION 54 5 1 List of Winmate AP and Utilities 54...

Page 4: ...nstall the OS different from Winmate shipment For standard installation Windows OS installation you can use Winmate s Recovery CD DVD or use Recovery Wizard following procedures described in the M133...

Page 5: ...Windows 10 Legacy Windows 7 2 2 Changing BIOS Mode for OS Installation There are two ways to change the BIOS mode on the tablet for new OS installation 1 Through change of BIOS settings UEFI LEGACY mo...

Page 6: ...during start up The prompt screen shows only few seconds so need press Del key quickly BIOS Navigation Keys The following keys are enabled during POST Key Function Del Enters the BIOS setup menu F7 D...

Page 7: ...Key Function F1 General Help F2 Previous Values F3 Optimized Defaults F4 Save Exit Esc Exit Change options Enter Select or execute command Cursor Moves to the previous item Cursor Goes to the next ite...

Page 8: ...ode in BIOS settings to install OS that is different from the version that is shipped 2 4 1 Default Windows 8 8 1 change to Windows 7 The instruction below describes how to change Windows 8 8 1 to Win...

Page 9: ...8 3 Change OS setting to Windows 7...

Page 10: ...9 2 4 2 Default Windows 7 change to Windows 8 1 1 Enter BIOS Setup menu 2 Go into item Boot at BIOS setup menu 3 Change OS setting to Windows 8 X...

Page 11: ...will start installation process IMPORTANT Pay attention to the mode you created on the Recovery DVD PE3 0 only support legacy mode for Windows 7 PE5 0 can support Win7 8 8 1 at legacy or UEFI mode Cr...

Page 12: ...the USB drive 2 5 1 Tools needed 1 Tablet PC to be updated 2 One empty USB drive 3 Winmate BIOS Update files 4 USB hub powered with an external AC adapter Note if the USB Hub is not externally AC powe...

Page 13: ...Plug in an empty USB drive to a PC 2 Unzip files from USB BOOT Disk Tool rufus 2 11p zip into any location on your computer first as a folder This folder will be used in the next few steps NOTE The a...

Page 14: ...dministrator 4 The disk format tool will appear as shown below Make sure the Device is targeted at the removable USB drive from Step 1 Partition scheme and target system type is MBR Partition scheme f...

Page 15: ...14 5 Select Quick Format and create a bootable disk using FreeDOS 6 Next click on the Start button and a Warning message will be shown Click Yes to proceed...

Page 16: ...OS startup disk Click OK to finish and Close the tool 8 Download the latest BIOS update files and extract the files into an UPDATE folder IMPORTANT It is important that the folder name is shorter than...

Page 17: ...16 9 Copy the UPDATE folder into the formatted USB The USB drive is now ready to be used to perform for BIOS and EC firmware update procedure detailed in the next section...

Page 18: ...he USB drive prepared in the previous section and the USB keyboard 2 Power on the Tablet PC while pressing DEL key on the keyboard to enter the BIOS Setup Menu 3 Use the direction keys on the keyboard...

Page 19: ...CSM and hit Enter Select Enabled and hit Enter again Jump to step 6 5 Use the direction keys on the keyboard to navigate to the submenu Boot and then choose Select Operating System by pressing Enter...

Page 20: ...and exit BIOS 7 Press F7 on the keyboard to go into the Boot Select Menu while the computer restarts automatically Select the removable USB drive to boot into the USB 8 The computer now will boot int...

Page 21: ...PDATE folder enter the command update to initiate the 11 The update script will scan through the BIOS on the computer and replace it with new BIOS The user will see block of data being programmed with...

Page 22: ...s done a FPT Operation Passed message will be shown and the update script will automatically run through all the necessary update processes as shown below No user input will be required and the comput...

Page 23: ...22 13 To ensure the BIOS and EC firmware updates are applied successfully please restart the computer and press the DEL on the keyboard while the computer is starting up to boot into BIOS Setup Menu...

Page 24: ...23 14 Once the BIOS Setup Menu starts check under the Main menu to find the Project Version and the EC Version are shown to be update that was successfully applied...

Page 25: ...For other OS follow on screen instructions from Microsoft 3 1 Windows 10 IoT Enterprise Follow the steps below to complete the setup process 1 Press the power button to turn on the computer 2 First s...

Page 26: ...25 4 Enter the product key to activate Windows click Next 5 Microsoft license will appear Carefully read the terms of license select I accept the license terms then click Next...

Page 27: ...26 6 Select the type of installation you want We recommend you to choose custom Click Custom to continue 7 Choose the place where to install Windows then click Next...

Page 28: ...27 8 Windows setup window will pop up Windows might create additional partitions for you system files Click Ok 9 Windows have created partition 2 Click Next to continue...

Page 29: ...28 10 Windows setup warning message pops up read it carefully and then click Cancel Click Next to continue 11 Installing Windows Please wait...

Page 30: ...u are ready to Setup your system Click Use Express settings 13 Read any introductory screens describing features of your computer and click Next upon completing each You are now done with the initial...

Page 31: ...he setup process 1 Press the power button to power on the computer 2 Check I accept the license terms for using Windows to accept the terms and then click or tap I Accept 3 On the Personalize screen c...

Page 32: ...31 4 In the PC name field type a name for your computer and then click or tap Next 5 On the Settings page screen choose Use express settings for the fastest setup...

Page 33: ...connect to network Ignore attempt to connect to internet as you do not need internet connection to finish setup your pc 7 On Your account screen type your username and password to create a local accou...

Page 34: ...33 8 Windows may take some time to finalize your settings 9 On the Windows Sign in screen enter the user name and password that you set up earlier and then press Enter...

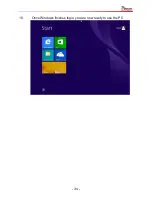
Page 35: ...34 10 Once Windows finishes login you are now ready to use the PC...

Page 36: ...System Follow the steps below to complete the setup process 1 Press the power button to power on the computer 2 First select your region and language information and then tap Next 3 Type in a user nam...

Page 37: ...ssword for your account and tap Next 5 Now enter the product key that came with the computer and tap Next For this version of the Windows a product key entry is required when setting up the computer f...

Page 38: ...rms screen click on the I accept the license terms and tap Next 7 For the update option choose Use recommended settings for Windows to install updates If you do not wish Windows to do so choose the ot...

Page 39: ...38 8 Next review the date and time settings on the computer 9 Select the computer current location for network privacy setting Choose the location below to your actual usage accordingly...

Page 40: ...39 10 Allow time for windows to setup your desktop for the first time 11 Now the computer is ready to be used...

Page 41: ...4 1 Windows 10 IoT Enterprise Download drivers from Winmate Download Center Go to www winmate com Support Download Center Rugged Tablet PCs M133W Drivers Driver Installation Sequence 1 Chipset 2 Graph...

Page 42: ...Center Rugged Tablet PCs M133W Drivers Driver Installation Sequence 1 Chipset 2 Graphics 3 Management Engine 4 Serial I O 5 Audio 6 LAN 7 GPS 8 Bluetooth 9 Wi Fi 10 WWAN 11 WMMIO Driver Please see Se...

Page 43: ...stallation Sequence 1 Chipset 2 Graphics 3 Kernel Mode Driver Framework version 1 11 Update 4 Management Engine 5 Audio 6 LAN 7 USB 3 0 8 Net 4 5 2 9 Sensor Hub 10 LAVFilters 11 GPS 12 Bluetooth 13 Wi...

Page 44: ...ver Installation For Window 7 Only 1 Open Device Manager located in Computer Management menu and then go to Human Interface Devices right click on HID compliant device in the drop down menu choose Pro...

Page 45: ...D_91D1 REV_0034 Col01 refer to the picture below 4 If the device confirmed to be the same as contents go to the HID compliant device proprieties menu go to Driver tab and select Update Driver If the c...

Page 46: ...45 5 In the opened menu select Browse my computer for driver software 6 Select Let me pick from a list of device drivers on my computer...

Page 47: ...46 7 Click on Have Disk 8 Choose the location for the driver to be installed...

Page 48: ...47 9 In the specified Sensor Hub folder STSensorHub inf find STSensorHub inf click on Open 10 Complete original Model name change to STMicroelectronics Sensor Hub and then select Next...

Page 49: ...48 11 Windows security window pops u select Install this driver software anyway 12 Wait while the system is installing driver software...

Page 50: ...49 13 Installation complete close the window 14 The name of the device will be updated under the Sensors category...

Page 51: ...50 15 After the driver is installed please open Control Panel 16 Go to Hardware and Sound...

Page 52: ...51 17 Select Location and Others Sensors 18 In STMicroelectronics Sensor Hub settings choose Enabled and click Apply now the device can work properly...

Page 53: ...n required for HotTab utility WMMIO Driver is required for the following OS Windows 7 Windows 8 1 and Windows 10 IoT WMMIO Driver Installation steps i Type cmd in the run box ii The cmd exe will appea...

Page 54: ...r v When Windows Security dialog appear select install to continue the installation vi When the driver is successfully installed you can see Drivers Updated successfully message in the dos prompt vii...

Page 55: ...Utilities for M133 Series Rugged Tablet PC Item Type Description 1 Utility M133 Hot Tab Utility Refer to utility User Manual for detailed AP Utility installation instructions M133 Series Rugged Table...

Page 56: ...If it exists please uninstall 3 Install the new HotTab installation executable setup exe in the folder 4 After installation is finished restart the tablet before again 5 Check the new version of HotT...

Page 57: ...talling Winmate AP Utility you may require to adjust serial COM port settings to match with Winmate AP settings 6 1 COM Port Settings Please make adjustments to the serial COM Port settings so they ma...

Page 58: ...57 6 2 Adjusting COM Port Number 1 Go to the Device Manager Expand the Ports COM LPT Right click on the device and click on Properties 2 In the Ports Settings tab click Advanced...

Page 59: ...58 3 Specify the COM Port Number Change COM port number from COM4 to COM15 Click OK 4 Check the device management that has been changed COM15 and then restart your device...

Page 60: ...g Up Bluetooth COM Port Instruction 1 Open the Bluetooth Devices Control Panel 2 In the Options tab select Turn discovery on and allow Bluetooth devices to connect to this computer 3 In the COM Ports...

Page 61: ...nitiates the connection and click OK NOTE The COM port number you just added would be auto paired when the Bluetooth Barcode scanner scans the barcode sticks on the tablet PC 5 Click OK to close the B...

Page 62: ...ieties To check the actual location of the device 1 Right click on Communications Port from Device Manager and select Properties 2 Enter Properties then go to Details tab in Device Instance Path check...

Page 63: ...62...

Page 64: ...to perform the necessary adjustments in the OS to make sure the for all the hardware devices to work on the M133W Tablet 7 1 Microphone Setting Adjustment 1 Use the right mouse button to click the so...

Page 65: ...64 3 In Sound menu enter Recording right click on the Default Microphone and select Disable 4 Right click on the Microphone of Realtek High Definition Audio and select Properties...

Page 66: ...65 5 Enter the proprieties and select the Levels category 6 Enter Levels adjust Microphone to 100 and Microphone Boost to 10 dB...

Page 67: ...66 7 2 Display Size Adjustment 1 Open Control Panel and go to Appearance and Personalization 2 Choose Display...

Page 68: ...67 3 Default setting is 100 4 Modify default setting to 125 and click Apply...

Page 69: ...68 5 Warning window will pop up Click on Log off now to log off your computer and apply new settings...

Page 70: ...69 7 3 On screen Keyboard Adjustment For Windows 10 Only 1 First ppen Windows Settings 2 Open Devies...

Page 71: ...70 3 Selet Typing 4 Set Automatically show the touch keyboard in windowed apps when there s no keyboard attached to your device off on...

Page 72: ...71 5 Automatically show the touch keyboard 6 Search regedit...

Page 73: ...72 7 In the Registry Editor use the navigation pane to locate HKEY_LOCAL_MACHINE SOFTWARE Microsoft Windows CurrentVersion Explorer Scaling 8 Right click the newly created value and click Modify...

Page 74: ...73 9 Enter the screen size of your device in diagonal inches eg 13 3 10 Restart your machine Windows will automatically scale your apps and UI based on the specified screen size...

Page 75: ...74 7 4 Graphics Setting 1 On the desktop open the shortcut Intel HD Graphics Control Panel 2 Select Power 3 Enter the Power setting...

Page 76: ...75 4 In the upper left corner click Power and select On Battery...

Page 77: ...76 5 Enter power settings 6 Change Display Refresh Rate Switching from Enable to Disable and then click Apply...

Page 78: ...77 7 A warning window will pop up asking if you want to save the newly modified settings click Yes 8 You have completed changing graphics settings...

Page 79: ...ugged Tablet PC If you cannot find SDK for your model please contact Winmate at sales winmate com tw 8 1 Winmate Download Center Go to www winmate com Support Download Center Rugged Tablet PCs M133 De...

Page 80: ...Winmate Inc 9F No 111 6 Shing De Rd San Chung Dist New Taipei City 24158 Taiwan R O C Tel 886 2 8511 0288 Fax 886 2 8511 0211 Email sales winmate com tw Official website www winmate com...

Reviews: