background image


14 

Chapter 3: First-time Operation 

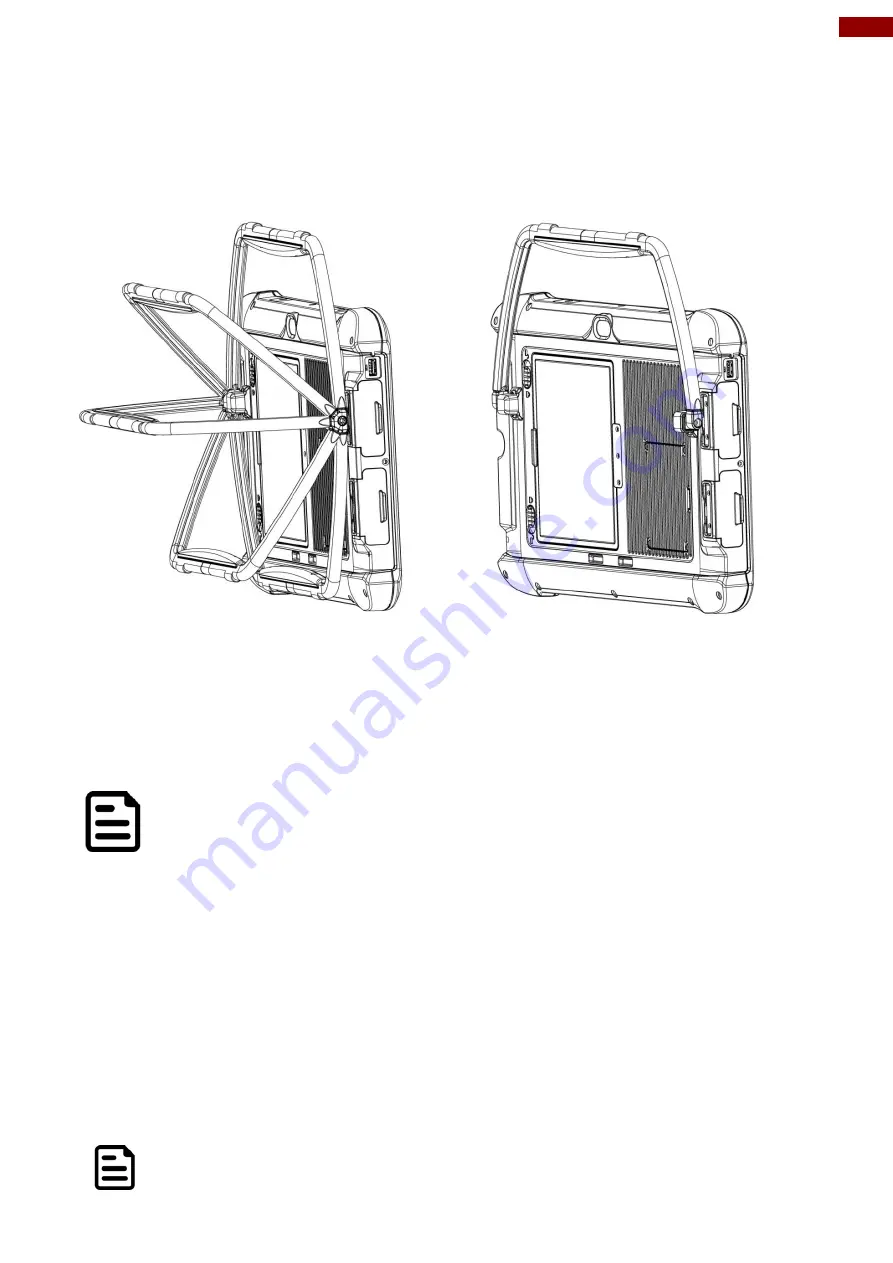
3.4 Adjusting Kickstand Position 

The M133WK Series Ultra-Rugged Tablet has an integrated kickstand. The user can adjust the 
kickstand for variable positioning on any surface. The kickstand can also act as an ergonomic 
handle for easy carrying. To use as a handle simply adjust the kickstand to the topmost 
position. 


Adjusting Kickstand Position 

Handle 

3.5 Turning On and Off 

Turning On 

Press and hold the power button for 

3 seconds 

until the blue LED power indicator light up. 


Note: 

  Do not press the power button repeatedly. 

  Do not perform the following operations until the Disk Activity Indicator 

off 

o

  Connecting or disconnecting the AC adapter 

o

  Pressing the power button 

o

  Touching the tablet buttons, screen, or external keyboard/mouse 

Turning Off 

Perform the following procedure to power off the Tablet Computer: 

1.   Make sure you have closed any programs that are open on the Desktop. Start Screen 

apps don’t need to be closed. 

2. 


Tap on the 

Settings

 charm. 

3. 


Tap on 

Power

4. 


Tap on 

Shut Down

5.  Wait for Tablet Computer to power off. 


Note: 

If system does not respond, please forcibly turn the tablet computer off 

by pressing and holding the power button for 

6 seconds or longer

.


Summary of Contents for M133WK Series

Page 1: ...refully before using this product and save this manual for future use M133WK Series Ultra Rugged Tablet Intel Core i5 8265U 6M Cache up to 3 90 GHz Windows 10 IoT Enterprise LTSC User Guide Document P...

Page 2: ...4 SETTING UP WINDOWS FOR THE FIRST TIME 15 4 1 INTRODUCTION 15 4 2 SETTING UP WINDOWS 10 IOT ENTERPRISE 15 CHAPTER 5 OPERATING THE DEVICE 18 5 1 HOTTAB INTRODUCTION 18 5 2 USING PHYSICAL MEMBRANE KEYS...

Page 3: ...ion Important An important note indicates information that is important for you to know Caution A Caution alert indicates potential damage to hardware and explains how to avoid the potential problem A...

Page 4: ...attery Pack Has Deteriorated Replace It with a New Battery Continued use of a damaged battery pack may result in heat generation ignition or battery rupture FR Lorsque la pile est d t rior e la rempla...

Page 5: ...obsol te Use only accessories specified by the manufacturer FR Utiliser uniquement les accessoires sp cifi s par le fabricant This product should not be used near water such as bathtubs sinks swimmin...

Page 6: ...n alcalin pour essuyer l ext rieur du produit Gently wipe the display with a soft lint free cloth Do not use alcohol or detergent on the product FR Essuyer d licatement l cran avec un chiffon doux non...

Page 7: ...y energy and if not installed and used in accordance with the instruction manual may cause harmful interference to radio communications Operation of this equipment in a residential area is likely to c...

Page 8: ...ws Tablet The documentation set provides information for specific user needs and includes 13 3 Ultra Rugged Tablet M133WK User Manual contains detailed description on how to use the tablet its compone...

Page 9: ...entify the supplied accessories Rugged Tablet Computer Standard Battery M133 Part No 320000000017 Power Adapter Part No 9220065W19V1 Power Cord Varies by the country Stylus Part No 9AN00000000V User M...

Page 10: ...Computer from drops No Item Description 7 Waterproof I O Cover Protects I O ports from water and dust 8 9 USB 3 0 Type A USB 3 0 port connects to USB devices such as USB flash drive mouse keyboard pri...

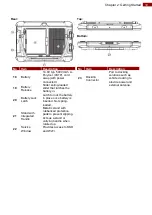
Page 11: ...atch Latch to lock the battery in place once battery is inserted Not spring loaded 21 Stand with Integrated Handle Metallic stand with rubberized protection pads to prevent slipping Acts as a stand or...

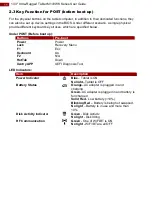
Page 12: ...ttons Pre boot Power Power Lock Recovery Menu F1 Esc Keyboard Up F2 N A HotTab Down Xentry APP UEFI Diagnosis Tool LED Indicators Item Description Power Indicator Blue Tablet is ON No light Tablet is...

Page 13: ...k 1 Disconnect any cords connected to the tablet computer 2 Turn the tablet computer over back facing up 3 Locate the Battery Lock Latch and push it to the Unlocked position 4 Locate the Battery Relea...

Page 14: ...r cord into the AC adapter 4 Finally plug the AC power cord into the electrical outlet When the AC Adapter is connected the battery pack starts charging The battery LED indicator on the tablet compute...

Page 15: ...ht up Note Do not press the power button repeatedly Do not perform the following operations until the Disk Activity Indicator off o Connecting or disconnecting the AC adapter o Pressing the power butt...

Page 16: ...irst time with internal battery power Public network Select this location if you do not recognize all the computers on the network For example you are in a coffee shop or airport or you have mobile br...

Page 17: ...s will then try to connect to network Tap Skip this step to continue without a wireless connection as you can then set up the network later 5 On the Get going fast screen click Use Express settings fo...

Page 18: ...er name password and Password hint in the fields provided then tap Next 7 The initial setup screens are complete and the desktop is displayed 8 Read any introductory screens describing features of you...

Page 19: ...hing the Hottab application HotTab Button on the Front Panel HotTab Utility Icon The main user interface is located on the right side of the screen There are 3 main menu options Shortcuts Settings and...

Page 20: ...m the Windows desktop to prevent unauthorized access to the device Pressing this Key will set the device to the Windows log in screen F1 The F1 Programmable Key settings can be configured in HotTab F2...

Page 21: ...ndows notification area The more bars the icon shows the better the wireless LAN connection strengthis 8 Now wireless LAN connection is setup try connection to the network with a internet browser such...

Page 22: ...ED indicators perform the following procedure 1 Open the HotTab utility by pressing HotTab Button located on the front panel or launch the HotTab application 2 Tap on the Device ON OFF button 3 Check...

Page 23: ...to move away from the optimal resolution setting at 1920 x 1080 This section will explain how you can adjust the built in windows display scaling setting and resolution setting Note The Tablet comput...

Page 24: ...150 Recommended or any other desired display scaling 6 1 2 Changing Screen Resolution Alternatively instead of changing the display scaling setting user may choose to change the overall resolution se...

Page 25: ...y Settings prompt will show up to ask the user if the applied resolution is usable 4 If the new resolution is the desired display setting hit Keep changes and continue to next step If the new resoluti...

Page 26: ...This section provides user device information in regards to BIOS Version EC Versions HotTab Versions OS Versions as well as Unit Serial Number shown in the picture sample Battery Information This sec...

Page 27: ...assurez vous de sauvegarder toutes les donn es utilisateur car toutes les donn es seront perdues apr s le processus de r cup ration To enable quick one key recovery procedure 1 Plug in the AC adapter...

Page 28: ...t till the recovery process to complete During the recovery process a command prompt will show up to indicate the percent of recovery process 6 After recovery is completed please press any key to cont...

Page 29: ...with leading characters to instruct the wireless Bluetooth device to initial Bluetooth Serial Port Profile pairing request 6 4 1 Setup Computer for Bluetooth Pairing To start the pairing process first...

Page 30: ...ices Menu appears click More Bluetooth options under Related settings section as shown below Click OK to continue 4 go to Options tab and make sure that in the Discovery section the computer is set to...

Page 31: ...ireless Bluetooth Barcode Scanner to communicate via the Bluetooth Serial Port Profile Click on the Add button 1 You are in Add COM Port window Choose Incoming device initiates the connection and clic...

Page 32: ...used to accept the scanned data from the wireless Bluetooth Device The application has to be configured to accept the same COM Port that has been assigned for the Bluetooth Serial Port Profile in the...

Page 33: ...n window pop up on the right hand side of the desktop Left click on the mouse to enter Add a device menu 3 Locate the Bluetooth icon in the Notification Area 4 Click Add Bluetooth Device 5 In Add a Bl...

Page 34: ...successfully pared to the Computer follow the steps below Locate the Bluetooth icon in the Notification Area Select Show Bluetooth Devices You can access this menu in the Control Panel Windows Control...

Page 35: ...the screen during start up The prompt screen shows only few seconds so you will need to press the Del key promptly Important Updated BIOS version may be published after the manual released Check the l...

Page 36: ...nnected to the system With cursor and cursor and press ENTER select the device used for the boot The following Keys can be used after entering the BIOS Setup Key Function F1 Help F5 F6 Change Values F...

Page 37: ...on processor RC version system language time and date BIOS Setting Description Setting Option Effect Language Displays the system language English is set up by default Adjustment of the language Set t...

Page 38: ...ugh the BIOS Setup menu To enable or disable either the Intel Dual Band Wireless AC 9260 or DLink DWA 131 wireless modules enter the BIOS Setup menu then switch to the advanced tab To either enable or...

Page 39: ...BIOS Setup Press Enter to open sub menu In the PCI Express Clock Gating menu for PCI Express Root Port settings the user has the option to select different settings to manage the Wi Fi operations Sel...

Page 40: ...ablet M133WK Series User Guide 7 2 2 2 WLAN Intel Card Choose Enabled in WLAN Intel Card menu To either enable or disable the WLAN Intel Card module toggle settings for the WLAN Intel Card in the BIOS...

Page 41: ...40 Chapter 7 BIOS Setup 7 2 2 3 WLAN AzureWave Card To either enable or disable the WLAN AzureWave Card module toggle settings for the WLAN AzureWave Card in the BIOS settings Advanced tab...

Page 42: ...Band Wireless AC 9260 802 11 a b g n ac Intel Dual Band Wireless AC 9260 802 11 a b g n ac WLAN2 802 11a b g n VCI Communication 802 11a b g n VCI Communication Bluetooth Intel Dual Band Wireless AC...

Page 43: ...SD Contact Air 12kV 12kV 12kV 12kV Power Management Power Input 19 V DC 19 V DC Battery 14 8V typ 5900 mAh Li Polymer 4S1P cold swap with power connected 14 8V typ 5900 mAh Li Polymer 4S1P cold swap w...

Page 44: ...No 9220065W19V1 Standard Battery Part No 320000000017 Stylus Part No 9B000000006U Optional Accessories External Camera Part No 9B000000007W HS Code 8473 30 90 00 USB Hub Part No 9B00000000AC HS Code 8...

Page 45: ...wave ovens cordless phones Move the tablet away from objects causing interference I cannot connect to another wireless LAN device Make sure that wireless LAN feature is powered on Make sure that the S...

Page 46: ...ncouraged to try to correct the interference by one or more of the following measures Reorient or relocate the receiving antenna Increase the separation between the equipment and receiver Connect the...

Page 47: ...tions typiques avec la partie arri re de la manoeuvre gard e 0mm du corps afin de maintenir la conformit avec les exigences du FCC relatives l exposition RF L utilisation des accessoires qui maintienn...

Reviews: