background image

6


8.4"/ 10.4" Ultra-Rugged Tablet Quick Start Guide 


1.3


Handling and Maintenance 


Cleaning Guideline 

Guide de nettoyage 

Use a  soft  cloth  moistened  with  water or a non- 
alkaline  detergent  to  wipe  the  exterior  of  the 
product. 

[FR]  Utiliser  un  chiffon  doux  humidifié  avec  de 
l’eau  ou  un  détergeant non alcalin pour essuyer 
l'extérieur du produit. 


General Guideline 

Guide Général 

Keep the product  at  least  13  cm  (5  inches)  away 
from  electrical  appliances  that  can  generate  a 
strong  magnetic  field  such  as  TV,  refrigerator, 
motor, or a large audio speaker. 

[FR] Garder le produit au moins à 13 cm (5 pouces) 
de distance des appareils électriques qui peuvent 
générer  un  fort  champ  magnétique  comme  une 
télévision,  un  réfrigérateur,  un    moteur,  ou  un 
important haut-parleur. 

Do  not  place  heavy  objects  on  top  of  the  tablet 
computer as this may damage the display. 

[FR] Ne pas placer d'objets lourds sur le dessus de 
l'ordinateur tablette cela peut endommager l'écran. 

The  screen surface  can be  easily  scratched.  Use 
with  care.  Do  not  use  paper  towels  to  clean  the 
display but use the included cleaning cloth. Avoid 
touching it with a pen or pencil. 

[FR]  La  surface  de  l'écran  peut  être  facilement 
rayée. Utiliser avec précaution. Ne pas utiliser de 
serviette  en  papier  pour  nettoyer  l'écran  mais 
utiliser  le  chiffon  de  nettoyage  inclus.  Éviter  de 
toucher avec un stylo ou un crayon. 

To maximize the life of the backlight in the display, 
allow backlight to automatically turn off as a result 
of power management. Avoid using a screen saver 
or  other  software  that  prevents  the  power 
management from working. 

[FR]  Pour  maximiser  la  durée  de  vie  du 
rétroéclairage de l'écran, autoriser le rétroéclairage 
résultant  de  la  gestion  de  l'alimentation.  Éviter 
d'utiliser  un  économiseur  d'écran  ou  un  autre 
logiciel empêchant  la  gestion de  l'alimentation  de 
fonctionner. 


Gently wipe the display with a soft, lint-free cloth. 
Do not use alcohol or detergent on the product. 

[FR] Essuyer délicatement l'écran avec un 

chiffon doux non pelucheux. Ne pas utiliser 
d'alcool ou un détergent sur le produit.


Touchscreen Guideline 

Guide de l'écran tactile 

Use your finger or the stylus on the display. Using 
sharp or metallic object may cause scratches and 
damage the display, thereby causing errors. 

[FR]Utiliser  votre  doigt  ou  le  stylet  sur  l'écran. 
L'utilisation  d'un  objet  pointu  ou  métallique  peut 
provoquer des rayures. 

Use a soft cloth to remove dirt on the display. The 
touchscreen  surface  has  a  special  protective 
coating that  prevents dirt from  sticking  to  it.  Not 
using  a  soft  cloth  may  cause  damage  to  the 
special  protective  coating  on  the  touchscreen 
surface.  To  clean  off  hard  to  remove  dirt,  blow 
some  steam  on  the  particular  area  and  gently 
wipe away using a soft cloth. 

[FR]Utiliser  un  chiffon  doux  pour  enlever  la 
poussière sur l'écran. La surface de l'écran tactile 
a un revêtement protecteur spécial empêchant la 
saleté de se coller à lui. Ne pas utiliser un chiffon 
doux peut endommager le revêtement spécial sur 
la  surface  de  l'écran  tactile.  Pour  nettoyer  les 
saletés plus difficiles à enlever, souffler de la buée 
sur  la  zone  particulière  et  essuyer  doucement 
avec un chiffon doux. 

Do not use excessive force on the display. Avoid 
placing objects on top of the display as this may 
cause the glass to break. 

[FR]Ne  pas  utiliser  une  force  excessive  sur 
l'écran. Éviter de placer des objets au dessus de 
l’écran  cela  pourrait  provoquer  une  cassure  du 
verre. 

When there is a noticeable discrepancy in the 
operation of the touchscreen function (your touch 
does not correlate to the proper location on the 
screen), recalibrate the touchscreen display. 

[FR]Lorsqu'il y a un écart sensible dans le 
fonctionnement de l'écran tactile (votre contact 
ne correspond pas à la bonne position sur 
l'écran), recalibrer l'écran tactile. 


Summary of Contents for Porty G4

Page 1: ...a Rugged Tablet R08IWK8M RTU1GP Intel Core i5 8265U 1 6 GHz turbo up to 3 9 GHz Quick Start Guide Document Version 1 0 Please read this instructions before operating the device and retain them for fut...

Page 2: ...TION OF PARTS 10 2 6 HOTKEY FOR SPECIFIC FUNCTIONS 14 2 7 LED INDICATORS 14 2 8 FIRST TIME OPERATION 15 2 9 INSTALLING BATTERY PACK 15 2 10 INSTALLING MICROSD CARD 15 2 11 INSTALLING MICRO SIM CARD 16...

Page 3: ...ion Important An important note indicates information that is important for you to know Caution A Caution alert indicates potential damage to hardware and explains how to avoid the potential problem A...

Page 4: ...ery Pack Has Deteriorated Replace It with a New Battery Continued use of a damaged battery pack may result in heat generation ignition or battery rupture FR Lorsque la pile est d t rior e la remplacer...

Page 5: ...obsol te 9 Use only accessories specified by the manufacturer FR Utiliser uniquement les accessoires sp cifi s par le fabricant 10 This product should not be used near water such as bathtubs sinks sw...

Page 6: ...la gestion de l alimentation de fonctionner Gently wipe the display with a soft lint free cloth Do not use alcohol or detergent on the product FR Essuyer d licatement l cran avec un chiffon doux non...

Page 7: ...uency energy and if not installed and used in accordance with the instruction manual may cause harmful interference to radio communications Operation of this equipment in a residential area is likely...

Page 8: ...erated with ease by either a plastic stylus or a fingertip The Ultra Rigged Tablet Computer packs WLAN BT GPS and WWAN function all into a single device The Ultra Rugged Tablet offers highly reliable...

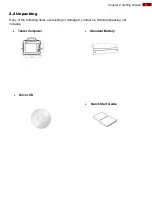
Page 9: ...Chapter 2 Getting Started 9 2 4 Unpacking If any of the following items are missing or damaged contact us Standard packing list includes Tablet Computer Standard Battery Driver CD Quick Start Guide...

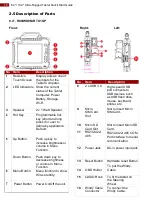
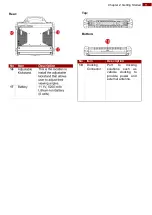
Page 10: ...ness or volume in Menu Function Menu function to show Win set utility Power Button Power On Off the unit 2 5 Description of Parts 8 4 R08IWK8M RTU1GP Front Right Left No Item Description 8 2 x USB 3 0...

Page 11: ...Chapter 2 Getting Started 11 Rear No 18 Item Docking Connector Description Port to docking solutions such as vehicle docking to provide power and external antenna Bottom Top...

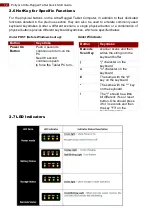
Page 12: ...boot up Under Windows 2 7 LED Indicators Button Keystroke Power On Button Push 4 seconds continuous to turn on the PC Need 8 second continuous push to force the Tablet PC turn off immediately N e e d...

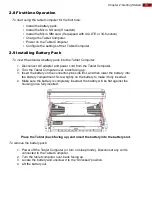
Page 13: ...let Computer 2 Turn the Tablet Computer over back facing up 3 Insert the battery on the connector pins side first and then lower the battery into the battery compartment Screw tightly on the battery t...

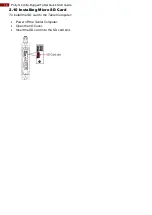
Page 14: ...G4 Ultra Rugged Tablet Quick Start Guide 2 10 Installing Micro SD Card To install the SD card to the Tablet Computer Power off the Tablet Computer Open the I O Cover Insert the SD card in to the SD c...

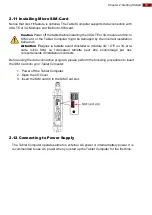
Page 15: ...te avant d installer le module 4G LTE ou 3G et la carte micro SIM ou l ordinateur tablette peut tre endommag par des comportements d installation incorrects Before using the data connection program pl...

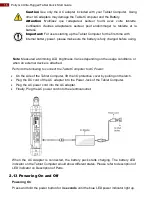
Page 16: ...ies depending on the usage conditions or when an external device is attached Perform the following to connect the Tablet Computer to AC Power On the side of the Tablet Computer lift the I O protective...

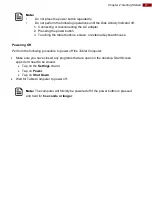
Page 17: ...tablet buttons screen or external keyboard mouse Powering Off Perform the following procedure to power off the Tablet Computer Make sure you have closed any programs that are open on the desktop Start...

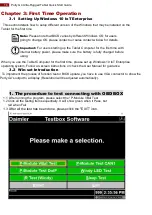
Page 18: ...sure the battery is fully charged before using When you use the Tablet Computer for the first time please set up Windows 10 IoT Enterprise operating system Follow on screen instructions or check the U...

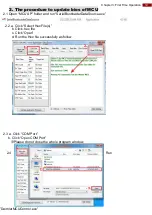
Page 19: ...MCU AP folder and run SerialBootloaderDataSource exe 2 2 a Click Select Hex File s b Click hex file c Click Open d Run the Hex file successfully as follow 2 3 a Click COM Port b Click Open COM Port Pl...

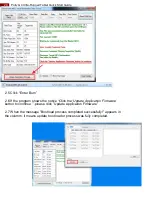
Page 20: ...6 If the program shows the notice Click the Update Application Firmware button to continue please click Update Application Firmware 2 7 When the message Bootload process completed successfully appear...

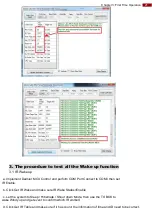
Page 21: ...rform COM Port Connect to COM3 then set IR Enable b Click Get IR Wake and make sure IR Wake Status Enable c Let the system to Sleep Hibernate Shout down Mode then use the TX BOX to wake Windy up and g...

Page 22: ...e to wake up the Porty G3 S Click get Event to confirm whether wake up by OBD In d Click OBD In Setting make sure whether the count and time information are correct 3 3 OBD Out Wake up a Implement Dai...

Page 23: ...erform COM Port connect to COM3 then set Button out enable b Click Get Button settings and make sure Button Wake Status Enable c Allow the system to enter the Sleep Hibernate Shut down Mode and press...

Page 24: ...up a Implement Daimler MCU Control and perform COM Port connect to COM1 then set DC In enable b Click Get Docking In Wake and make sure Docking in Wake Status Enable c Allow the system to enter the Sl...

Page 25: ...r Wake and make sure G Sensor Status Enable c Click on the G Sensor lnt to adjust the sensitivity of G Sensor 10 to 0 d Allow the system to enter the Sleep Hibernate Shut down Mode and motion the Wind...

Page 26: ...ase brightness The screen suddenly turns blank and the power indicator goes off Make sure that LED indicator is not powered off in Win set Make sure the AC adapter is properly connected If running on...

Page 27: ...Computer check Win set to see if BT is powered on Make sure that the distance between the two devices is within 10 meters and there are no walls or large obstructions between the devices Make sure bo...

Page 28: ...t 1 x Power Jack Memory Card Slot 1 x Micro SD Card Slot SIM Card Slot 1 x Micro SIM Card Slot Audio Connector 1 x Audio Combo Connector Mic in or Line out Audio Speaker 2 x 1 Watt Speaker Wireless Co...

Page 29: ...Operating Time 8 hours AC Adapter 100 240V 50 60Hz 19V DC Security Function Security Trusted platform module TPM V2 0 Standards and Certification EMC FCC Safety CE Accessories Standard Accessories Sta...

Page 30: ...Winmate Inc 9F No 111 6 Shing De Rd San Chung District New Taipei City 24158 Taiwan R O C www winmate com Copyright 2018 Winmate Inc All rights reserved...

Page 31: ...y energy and if not installed and used in accordance with the instructions may cause harmful interference to radio communications However there is no guarantee that interference will not occur in a pa...

Reviews: