background image


Chapter 5 

Frequently Used Settings 

35 


Changing Display Scaling Setting (Recommended) 

Perform the following to change display scaling setting: 

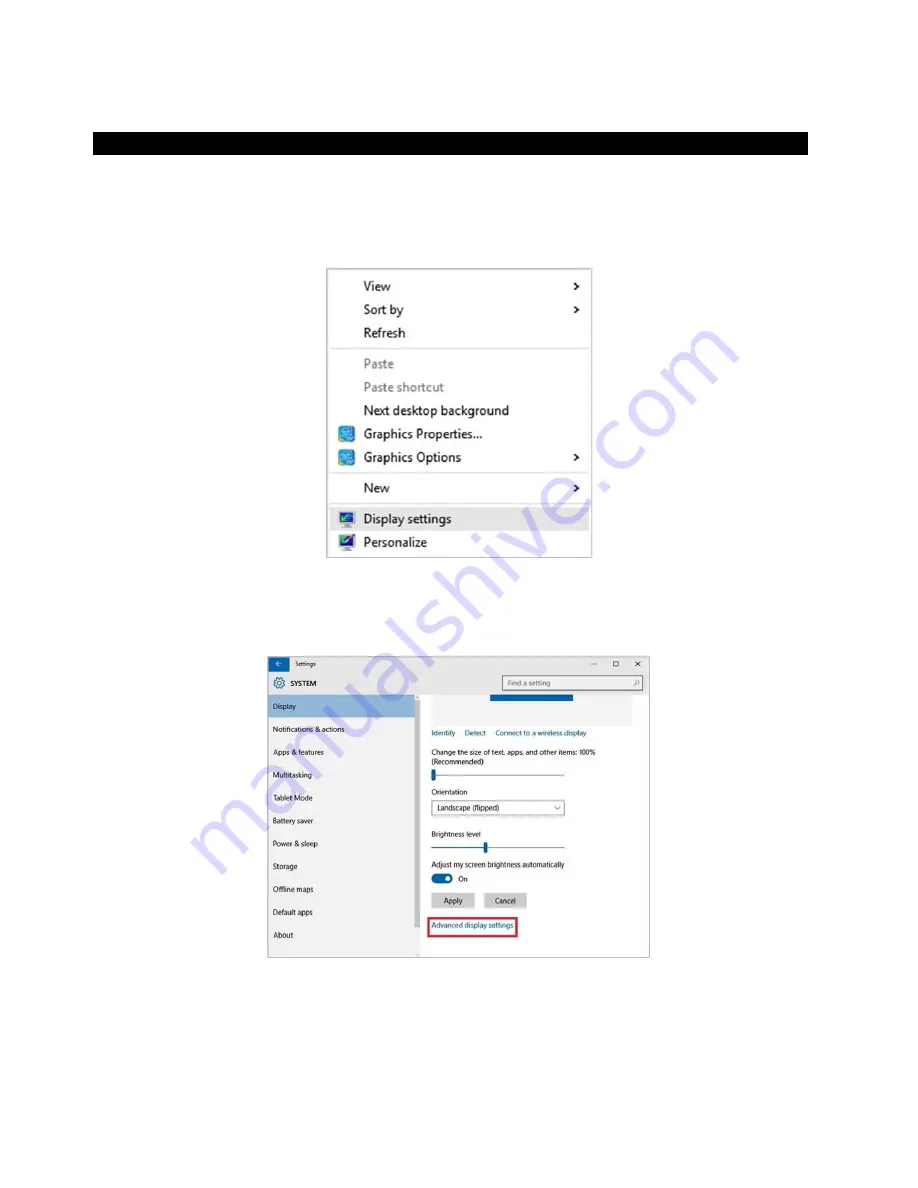
1.  Tap and hold anywhere on the desktop and right-click your mouse and go to

” 

Display 

Settings

 option as shown below: 


2.  The following panel will open. Here you can adjust the size of text, apps, and other items 

and also change the orientation. To change the resolution settings, scroll down this 
window and click on Advanced Display Settings 


3.  1024 x 768 is the recommended screen resolution for R10IH8M-RTT2GP. 


Summary of Contents for R10IH8M-RTT2GP

Page 1: ...tions carefully before using this product and save this manual for future use Ultra Rugged Tablet Computer Intel Core i5 5200U Broadwell 2 2 GHz up to 2 7 GHz R10IH8M RTT2GP 10 4 Ultra Rugged Tablet P...

Page 2: ...pecified use without further testing or modification Warranty Our warranty guarantees that each of its products will be free from material and workmanship defects for a period of one year from the inv...

Page 3: ...ntions Four types of advisories are used throughout the user manual to provide helpful information or to alert you to the potential for hardware damage or personal injury These are Notes Important Cau...

Page 4: ...ice must accept any interference received including interference that may cause undesired operation This equipment has been tested and found to comply with the limits for a class B digital device purs...

Page 5: ...ETTING UP WINDOWS EMBEDDED 8 1 INDUSTRY PRO 16 SETTING UP WINDOWS 10 IOT ENTERPRISE 21 CHAPTER 4 QUICK ACCESS WITH HOTTAB 23 HOTTAB INTRODUCTION 23 SHORTCUTS 24 CAMERA 25 Using Camera Features 25 DEVI...

Page 6: ...v BASIC TROUBLESHOOTING 38 APPENDIX A SPECIFICATIONS 40 APPENDIX B DIMENSIONS AND SCHEMATICS 42 APPENDIX E SOFTWARE DEVELOPMENT KIT SDK 43...

Page 7: ......
Page 8: ...components and features Chapter Descriptions Chapter 1 Read Me First provides important safety information for you to know prior using R10IH8M RTT2GP Chapter 2 Getting Started provides basic instruct...

Page 9: ...ation of heat ignition or rupture may result When carrying or storing the device do not place the battery pack together with articles that may contact electricity Ne pas court circuiter les bornes Pos...

Page 10: ...eu ou de casser Do Not Use This Product With Battery Other Than the One Specified Ne pas utiliser ce produit avec une batterie autre que celle sp cifi e General Product Safety S curit g n rale des pro...

Page 11: ...oires sp cifi s par le fabricant Use only with its transport carriage stand tripod console or table specified by the manufacturer or sold with the product When using a carriage move the carriage assem...

Page 12: ...d touching it with a pen or pencil La surface de l cran peut tre facilement ray e Utiliser avec pr caution Ne pas utiliser de serviette en papier pour nettoyer l cran mais utiliser le chiffon de netto...

Page 13: ...n La surface de l cran tactile a un rev tement protecteur sp cial emp chant la salet de se coller lui Ne pas utiliser un chiffon doux peut endommager le rev tement sp cial sur la surface de l cran tac...

Page 14: ...M RTT2GP comes with a 10 4 high quality XGA 1024 x 768 screen this 4 wire resistive touch screen may be operated with ease by either a plastic stylus of fingertip The R10IH8M RTT2GP packs WLAN Bluetoo...

Page 15: ...npacking If any of the following items are missing or damaged contact us Standard packing list includes Tablet Computer Standard Battery Power Adapter Power Cord and Plugs Driver CD User Manual Stylus...

Page 16: ...lication Default F1 short press will turn on HotTab AP utility 6 Optional Front Camera 5MP Autofocus Camera Captures photos and videos 7 LED indicator Show the current status of the Tablet Computer No...

Page 17: ...ormance 17 Adjustable Kickstand This adjustable kickstand allows user to adjust their viewing angle 18 Battery 11 1V 5200 mAh Lithium Ion Battery 6cells No Item Description 19 Docking Connector Port t...

Page 18: ...ied below Under POST before windows boot up Buttons Keystroke F1 Recovery Menu Under Windows Buttons Keystroke Menu Menu function to show brightness volume battery status and WiFi Bluetooth on off F1...

Page 19: ...back facing up 3 Insert the battery on the connector pins side first and then lower the battery into the battery compartment Screw tightly on the battery to make it fully inserted 4 Make sure the bat...

Page 20: ...wappable battery perform this following steps 1 Plug the hot swappable battery while the main battery in low power mode 2 Align the docking connecter of the tablet with the battery 3 Use the thumb scr...

Page 21: ...charged before using Perform the following to connect the Tablet computer to AC Power 1 On the side of the Tablet computer lift the I O protective cover by pulling on the latch 2 Plug the DC cord of t...

Page 22: ...n or external keyboard mouse Powering Off Perform the following procedure to power off the Tablet Computer 1 Make sure you have closed any programs that are open on the Desktop Start Screen apps don t...

Page 23: ...on of the Windows that may be installed on the tablet for the first time NOTE Please notice that BIOS varies by different Windows OS for users going to change OS please contact our sales contact windo...

Page 24: ...First Time Operation 17 3 On the Personalize screen choose a color you like you can always change this later from the Start screen 4 In the PC name field type a name for your computer and then click o...

Page 25: ...5 On the Settings page screen choose Use express settings for the fastest setup 6 Windows will then try to connect to network Ignore attempt to connect to internet as you do not need internet connect...

Page 26: ...Chapter 3 First Time Operation 19 7 On Your account screen type your username and password to create a local account and then click or tap Finish 8 Windows may take some time to finalize your settings...

Page 27: ...10IH8M RTT2GP User Guide 20 9 On the Windows Sign in screen enter the user name and password that you set up earlier and then press Enter 10 Once Windows finishes login you are now ready to use the PC...

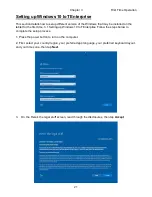
Page 28: ...for the first time 3 1 Setting up Windows 10 IoT Enterprise Follow the steps below to complete the setup process 1 Press the power button to turn on the computer 2 First select your country region yo...

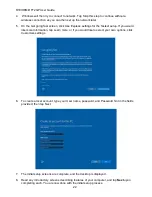
Page 29: ...If you would like more information tap Learn more or if you would like to select your own options click Customize settings 6 To create a local account type your User name password and Password hint i...

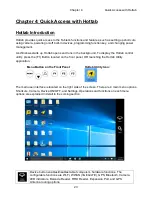
Page 30: ...he F1 Button located on the front panel OR launching the Hottab Utility application Menu Button on the Front Panel Hottab Utility Icon The main user interface is located on the right side of the scree...

Page 31: ...stalled on the tablet Short Cut Menu To store a new shortcut 1 Launch the Hottab Utility application 2 Tap on the Shortcuts button 3 Tap on button of any empty slot 4 An on screen file browser will ap...

Page 32: ...ch the Hottab Utility application 2 Tap on Device ON OFF button to check the built in devices status 3 Check the status color of the Camera icon Item Status Color Description Orange Camera is enabled...

Page 33: ...taking pictures LED Flash fires automatically in low light condition when taking pictures 4 Resolution Pictures will be saved at resolution of 640 x 480 Pictures will be saved at resolution of 1024 x...

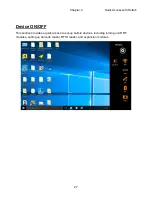
Page 34: ...r 4 Quick Access with Hottab 27 Device ON OFF This section provides a quick access to set up built in devices including turning on off RF modules setting up barcode reader RFID reader and expansion mo...

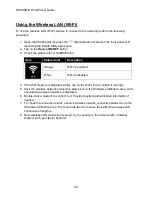
Page 35: ...d 4 If the Wi Fi feature is disabled white tap on the Wi Fi icon to enable it orange 5 Click the wireless network connection status icon in the Windows notification area A list of available wireless n...

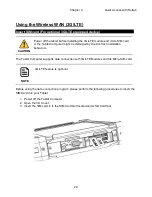
Page 36: ...might be damaged by the incorrect installation behaviors The Tablet Computer supports data connection with 3G LTE Modules and fits Micro SIM card NOTE 3G LTE feature is optional Before using the data...

Page 37: ...eless network connection status icon in the Windows notification area The more bars encompassed the better the signal is NOTE For the Windows 7 operating system you also can check the Access Connectio...

Page 38: ...on Item Status Color Description Orange Bluetooth is enabled White Bluetooth is disabled 4 If the Bluetooth feature is disabled white tap on the Bluetooth icon to enable it orange 5 Click the Bluetoot...

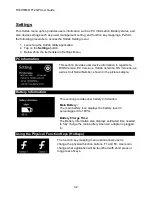
Page 39: ...on in regards to BIOS Version EC Versions Hottab Versions OS Versions as well as Unit Serial Number shown in the picture sample Battery Information This section provides user battery Information Main...

Page 40: ...ong Press icon at the bottom of the utility window 6 Pick from list of preset applications by tapping on the application icons OR customize which application to execute using the picker Using the Cust...

Page 41: ...ktop for optimal viewing Display scaling is the recommended method because it has the effect of adjusting user interface element without having to move away from the optimal resolution setting at 1024...

Page 42: ...esktop and right click your mouse and go to Display Settings option as shown below 2 The following panel will open Here you can adjust the size of text apps and other items and also change the orienta...

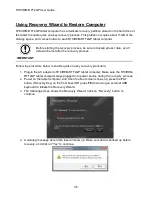
Page 43: ...y process Follow the procedure below to enable quick one key recovery procedure 1 Plug in the AC adapter to R10IH8M RTT2GP tablet computer Make sure the R10IH8M RTT2GP tablet computer stays plugged in...

Page 44: ...gs 37 5 Wait till the recovery process to complete During the recovery process a command prompt will show up to indicate the percent of recovery process After recovery is completed and the tablet comp...

Page 45: ...y is poor The tablet computer may be out of range Move the tablet computer closer to the access point or another wireless LAN device associated with it Check if your surroundings have interferences su...

Page 46: ...make sure that the cable is properly connected I cannot project the tablet computer display to another monitor Make sure the VGA driver is installed Make sure the output setting selected is correct Ba...

Page 47: ...2 11 a b g n Bluetooth 4 0 Dual Mode Class 1 Low Energy Combo module GPS u Blox NEO 6Q System I O Buttons Indicators Sensors Security Audio Built in 1W speaker External I O 2 x USB 3 0 1 x Audio Combo...

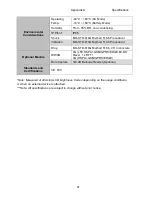
Page 48: ...Method 514 6 Procedure I Drop MIL STD 810G Method 516 6 4 ft to concrete Optional Module WWAN 4G LTE HSPA GSM GPRS EDGE EV DO Rev A 1 x RTT 3G HSPA GSM GPRS EDGE Data Capture 1D 2D Barcode Reader Opt...

Page 49: ...Appendix B Software Development Kit 42 Appendix B Dimensions and Schematics Default Configuration...

Page 50: ...oad SDK from Winmate Download Center or Winmate Partner Portal 1 Winmate Download Center http www winmate com tw Support Download Center Ultra Rugged Tablet IH83 2 Winmate File Share http www winmate...

Page 51: ...Winmate Inc 9F No 111 6 Shing De Rd San Chung District New Taipei City 24158 Taiwan R O C Tel 886 2 8511 0288 Fax 886 2 8511 0211 Email sales winmate com tw Official website www winmate com...

Reviews: