background image


- 5 - 

Advisory Conventions 

Four types of advisories are used throughout the user manual to provide helpful 
information or to alert you to the potential for hardware damage or personal injury. 
These are Notes, Important, Cautions, and Warnings. The following is an 
example of each type of advisory. 


NOTE: 

A note is used to emphasize helpful information 


IMPORTANT: 

An important note indicates information that is important for you to 
know. 


CAUTION/ ATTENTION 

A Caution alert indicates potential damage to hardware and explains 
how to avoid the potential problem. 

Unealerted

’ attention indique un dommage possible à l’équipement 

et explique comment éviter le problem potentiel. 


WARNING!/AVERTISSEMENT! 

An Electrical Shock Warning indicates the potential harm from 
electrical hazards and how to avoid the potential problem. 

Un Avertissement de Choc Électriqueindique le potentiel de 
chocssur des emplacements électriques et comment éviterces 
problèmes. 


Summary of Contents for R15FA3S-PTC3

Page 1: ...fully before using this product and save this manual for future use 15 Multi Touch Chassis HMI Freescale Cortex A9 i MX6 Dual Core 1GHz Optional Quad Core R15FA3S PTC3 Quick Start Guide V1 0 Document Part Number 91521110101W Android 6 0 ...

Page 2: ... 2 5 USB OTG Connector 12 2 2 6 Micro SD Card Slot 12 2 3 Speaker 13 3 Getting Started 14 3 1 Home Screen 14 3 2 Quick Settings 16 3 3 Configuring Serial Port Settings 18 3 4 Brightness Adjustment 20 3 5 Ethernet 21 3 5 1 Configuring Ethernet Settings 22 3 5 2 Configuring Ethernet 23 3 6 Winmate Home Manager WHM 24 3 6 1 How to Lock Applications 24 3 6 2 How to Unlock Applications 27 3 6 3 How to ...

Page 3: ...stalled and used in accordance with the instruction manual may cause harmful interference to radio communications Operation of this equipment in a residential area is likely to cause harmful interference in which case the user will be required to correct the interference at him own expense European Union Electromagnetic Compatibility Directive 2014 30 EU EN55024 2010 A1 2015 o IEC61000 4 2 2009 o ...

Page 4: ... If the customer discovers a defect we will at his her option repair or replace the defective product at no charge to the customer provide it is returned during the warranty period of one year with transportation charges prepaid The returned product must be properly packaged in its original packaging to obtain warranty service If the serial number and the product shipping data differ by over 30 da...

Page 5: ...t note indicates information that is important for you to know CAUTION ATTENTION A Caution alert indicates potential damage to hardware and explains how to avoid the potential problem Unealerted attention indique un dommage possible à l équipement et explique comment éviter le problem potentiel WARNING AVERTISSEMENT An Electrical Shock Warning indicates the potential harm from electrical hazards a...

Page 6: ...é devrait ouvrir ces chassis CAUTION ATTENTION Always ground yourself to remove any static charge before touching the CPU card Modern electronic devices are very sensitive to static electric charges As a safety precaution use a grounding wrist strap at all times Place all electronic components in a static dissipative surface or static shielded bag when they are not in the chassis Toujours verifier...

Page 7: ...entify the supplied accessories HMI Quick Start Guide Hardcopy Driver CD Varies by product specifications 91521110101W FA30 210 9171111I103L AC Adapter 12V 50W Power Cord Terminal Block 2 pin to DC jack 922D050W12VA Varies by country 94J602G020K0 ...

Page 8: ... 276 70 x 45 Connectors Description Description 12V DC in 2 Pin Phoenix type RJ 45 LAN Optional PoE IEEE 802 3at 25W USB 2 0 Console Port Mini USB for Linux Debug CANBus DB9 Micro SD Console Port Mini USB RS 232 422 485 DB9 Power and Reset Button USB OTG 1 Watt Speaker ...

Page 9: ... to turn on your device 1 Connect one side of 2 pin terminal block to DC jack connector to the HMI Connect the other side to the AC adapter 2 Connect the power cord to AC adapter 3 Plug the power cord to the AC outlet 4 Press Power button on the rear OSD panel ...

Page 10: ...nnector The HMI has one serial port connector to connect your device to external devices such as mouse modem or printer You can configure serial port settings by software Voltage Minimum Voltage 11 4V Maximum Voltage 12 6V Maximum Current 4 2A Pin RS 232 Default RS 422 RS 485 1 DCD TxD D 2 RXD TxD D 3 TXD RxD NC 4 DTR RxD NC 5 GND GND GND 6 DSR NC NC 7 RTS NC NC 8 CTS NC NC 9 RI NC NC ...

Page 11: ...ternet IMPORTANT Power Device PD follows IEEE 802 3at 25 Watt 2 2 4 USB 2 0 Connector Use USB A Type USB 2 0 connector to connect your device to other USB 2 0 compatible devices Pin Signal Name Pin Signal Name 1 TX1 2 TX1 3 TX2 4 TX2 5 TX3 6 TX3 7 TX4 8 TX4 Pin Signal Name Pin Signal Name 1 5V 2 USB_D 3 USB_D 4 GND ...

Page 12: ...nstall software on the HMI device Refer to the User Manual for more details on how to install software 2 2 6 Micro SD Card Slot Insert microSD card to microSD card slot to extend the memory of your HMI device Pin Signal Name Pin Signal Name 1 5V 2 USB_OTG_D 3 USB_OT G_D 4 USB_OTG_ID 5 GND Pin Signal Name Pin Signal Name 1 DATA2 2 DATA3 3 CMD 4 3 3V 5 CLK 6 GND 7 DATA0 8 DATA1 9 Card_Det ...

Page 13: ...r is located on the rear side of the display Electrical Specifications Rated impedance 6 15 ohms 2KHz 1 Vrms input Power Rating 0 67 W Short Term Max Power 1 3W Acoustical Specifications Sound Pressure Level 75 3dB 40cm 1kHz ...

Page 14: ... 14 3 Getting Started The R15FA3S PTC3 runs on Android 6 0 OS Default 3 1 Home Screen Your device runs on Android 6 0 Operation System Default Navigation Buttons ...

Page 15: ...app icons to any of your Home screens The apps you ve used most recently appear in the first row Some apps hide these buttons temporarily or fade them to small dots in the same position To bring them back touch the dots touch the screen in the middle or swipe up from the bottom Many screens in apps and Settings include a menu icon at the top right of the screen Touch it to explore additional optio...

Page 16: ...ently used settings like turning on Wi Fi To open Quick Settings swipe down from the top of the screen with two fingers To change a setting just touch the icon Display brightness Slide to lower or increase the brightness of your screen Wi Fi network Turn Wi Fi on or off or open the Wi Fi settings menu Bluetooth settings Turn Bluetooth on or off or open the Bluetooth settings menu Auto rotate Lock ...

Page 17: ... 17 Open the main Settings menu by touching Settings at the top right ...

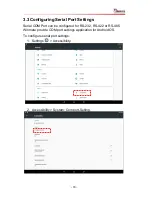
Page 18: ...t Settings Serial COM Port can be configured for RS 232 RS 422 or RS 485 Winmate provide COM port settings application for Android OS To configure serial port settings 1 Settings Accessibility 2 Accessibility System Comport Setting ...

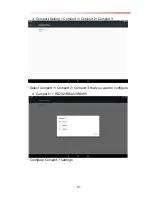
Page 19: ... 19 3 Comport Setting Comport 1 Comport 2 Comport 3 Select Comport 1 Comport 2 Comport 3 that you want to configure 4 Comport 1 RS232 RS422 RS485 Configure Comport 1 settings ...

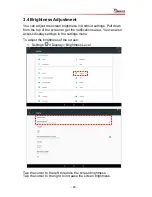
Page 20: ...he top of the screen to get the notifications area You can also access display settings in the settings menu To adjust the brightness of the screen 1 Settings Display Brightness Level Tap the cursor to the left to reduce the screen brightness Tap the cursor to the right to increase the screen brightness ...

Page 21: ... 21 3 5 Ethernet 1 Connect Ethernet Cable to the HMI 2 Touch All APPS icon and the open Ethernet application 3 Ethernet APP main menu appears ...

Page 22: ...figure Ethernet Ethernet OFF is set by default Swipe Ethernet ON to activate Ethernet connection Connection Type Setting Description DHCP The device automatically capture IP address from the router Static IP Allows to manually set up IP address DNS Network and Gateway ...

Page 23: ... 23 3 5 2 Configuring Ethernet To check Ethernet settings Go to All Apps Ethernet Check Ethernet Ethernet settings menu appears on the top right side of the desktop ...

Page 24: ...lled APP named Winmate Home Manager WHM which let the device manager to lock the launcher then the user can only use one application assigned by the device manager 3 6 1 How to Lock Applications To lock applications 1 In the main APPS window select the Home Manager APP and tap it to open ...

Page 25: ... want to run up automatically after booting Password Manager Set the WHM password Default password is 0000 About Displays information about Home Manager 2 Go to Application Selector and choose the app which you want to run up automatically after booting ...

Page 26: ...t Restrict Home and Always and then restart the computer to enable these settings The system will automatically start the application which you selected and lock it Any time user presses home key or back key the system will go back to the same application which you have selected ...

Page 27: ... Applications Follow the instruction below to reset Home Manager 1 If you want to reset the home manager pull down the left side to open the status bar and open HomeManager 2 System will request the password to login Touch OK ...

Page 28: ...ou will go back to the normal Launcher 3 6 3 How to Change Password To change the password 1 Go to Password Manager and set your own password for this APP 2 The default password is 0000 Enter a new password in New Password field and then tap Change Password ...

Page 29: ...ort 1 x RS 232 422 485 DB9 1 x CANBus DB9 USB 1 x USB 2 0 1 x USB OTG Ethernet 1 x RJ 45 10 100 1000 Mbps LAN Optional PoE IEEE 802 3at 25W Console 1 x Mini USB SD Card 1 x Micro SD Card Reader Power Connector 1 x Terminal block 2 pin Speaker 2 x 1W Speakers Power Specifications Power Input 12V DC Terminal Block Phoenix Type Power Consumption 13W typical normal operation Mechanical Specification M...

Page 30: ..._______________________________________________ _______________________________________________________ _______________________________________________________ _______________________________________________________ _______________________________________________________ _______________________________________________________ _______________________________________________________ ________________...

Page 31: ..._______________________________________________ _______________________________________________________ _______________________________________________________ _______________________________________________________ _______________________________________________________ _______________________________________________________ _______________________________________________________ ________________...

Page 32: ...Winmate Inc 9F No 111 6 Shing De Rd San Chung District New Taipei City 24158 Taiwan R O C Tel 886 2 8511 0288 Fax 886 2 8511 0211 Email sales winmate com tw Official website www winmate com ...

Reviews: