background image


21 


UID0 Menu 

The system will read the data once the card will be near. You can select different 
reader modes. Each mode is described below. 

Item 
№ 

Key button 

Function 

A0- Continuous 
Read (default) 

The RFID Reader will perform a series of multiple 
scanning operations 

A1- Once Read  The RFID Reader will perform a single scanning 

operation during the card is near 

A9- Type Read  The RFID Reader will perform  a scanning operation of 

IC type tag 

To scan the card, bring it close to the right bottom front side of device with RFID 
icon. 


Item 

№  Data 32 

Function 

XXXXXXXXXXXABCDEF  Display the information written in the card  

Writing Mode 

Refer to the 

RFID Porting Guide SDK

 to configure Writing Mode parameters. 


Summary of Contents for W07IB3S-PCM1

Page 1: ...Please read these instructions carefully before using this product and save this manual for future use 7 S Series HMI W07IB3S PCM1AC W07IB3S PCM1 Quick Start Guide V1 1 Document Part Number 9152070I1002 ...

Page 2: ... that are described in this manual are for illustration purposes only We make no representation or guarantee that such application will be suitable for the specified use without further testing or modification Warranty Winmate Inc warranty guarantees that each of its products will be free from material and workmanship defects for a period of one year from the invoice date If the customer discovers...

Page 3: ...DC Input Connector 9 Serial Port Connector 9 LAN RJ45 Connector 9 USB A Type Connector 10 HDMI Connector 10 Turning ON or OFF 11 Turning ON 11 Turning OFF 12 Operating the HMI Device 13 Hot Tab Menu 13 Utilities 13 Brightness 14 Volume 14 Testing LED Light Bar 15 Performance 15 Touch Lock 15 Using Front Camera 16 Camera Interface 16 Shooting Photos 17 Recording Videos 17 Camera Settings 18 Using H...

Page 4: ...Software Developer Support 22 Winmate Software Development Kit 22 Winmate Download Center 22 Winmate File Share 22 Technical Specifications 23 HMI Device Specifications 23 HF RFID Reader Specifications 25 ...

Page 5: ...Celeron N2930 1 83GHz processor and support Windows 10 IoT Windows Embedded 8 1 Industry Pro Windows Embedded 8 Standard and Windows Embedded Standard 7 WS7P operating systems The HMI device features P Cap touch screen In addition the HMI device model supports an exceptional feature LED Light Bar With the help of red green blue and orange LED indicators you can see the status of the machine or pro...

Page 6: ...items listed below are inside your package If any of these items are missing or damaged contact us immediately Accessories Standard factory shipment list 7 HMI Device Quick Start Guide Hardcopy Driver CD User Manual AC Adapter 12V 50W Power Cable VESA Plate 75 x 75 mm VESA Mount Screws ...

Page 7: ...this guide for future use Description Of Parts No Description No Description 12V DC in jack 2 x RJ 45 Gbe LAN RS 232 422 485 1 Watt Speaker 1 x USB 3 0 1 x USB 2 0 2MP Camera optional HDMI RGB LED Light Bar Note RGB LED light bar only available for the model number W07IB3S PCM1AC ...

Page 8: ...7 Dimensions ...

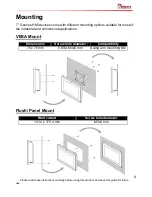
Page 9: ...nting 7 S series HMI devices come with different mounting options suitable for most of the industrial and commercial applications VESA Mount Dimensions Screw hole diameter Compatibility 75 x 75 mm VESA M4x5 mm Swing arm mounting kits Flush Panel Mount Wall cutout Screw hole diameter 131 4 x 175 4 mm M3x4 mm ...

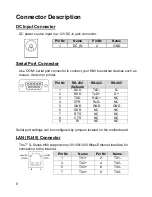
Page 10: ...ort settings can be configured by jumpers located on the motherboard LAN RJ45 Connector The 7 S Series HMI supports one 10 100 1000 Mbps Ethernet interface for connecting to the internet Pin Name Pin Name 1 DC_IN 2 GND Pin RS 232 Default RS 422 RS 485 1 DCD TxD D 2 RXD TxD D 3 TXD RxD NC 4 DTR RxD NC 5 GND GND GND 6 DSR NC NC 7 RTS NC NC 8 CTS NC NC 9 RI NC NC Pin Name Pin Name 1 TX1 2 TX1 3 TX2 4...

Page 11: ...other USB3 0 compatible devices HDMI Connector Use HDMI Type A connector to connect the HMI device to external monitor Pin Name Pin Name 1 5V 2 USB_D 3 USB_D 4 GND 5 STDA_SSRX 6 STDA_SSRX 7 GND_DRAIN 8 STDA_SSTX 9 STDA_SSTX 10 5V 11 USB_D 12 USB_D 13 GND Pin Name Pin Name 1 TMDS_DATA2 2 GND 3 TMDS_DATA2 4 TMDS_DATA1 5 GND 6 TMDS_DATA1 7 TMDS_DATA0 8 GND 9 TMDS_DATA0 10 TMDS_CLOCK 11 GND 12 TMDS_CL...

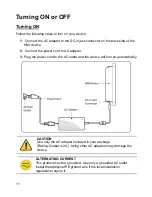
Page 12: ... cord to AC adapter 3 Plug the power cord to the AC outlet and the device will turn on automatically CAUTION Use only the AC adapter included in your package Rating Output 4 2 A Using other AC adapters may damage the device ALTERNATING CURRENT This product must be grounded Use only a grounded AC outlet Install the additional PE ground wire if the local installation regulations require it ...

Page 13: ...product and save this guide for future use Turning OFF You can Turn OFF the HMI device with the Windows power settings To shut down the device 1 Tap Start Shut down 2 Wait for your HMI device to completely turn off before disconnecting the power cord if necessary ...

Page 14: ...ick the Hot Tab icon on the Windows desktop 2 The Hot Tab main menu will appear on the screen as shown below NOTE RFID and LED Light Bar are optional features and may not be present in your model Utilities Utilities category allows automatically changing orientation from landscape to portrait mode or rotating the desktop to a different degree as 0 90 180 and 270 ...

Page 15: ...ss drag by touch this icon to the left To enhance the brightness drag by touch this icon to the right Tap Close icon to save the changes and exit the interface Volume Tap Volume button to show current brightness level To decrease the volume drag by touch this icon to the left To increase the volume drag by touch this icon to the right Tap Close icon to save the changes and exit the interface ...

Page 16: ... on the LED Bar Performance User can adjust the performance level of the HMI device There are four options available Extreme performance Office Document High performance Power Saving Touch Lock To LOCK touch screen double click the Hot Tab icon on the Windows desktop and tap Touch Lock To UNLOCK the touch screen tap button to the right ...

Page 17: ...f the following to open the camera 1 Press the F1 key 2 Tap then double tap to display the HotTab screen Select Camera No Item Description 1 Video Tap to record videos 2 Photo Tap to capture photos 3 Settings Tap to select the destination folder to save captured photos and videos enable preview and select picture resolution and quality 4 Close Tap to close the camera 5 Capture Screen Shows the obj...

Page 18: ... on the screen The preview screen automatically closes after 3 seconds Alternatively do one of the following Tap to delete the photo and return to the camera screen Tap to close the preview and return to the camera screen Recording Videos 1 Open the Camera 2 Focus on the object 3 Tap to record the video The video recording screen appears ...

Page 19: ...w Preview Check this box and enter the preview duration on Close preview after When the duration ends the preview screen will automatically close Always Show Preview When this box is checked the preview screen will only close when you tap the return button 2 Picture Save Tap this button to browse for the folder directory where you want to save captured photos 3 Video Save Folder Tap this button to...

Page 20: ...a transfer applications The RFID Reader is located on the bottom right front side of the HMI device The COM Port setting in RFID Reader is COM 14 1 Double click the RFID icon on the Windows desktop 2 Reader menu appears on the screen as shown below Note The picture below of Reader Demo Version 1 4 is for illustration purposes only Your Reader version may differ from the picture below ...

Page 21: ...der Demo Version 1 04 Reading Mode Select the default RFID Reader COM14or press Search on the upper left corner of the screen The system will automatically find RFID COM port show the Version Item Key button Function 1 E1 Version Displays the current version of RFID Reader system 2 E2 Reset Reset all settings ...

Page 22: ...ng operations 4 A1 Once Read The RFID Reader will perform a single scanning operation during the card is near 5 A9 Type Read The RFID Reader will perform a scanning operation of IC type tag To scan the card bring it close to the right bottom front side of device with RFID icon Item Data 32 Function 6 XXXXXXXXXXXABCDEF Display the information written in the card Writing Mode Refer to the RFID Porti...

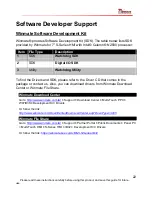
Page 23: ... To find the Drivers and SDK please refer to the Driver CD that comes in the package or contact us Also you can download drivers from Winmate Download Center or Winmate File Share Winmate Download Center Go to http www winmate com tw Support Download Center Multi Touch PPC W07IB3S Development Kit Drivers Or follow the link http www winmate com DownCenter DownLoadCenter asp DownType 3005 Winmate Fi...

Page 24: ...C Integrated Memory 2GB DDR3L 1066 1333 SO DIMM optional 4GB Storage 64GB mSATA SSD Ethernet Dual Intel WG82574L GbE LAN OS Windows 10 IoT Windows Embedded 8 1 Industry Pro Windows Embedded 8 Standard Windows Embedded Standard 7 WS7P I O Connectors Serial Port 1 x RS 232 422 485 USB Port 1 x USB 3 0 1 x USB 2 0 Ethernet Port 2 x RJ 45 10 100 1000 Mbps HDMI 1 x HDMI Peripheral Optional Camera Optio...

Page 25: ......

Page 26: ...f IP65 Front Side IP22 Full Device Note Windows 8 requires 1024 x 768 resolution to operate Metro UI HF RFID Reader Specifications The RFID Reader can read and write data according to different HF RFID standards HF RFID Standard Purpose ISO 14443 A Standard for MIFARE technology which used in smart cards and proximity cards ISO 15693 Standard for tracking items ISO 18092 Standard for Near Field Co...

Page 27: ...Winmate Inc 9F No 111 6 Shing De Rd San Chung District Taipei 241 Taiwan R O C Tel 886 2 8511 0288 Fax 886 2 8511 0211 Email sales winmate com tw Official website www winmate com ...

Reviews: