A
B
C
D
E
H
I
J
K
A
B
C
D
E
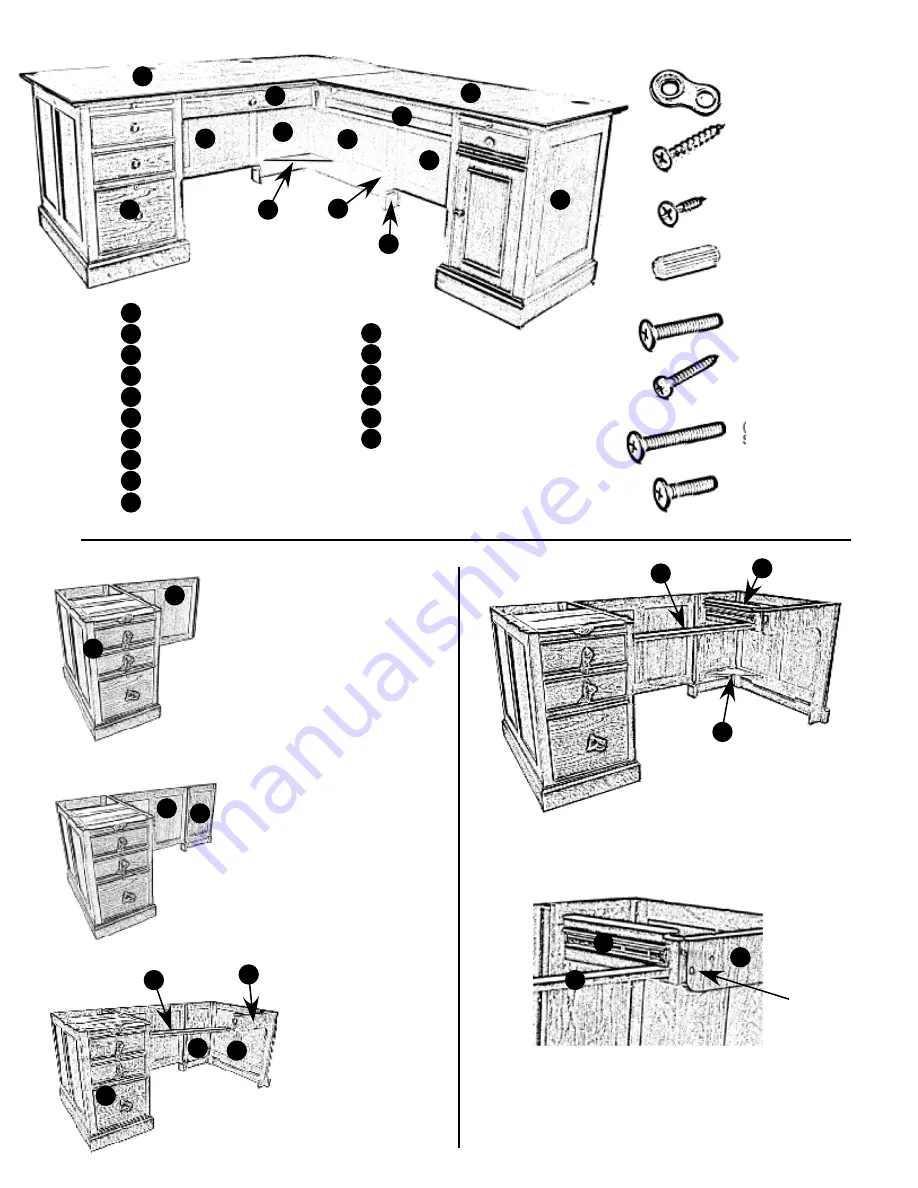
Components List
Main Pedestal
Main Centre Back Panel
Main RHF Back Panel
Main RHF Side Panel
Main RHF Small Panel
Main RHF Glide Assembly
Main Drawer Support
Main Drawer
Main Top
Triangular Shelf
Return Pedestal
Return Back Panel
Return Small Panel
Return Keyboard Support
Return Keyboard Tray
Return Top
Parts List
Place [Main Pedestal] (A) on
a flat surface, Using 3
machine screws (5), secure
[Main Centre Back Panel] (B)
to the back of [Main Pedestal]
(A).
A
B
Insert the other end of (G) into the square hole of [Main
RHF Glide Assembly] (F). Secure [Triangular Shelf] (P)
using 4 [Machine Screws] (5).
L
M
(1) Figure-8 Irons: 24
(2) Long (1¼“) Flat Head
Wood Screws : 27
(4) Wood Dowels
(5/16 x 1"): 6
(5) Machine Screws
(1¼“): 28
(6) Pan Head Wood
Screws (1¼“): 4
(7) Long Machine
Screws (1¾“): 1
Other Parts (photo not shown)
(9) Metal Grommets:
1
(10) Keys for File Drawer:
2
(11) Power Centre:
1
F
G
N
O
(8) Short Machine
Screws (1"): 1
H
I
J
K
L
N
O
C
Using 3 machine screws (5),
attach [Main RHF Back
Panel] (C) to [Main Centre
Back Panel] (B).
B
Using 6 machine
screws (5) to loosely
secure (D) to (C)
and to attache (E) to
(D). Place (G) into
the square hole on
(A).
D
E
C
G
A
F
G
Use Short Machine Screw (8) to secure (F) to (E)
through the hole indicated by the arrow above. Fasten
(G) to (A)/(F) with 2 (6) Pan Head Wood Screws. Now
tighten the machine screws holding (C) and (D).
E
F
G
(3) Short (¾”) Flat Head
Wood Screws: 24
P
P
P
(8)


