1143100
SmartPAC PRO User Manual
46
Chapter 2 – Installing SmartPAC PRO
•
Correctly terminate all cable shields
Terminate all cable shields to the studs provided in the enclosure or to a good grounding location
(see
•
Install suppressors across inductive loads
All relays, solenoids, or other inductive loads that are controlled by SmartPAC PRO must be
suppressed. Suppressors should be installed across the load and as close to the load as possible.
See Figure 2-15, page 72. Never install a suppressor across relay contacts. If you do, the
suppressor may fail shorted, and the equipment controlled by that relay will remain energized.
Additional suppressors (part number 2238801) can be obtained from Wintriss Controls.
NOTICE
REMOTE INSTALLATION OF SMARTPAC PRO DISPLAY
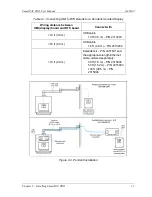
If you install your SmartPAC PRO display separately, in a pendant, for example, see wiring
diagrams Figure 7 and Figure 8 for connection details.
Terminating Cable Shields
NOTICE
TERMINATE CABLE SHIELDS CORRECTLY TO MINIMIZE ELECTROMAGNETIC
INTERFERENCE (EMI)
Shielded cables are used with the SmartPAC PRO. For effective shielding, terminate the cable
shields as near as possible to the terminal block you are wiring to.
NOTICE
TERMINATE BOTH ENDS OF SHIELD
Be sure to terminate cable shields at both ends (for example, at SmartPAC PRO and DSI 2).
For each shielded cable, perform the following steps.
1.
Strip the cable jacket back about 3 inches.
2.
You can terminate the shield braid or drain wire to either a chassis ground stud or under the screw
on a PC board standoff. Find one of these as close as possible to the terminal block you are
wiring.
3.
Connect the shield drain wire or braid to the chassis ground stud or beneath the screw in the PC
board standoff.
4.
Connect the insulated wires to their designated positions on the terminal block.
Summary of Contents for SmartPAC PRO
Page 1: ......
Page 2: ......
Page 4: ......
Page 6: ......
Page 20: ......
Page 22: ......
Page 24: ......
Page 42: ...1143100 SmartPAC PRO User Manual 42 Chapter 1 Introduction to SmartPAC PRO ...
Page 142: ...1143100 SmartPAC PRO User Manual 142 Chapter 4 SmartPAC PRO Program Mode ...
Page 200: ...1143100 SmartPAC PRO User Manual 200 Chapter 6 Using DiProPAC Die Protection Optional ...
Page 222: ...1143100 SmartPAC PRO User Manual 222 Chapter 7 ProCamPAC Instructions ...
Page 254: ...1143100 SmartPAC PRO User Manual Appendix C SmartView Remote Viewing and E mail Setup 254 ...
Page 280: ...SmartPAC PRO User Manual 1143100 280 Appendix C Reporting Downtime and Scrap to SFC ...
Page 290: ...SmartPAC PRO User Manual 1143100 290 Index Y yellow fault 232 yellow sensor 169 ...
Page 292: ......
Page 294: ......
Page 296: ......
Page 298: ......
Page 300: ......
Page 301: ......
Page 302: ......
Page 303: ......
Page 304: ......
Page 305: ......
Page 306: ......
Page 307: ......
Page 308: ......
Page 309: ......
Page 310: ......
Page 311: ......
Page 312: ......
Page 313: ......
Page 314: ......
Page 315: ......
Page 316: ......
Page 317: ......
Page 318: ......


