background image


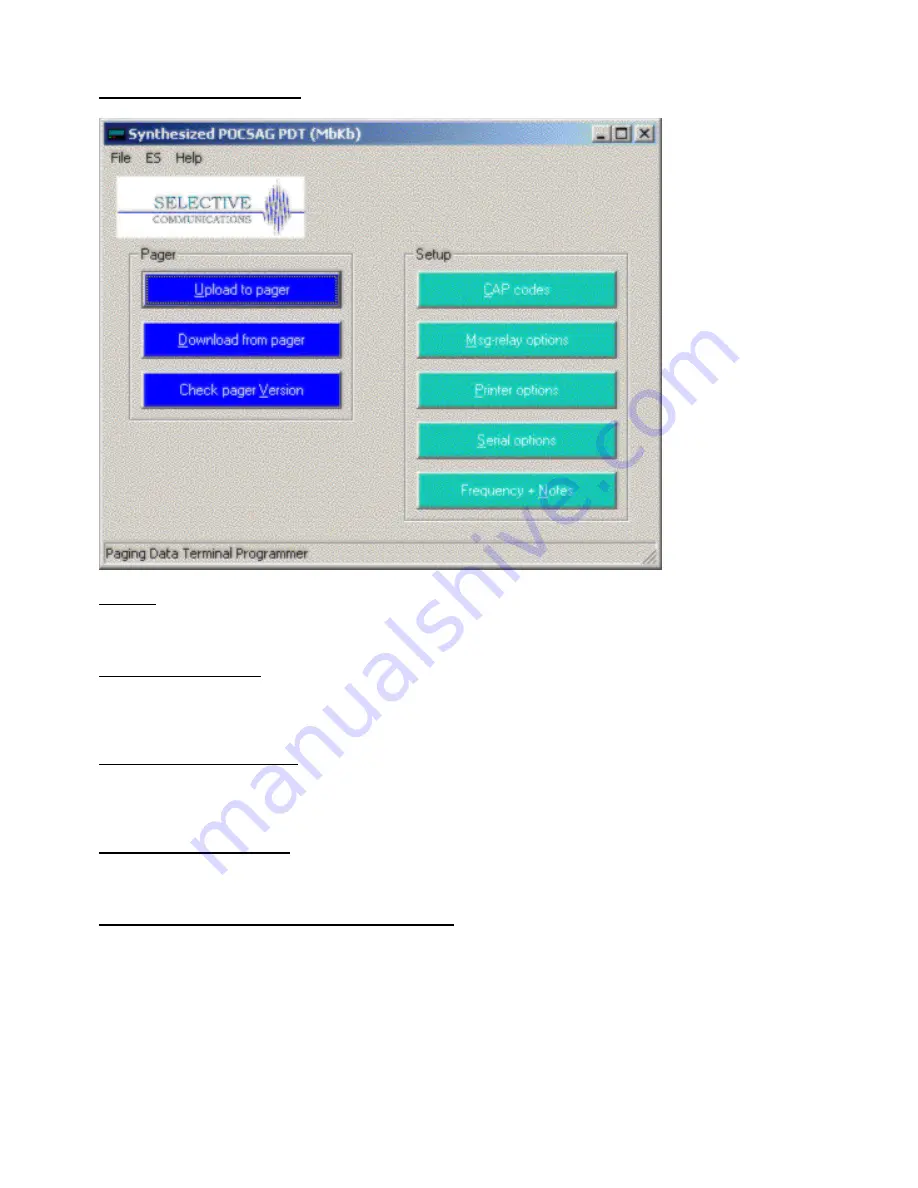
The Main PDT3P Window 


Title Bar 

The blue Title Bar at the top shows the current Template selected. 

Upload To Pager Button 

This button is used to upload new settings to the PDT3000. This will overwrite any settings currently in the 
PDT3000. 

Download From Pager Button 

This button is used to download the current settings from the PDT3000. This will overwrite any settings currently in 
PDT3P and will change the template in PDT3P to that programmed in the PDT3000 if different from that showing. 

Check Pager Version Button 

This button is used to read the software and hardware versions from the PDT3000. 

The Set Time & Upload Button (PDR Templates Only) 

This button is used to set the time and upload the new settings to the PDR2000. Time is set on the PDT in the PDT 
User Interface or by selecting the set time and write function in the ES menu. 

Summary of Contents for PDT3000

Page 1: ...PDT3000 Service Manual June 2008 www wipath com ...

Page 2: ...Contents Section 1 Product Description Section 2 User Instructions Section 3 Programming using PDT3P Section 4 Technical Service ...

Page 3: ...ts and outputs for control of devices such as LED signs The PDT3000 is available in a number of configurations with different connector combinations and weathertightness ratings and has a number of mounting options to choose from The following page shows the different back panel connector options Other options are available on request minimum order 500 pieces Specifications Display Size 130 x 40mm...

Page 4: ......

Page 5: ... appear below them Exit Return to main screen Delete Message Delete the 1 message under which the message cursor is placed Delete All Read Messages Delete all messages that have been read Delete All Messages Delete all messages except locked messages Lock Message Place the selected messages in the Locked Messages section Note the same symbol is used to unlock locked messages Display Functions Adju...

Page 6: ...s option on and off to Y or N allow all messages to be deleted Message Alert Options Function Description Settings Audible Alert Beeper sounds on receipt of message On or Off Beep Continuously Beeper sounds until message is acknowledged by Y or N pressing any key Reminder Beep Reminder beep sounds until message is read On or Off Initial Alert Time Time beeper sounds on initial receipt of message 1...

Page 7: ...elow General Specifications Receiver type Synthesized FSK FM receiver Freq bands available 135 174 450 470 929 932 MHz 5MHz band splits 25kHz band width Sensitivity Typically better than 118 dBm into 50 ohms Decoding format Pocsag or Flex TM Capcodes Addresses Up to 1000 Varies according to format selected and other functions LCD Display Format Blue White Graphical 240x64 high brightness LED backl...

Page 8: ...de File Import Capcodes File Exit ES Read Write ES Upgrade ES Set password ES Set Time Write ES Upload a specific SES file ES Get OTAP Capcodes o The Capcodes Window Adding Capcodes Addresses Output Options Serial 1 Serial 2 Print Maildrop Type Level Relays 1 4 Global Option Clear By Keys Output to Transmitter Output to Control Relay Board Capcode Control Relay Board Settings Window Capcode Alarm ...

Page 9: ...bal Option Clear By Keys Only match at beginning Output to Control Relay Board Options Message Control Relay Board Options Window o The Alert Options Window PDR PSR Only o The Frequency Notes Window Frequency Invert Decoder Bit Steam Set Decoder Baud Rate Allow Paging Network to set time Receiver type Allow decoding errors Remove unreadable characters Remove leading characters LCD contrast base No...

Page 10: ...functions visible in PDT3P will change according to which template is loaded The firmware contained in the PDT3000 determines its basic operational capabilities There is only one version of firmware rom file available for each of three different types of product All other differences between different models of the same product are set using the templates PDT3P Version Information PDT3P version 6 ...

Page 11: ... Plug the PDT3000 into a 12 volt supply and plug in the DB9 plug into the back of the PDT3000 PDT3P does not read or write to the PDT3000 unless instructed to do so It is recommended that unless you need to change the basic template of the PDT3000 you download the program in the unit first Click on the Download From Pager button This will download the current settings from the PDT3000 It will also...

Page 12: ...s from the PDT3000 This will overwrite any settings currently in PDT3P and will change the template in PDT3P to that programmed in the PDT3000 if different from that showing Check Pager Version Button This button is used to read the software and hardware versions from the PDT3000 The Set Time Upload Button PDR Templates Only This button is used to set the time and upload the new settings to the PD...

Page 13: ... functions like Set time and Get OTAP Capcode can not work in this mode File Import Capcodes Provides the capability to load a large number of cap codes from a csv file The csv file format should follow the sample files in PDT3P data folder File Exit Finish the program and exit ES Read Write Read and write configuration settings to and from the PDT3000 These are the same as the Upload and Download...

Page 14: ...for each cap code Adding Capcodes Addresses 1 Enter a new CAP code by clicking on the New Button 2 Enter the new CAP code in the Capcode box and the name in the name box below i e 1234567 TEST CAP The name is just an identifier and is not compulsory 3 If a range of cap codes is required then select the first cap code and the range that you wish to monitor e g entering cap code 1000000 and a range ...

Page 15: ...ws the type of message received to be set In Flex Templates the options are Alpha Alpha Warning and Alpha Watch In pocsag the tone and numeric options are added Note Alpha Warning and Alpha Watch are special settings that allow different initial alerts to be set for messages received on that capcode Level Sets the pocsag levels for the capcode ONLY in POCSAG Templates Relays 1 4 Sets the action th...

Page 16: ...finishing all settings click the OK Button to save the settings and return to the last window Click the Reset button to clear the relay list table and give up the current settings Capcode Alarm Options This sets the alarm actions of any capcode in the Capcodes Window When a capcode is not received within a certain time period it will trigger an alarm which can be the relays or the buzzer ...

Page 17: ... unit does not receive the capcode it will trigger alarms Click the Use audible alert check box the unit will trigger the buzzer alarm Sets the action that will occur on each of the 4 on board relays when any message on that capcode is not received within above setting time The buzzer and relays can be triggered at the same time ...

Page 18: ... Put Header on Separate Line Puts the Header Date Time Capcode on the first line followed by the message after a line feed Printer Page Width Set the width of the paper It may refer number of characters per line if a printer is set up as double size font Output Lines Between Messages Outputs a selectable number of line feeds following each message Printer Type Set printer type as parallel or seria...

Page 19: ...formats such as Control Input GPS Input IPage Input TNPP Output TNPP Input Output to Relay Board Message Direct to Relay Board and Message Manager it is default to input or output all data through the serial port Header String Sets the header string at the beginning of the serial output mainly for the Custom format Footer String Sets the footer string at the end of the serial output mainly for the...

Page 20: ... to 7 digit If it is less than 7 digits zero will be padded A address in hexadecimal p protocol m message type b baud rate in 4 digit decimal i e 0512 B baud rate in hexadecimal l numeric level i e 0 3 L alpha level i e A D t 24 hour with second T 24 hour time s 12 hour with second h 12 hour time d day M month y year Y day month year U month day year I year month day For example r n Name n Capcode...

Page 21: ...must be set if retransmitting on the same frequency Key up Delay The unit will hold data for a period of time ms before transmitting it This will stop receiving as well before and after transmitting if set above Stop receiving during retransmitting Transmit Input Response Transmit data from serial control input or logical level input pins DB25 TTL on the selected transmitter Output Response on Ser...

Page 22: ...e Serial Input Options Set the input messages which correspond to the output messages with the specific capcodes A finished sign for input messages should be a line feed or a carry return If the Catch Input Message Text is and the Output Message Text is this function will output all input messages except the finished signs ...

Page 23: ... this is the time interval after which if the state of contact has not reverted to its normal state then the message will be retransmitted and will continue to be retransmitted on this interval until the alarm reverts to normal This only applies to non normal alarm trigger Zero will disable this function State High Message a message will be transmitted or output on the serial when the pin state hi...

Page 24: ...ext box 3 Select the specified capcode whose messages will be searched to match the text in the Message Text box 4 Set the action that will occur on each of the four on board relay and the relays contained on the RCM2000 relay board Control Relay Options Relays 1 4 Sets the action that will occur on each of the 4 on board relays on receipt of any message on that capcode Relays are Normally Open Op...

Page 25: ... is determined by the number of chained RCM2000 modules connected x32 Click the Select relay action Button to start up the Message Control Relay Board Options Window Message Control Relay Board Options Window Click any number of relays at the relay list table in this Window then select the action in the Relay Action and Momentary Close Time box After finishing all settings click the OK Button to s...

Page 26: ...se advise use only the RCM option The RCM receiver is almost exclusively used on the PDT3000 Allow decoding errors Selects the number of character errors that the receiver will accept before it discards ignores the message Remove unreadable characters Add a filter to remove some control unreadable characters in a message before it outputs the message Remove leading characters Removes the selected ...

Page 27: ...the PDT3P folder OTAP Pager ID Set the PDT3000 to have a unique 7 digit number id to decode the OTAP message The pager only processes the OTAP message when it contains its id or broadcast id or its group id The 1200000 is broadcast id which can program all units The first 3 digit following by 5 zero is a group id which can program all starting with that 3 digits For example 1230000 would program a...

Page 28: ... 20 Backlight Level 2 Sets the initial display backlight level 2 1 20 Contrast Level Sets the initial display contrast level 1 20 Backlight Time Set how long backlight is to remain on after key press 5s 10s 30s 1m 5m Permanent Display Period Set the amount of time the message will display for before reverting to main screen 5s 10s 30s 1m 5m Permanent Font Size Sets the size of the message font on ...

Page 29: ...en Messages Arrive Turn the backlight on on receipt of a message On or Off Show Name Before Message Display the name assigned to the cap code address at the beginning of the message set via PDT3P On or Off Show Capcode Before Message Display Capcode at the beginning of the message On or Off Show Number Before Message Display the slot number of the message at the beginning of the message 1 40 On or...

Page 30: ...peripherals Port Pin out The usable ports on the PDT3000 are as follows DB25 parallel printer output DB9 PC serial output 1 and various other peripherals RJ11 PC serial output 2 RJ45 These two ports have 4 relays 2 each they are wired for normally open and normally closed outputs ...

Page 31: ...Serial Port2 to PC Cable Serial output 2 RJ11 to PC DB9 cable ...

Page 32: ...10 Logic Input 10 Pin12 Input11 Logic Input 11 Pin13 Input12 Logic Input 12 Pin14 VCC 5VDC supply needs to be factory set The signal is considered high when it is above 3 15v and low when it s below 1 35v For detailed specification on the tolerance of the input please look up the MC74HC245A converter IC manual PDT DB25 Pins 10 to 13 have pull down resistors fitted as standard the remainder need to...

Page 33: ...bedded System ES or firmware upgraded to ensure it is using the same version firmware as the programming software PDT3P ES Flash Instructions Remove power from the PDT3000 Open Latest version of PDT3P or specified version Select the appropriate template From the drop down menus select ES Upgrade Flash pdt_flash_PEV6 0 rom Immediately apply power to the unit wait to the bar at the bottom goes to 10...

Page 34: ...ceramic tuning tool adjust Tuning for the VCO output TC2 till you get as clear as possible signal on the scope picture 2 5 Adjust TC3 for maximum amplitude on the scope 6 Adjust the output of the paging signal generator to 115dbm picture 3 7 Repeat steps 4 and 5 in that order until the signal is as clear and large as possible picture 4 8 test the paging receiver for reception at 120dBm see notes P...

Page 35: ...Picture 2 Example of desired signal at 50 dBm Picture 3 Example of output at 115dBm after tuning at 50 dBm ...

Page 36: ...immer capacitor in small and slow movements harsh adjustments will cause damage to the trimmer and give poor tuning results When testing the paging device after tuning it should receive at 120dBm pocsag different levels will be indicated on Flex talk to WiPath however if the device is set to a frequency that is used locally i e a local telecommunications provider you may need to test the device in...

Page 37: ...3 The PDT3000 Mainboard Schematic Insert schematic here Circuit Diagram Insert Cct diagram here Board Layout Insert board layout here ...

Page 38: ...tenna Problem Check antenna is correctly connected and is in the right frequency band No Display Power Supply Check power supply is adequate Programming Check correct template is loaded Unit does not hold time date Backup Battery Replace internal backup battery CR2032 authorised workshop repair only Display too dark light Contrast Backlight Change contrast and backlight settings via the user inter...

Reviews: