www.ghibliwirbel.com
Professional Cleaning Machines Since 1968
ENGLISH
- 11
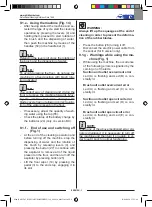
- Wash the inside of the tank, leaving the
drain cap open and adding clean water
through the front opening.
- When cleaning is complete, refit the cap
(60) and check the condition of the gas-
ket (61).
11.1.b - Cleaning the recovery water
tank (Fig. 17)
WARNING:
At the end of the washing operations, it
is compulsory to clean the recovery wa-
ter tank to prevent deposits or scaling
and the proliferation of bacteria, odours
or mould.
- Drain the recovery water as shown in the
relative paragraph, positioning the ma-
chine over a drain outlet.
- Remove the cover (62) and clean the in-
side of the cover and the aspirator safety
float (63) with running water.
- Leaving the hose (15 Fig. 15) lowered
and the cap off, add water through the
upper opening (64), cleaning the inside
of the tank until clean water comes out of
the drain hose.
- Replace all the components in reverse
order.
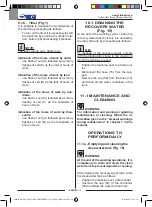
11.1.c - Cleaning the squeegee
(Fig. 18)
In order to clean the squeegee correctly (14),
it is necessary to remove it as follows:
- Pull the squeegee unit outwards (14).
- Disconnect the hose (16) from the squee-
gee (14).
- Loosen the knobs (65) and remove the
squeegee (14).
- Wash the squeegee and in particular the
rubber blades (66) and the inside of the
aspiration connector (53).
N.B.:
If, during washing, it is clear that the rubber
blades (66) are damaged or worn, it is neces-
sary to replace them or turn them over.
- Replace all the components in reverse
order.
OPERATIONS TO
PERFORM WEEKLY
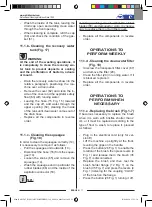
11.1.d - Cleaning the clean water filter
(Fig. 19)
- Unscrew the transparent filter cover (67)
and remove the filter (20).
- Clean the filter (20) in running water. If it
is blocked, replace it.
- Replace all the components in reverse
order.
OPERATIONS TO
PERFORM WHEN
NECESSARY
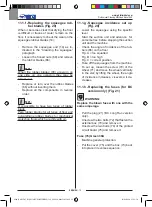
11.1.e - Replacing the brush (Fig. 1-7)
It becomes necessary to replace the brush
when it is worn with bristles shorter than 2
cm or it must be replaced according to the
type of floor to wash; to replace it, proceed
as follows:
- Plug in the electrical cord (only for ver-
sion E).
- Lift the machine up slightly at the front,
levering the grips on the handle.
- Press the button (26 Fig. 1) to enable the
rotation of the brush, then press levers (4
Fig. 1) and release them; the brush (35
Fig. 7) is disconnected.
- Replace the brush and then rest the
brush holder flange (12 Fig. 7) on the
brush (35 Fig. 7) and press the levers (4
Fig. 1) listening for the coupling “CLICK”
of the brush on the flange.
- Press the button (26 Fig. 1) turning it off.
Man_RAPID15_E38_M38BC-M38HYBRID_3ed_06-2020_49025101.indd 11
Man_RAPID15_E38_M38BC-M38HYBRID_3ed_06-2020_49025101.indd 11
11/06/2020 15:51:34
11/06/2020 15:51:34

