background image

OVERVIEW

Congratulations on your purchase of the Wirez LCTS-2. This is a high quality level
converter with signal sensing. It is capable of being used in many confi gurations
with both original equipment (factory installed) and aftermarket products.
Features:
• Selectable RCA or Speaker Wire Input/Output Confi guration
• Independent Left and Right Output Level Control
• Signal Sensing Remote Turn On Output

INSTALLATION NOTES

1.  The LCTS-2 should be mounted in a location that is easily accessible for system 

tuning.

2.  Ground and fused power connections should be made directly to the head unit power 

connection to prevent ground loops.

3.  To provide maximum signal to noise ratio performance, the use of an oscilloscope 

or distortion detection device like the SMD DD-1 should be used to properly set the 
output level of the head unit, LCTS-2 and if applicable, the amplifi er in your system.

4.  A common ground wire is included on both the input and output RCA and speaker 

wire harnesses of the LCTS-2. This wire is connected internally. In some applications, 
you may need to connect this wire to the chassis of the source unit and/or the 
amplifi er for the LCTS-2 to work properly. The criteria that most commonly require the 
use of this wire are:


LCTS-2 does not turn on when the radio is turned up


No audio produced by the LCTS-2


Engine noise and/or alternator whine in the audio system


Lack of bass / low Frequency music content

5.  The LCTS-2 will not produce alternator whine. It may, as with all signal processors, 

present a ground loop in the system that results in noise being introduced to the 
system. This is not a failure of the product and can be addressed through proper 
installation and the use of the common ground wire.

6.  If you are not experienced with the installation of mobile electronic components, 

the proper procedure to set system gain structure or do not fully understand these 
instructions, Wirez strongly recommends that you seek the assistance of a trained 
professional mobile electronics installer to complete the installation and tuning of your 
mobile entertainment system.

7.  Note: Many source units with Bluetooth Hands Free or Navigation only output audio 

from these sources on the front speaker wire or RCA outputs. Please take this into 
consideration when making your head unit connections.

Summary of Contents for LCTS-2

Page 1: ...LCTS 2 OWNER S MANUAL MANUEL DE L UTILISATEUR LEVEL CONVERTER WITH SIGNAL SENSING CONVERTISSEUR DE SORTIE SIGNAL AVEC MISE EN FONCTION PAR DÉTECTION DE SIGNAL ...

Page 2: ...may need to connect this wire to the chassis of the source unit and or the amplifier for the LCTS 2 to work properly The criteria that most commonly require the use of this wire are LCTS 2 does not turn on when the radio is turned up No audio produced by the LCTS 2 Engine noise and or alternator whine in the audio system Lack of bass low Frequency music content 5 The LCTS 2 will not produce altern...

Page 3: ...t APPLICATION 1 The most common use of the LCTS 2 is to connect the speaker outputs of a radio to the RCA inputs of an aftermarket amplifier 1 Connect the power ground and remote wires as described in the Power Connection Instructions 2 Connect the speaker wire plug to the Input jack Set the Input switch to Wire 3 Connect the RCA plug to the Output jack Set the Output switch to RCA 4 Connect the G...

Page 4: ...e are often included with wire harness adapters 2 Connect the RCA plug to the Input jack Set the Input switch to RCA 3 Connect the Speaker wire plug to the Output jack Set the Output switch to Wire 4 Connect the RCA inputs to the RCA output of your aftermarket head unit 5 Connect the Grey and Grey Black wires to the Right speaker input of the amplifier 6 Connect the White and White Black wires to ...

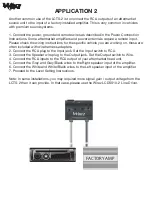
Page 5: ...ease check the wiring instructions for the specific vehicle you are working on these are often included with wire harness adapters 2 Connect the Speaker wire plug to the Input jack Set the Input switch to Wire 3 Connect the Speaker wire plug to the output jack Set the Output switch to Wire 4 Connect the Grey and Grey Black input wires to the Right speaker output of the radio 5 Connect the White an...

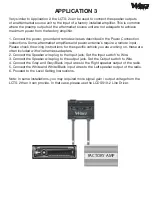
Page 6: ... to the Positive subwoofer output wire from the factory amplifier Set the Input switch to Wire 3 Connect both the Grey Black and White Black wires to the Negative subwoofer output wire from the factory amplifier 4 Connect the RCA Outputs to the input of the amplifier using a short interconnect cable or a pair of Male to Male couplers 5 Proceed to the Level Setting Instructions Note In some install...

Page 7: ...ts to distort the back them down 1 8 of a turn 3 If the amp does not distort turn up the gain sensitivity control on the amplifier until it distorts The goal is to get full power out of the amplifier with the least possible amount of gain increase 4 Note some amplifiers can not accept a high voltage input signal on the RCA inputs You may need to decrease the output of the LCTS 2 so as not to overd...

Page 8: ...clude the name of the original purchaser the name of the authorized Wirez dealer and the purchase date Warranty expiration on items returned without proof of purchase will be determined from the manufacturing date code The sole responsibility of Wirez under this Limited Warranty shall be limited to the repair of the products or replacement at the sole discretion of Wirez Product must be shipped in...

Page 9: ... intérieur Dans certaines applications il peut être nécessaire de connecter ce fil au châssis de l unité source et ou de l amplificateur pour que le LCTS 2 fonctionne correctement Les raisons qui justifient le plus couramment l utilisation de ce fil sont les suivantes Aucun son produit par le LCTS 2 Bruit de moteur et ou d alternateur dans le système audio Manque de basses contenu musical de basse...

Page 10: ...ation la plus courante de la LCTS 2 est de relier les sorties haut parleurs d une radio aux entrées RCA d un amplificateur de remplacement 1 Connectez l alimentation la mise à la masse et le fil de mise sous tension tel que décrit dans les directives de branchement 2 Branchez la prise câble d enceinte à la prise d entrée Réglez le commutateur d entrée de fil 3 Branchez la fiche RCA à la prise de s...

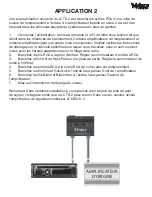
Page 11: ...t souvent inclus avec les harnais adaptateurs pour le filage de la radio 2 Branchez les fils RCA à la prise d entrée Réglez le commutateur d entrée à RCA 3 Branchez la fiche fil de Haut Parleur à la prise de sortie Réglez le commutateur de sortie à fil Wire 4 Branchez les entrées RCA à la sortie RCA de votre radio de remplacement 5 Branchez les fils Gris et Gris Noir à l entrée haut parleur Droit ...

Page 12: ...ez les instructions de câblage pour le véhicule spécifique sur lequel vous travaillez ceux ci sont souvent inclus avec les harnais adaptateurs pour le filage de la radio 2 Branchez la fiche Haut Parleur à la prise d Entrée Réglez le commutateur d Entrée à fil wire 3 Branchez la fiche fil de Haut Parleur à la prise de sortie Réglez le commutateur de sortie à fil Wire 4 Branchez les fils Gris et Gri...

Page 13: ...e à partir de l amplificateur installé en usine Réglez le commutateur d Entrée à fil wire 3 Branchez les deux fils Gris Noir et Blanc Noir au fil négatif de sortie sous grave à partir de l amplificateur installé en usine 4 Branchez les sorties RCA à l entrée de l amplificateur à l aide d un câble d interconnexion court ou une paire de raccords mâle mâle 5 Allez aux instructions de réglage du nivea...

Page 14: ...er revenez en arrière de 1 8ième de tour 3 Si l ampli ne distorsionne pas monter le contrôle de gain sensibilité de l amplificateur jusqu à ce qu il distorsionne Le but est d obtenir la pleine puissance de l amplificateur avec le moins possible d augmentation de gain 4 Remarque certains amplificateurs ne peuvent accepter un signal haute tension d entrée sur les entrées RCA Il peut être nécessaire ...

Page 15: ...our ou les dommages causés par le transport Afin d obtenir une réparation du produit sous cette garantie une preuve d achat d un revendeur agréé Wirez doit être fournie La preuve d achat doit comprendre le nom de l acheteur initial le nom du revendeur agréé Wirez et la date d achat L expiration de la garantie sur les produits retournés sans preuve d achat sera déterminée à partir du code de date d...

Page 16: ...www gotwirez com www facebook com gotwirez ...

Reviews: