background image

1h30

1h00

30 mn

15 mn

10 mn

1

2

3

clic !

C

Instruction de montage

Assembly instructions

 NO

T290735_A - 03/2019

12

Attachment of the flush plate

Fixation de la plaque de commande

9

1

2

3

1h30

1h00

30 mn

15 mn

10 mn

1

2

3

clic !

1h30

1h00

30 mn

15 mn

10 mn

1

2

3

clic !

1h30

1h00

30 mn

15 mn

10 mn

1

2

3

clic !

1

2

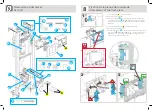
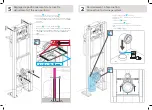
1 - Clipper le cable du mécanisme au support de commande 

K

  en tirant 

horizontalement (figure 

1

 ),

2 - Clipper le support de commande 

K

 dans le support de plaque 

J


(figure 

2

 ),

3 - Installer la plaque de commande 

L

 en l’inclinant contre le cadre en poussant 

vers le haut (action 

1

 de la figure 

3

) puis rebasculer la plaque sur la partie 

haute du cadre  (action 

2

 de la figure 

3

).

1 - Clip the mechanism cable to the control support 


K


by 

pulling


horizontally (figure 

1

 ),

2 - Clip the control support 

K

 in the plate support

J


(figure 

2

 ),

3 - Install the flush plate 

L

 by tilting it against the frame while 

pushing upwards (action 

1

 of figure 

3

) and tilt it back onto 

the top part of the frame (action  

2

 on figure 

3

).

100

360

175 - 280

1063 - 1278

288 - 503

Summary of Contents for COMPACT +

Page 1: ...e K dans le support de plaque J figure 2 3 Installer la plaque de commande L en l inclinant contre le cadre en poussant vers le haut action 1 de la figure 3 puis rebasculer la plaque sur la partie hau...

Page 2: ...ommande et fixer le l aide des crochets support I figure 2 et 3 en respectant le sens de montage sens des triangles en rouge sur la figure 2 le support doit se verrouiller sur l paisseur de l habillag...

Page 3: ...nd the sliding sleeve G with the pan seal H in the pan Fix F and G on the frame and fix the pan with the screws and washers T U V and W figure 6 7 1 6 5 2 7 4 10 3 Attachment of the pan Fixation de la...

Page 4: ...the height according to the 1 metre line see Zoom or according to the desired height 3 Once the adjustment is completed lock the hexagonal head screws 1 1000 mm 220 mm 6 1h30 1h00 30 mn 15 mn 10 mn 1...

Page 5: ...nut U on to each threaded rod S 2 Then screw them on to the frame as indicated on the diagram 1 3 Adjust their extruding length by adding the casing thickness wall finish l1 the depth of the pan secur...

Page 6: ...et mountings 2 Insert the drive studs E and tighten them with a wrench 3 Position the wall brackets and fix them to the wall Cut the rod if required 1 2 Water connection Raccordement en eau 4 Z 1 D co...

Page 7: ...et mountings 2 Insert the drive studs E and tighten them with a wrench 3 Position the wall brackets and fix them to the wall Cut the rod if required 1 2 Water connection Raccordement en eau 4 Z 1 D co...

Page 8: ...nut U on to each threaded rod S 2 Then screw them on to the frame as indicated on the diagram 1 3 Adjust their extruding length by adding the casing thickness wall finish l1 the depth of the pan secur...

Page 9: ...the height according to the 1 metre line see Zoom or according to the desired height 3 Once the adjustment is completed lock the hexagonal head screws 1 1000 mm 220 mm 6 1h30 1h00 30 mn 15 mn 10 mn 1...

Page 10: ...nd the sliding sleeve G with the pan seal H in the pan Fix F and G on the frame and fix the pan with the screws and washers T U V and W figure 6 7 1 6 5 2 7 4 10 3 Attachment of the pan Fixation de la...

Page 11: ...ommande et fixer le l aide des crochets support I figure 2 et 3 en respectant le sens de montage sens des triangles en rouge sur la figure 2 le support doit se verrouiller sur l paisseur de l habillag...

Page 12: ...e K dans le support de plaque J figure 2 3 Installer la plaque de commande L en l inclinant contre le cadre en poussant vers le haut action 1 de la figure 3 puis rebasculer la plaque sur la partie hau...

Reviews: