background image

PBC300

User Guide

I. Product Overview


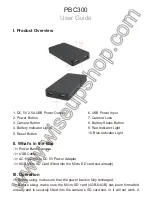
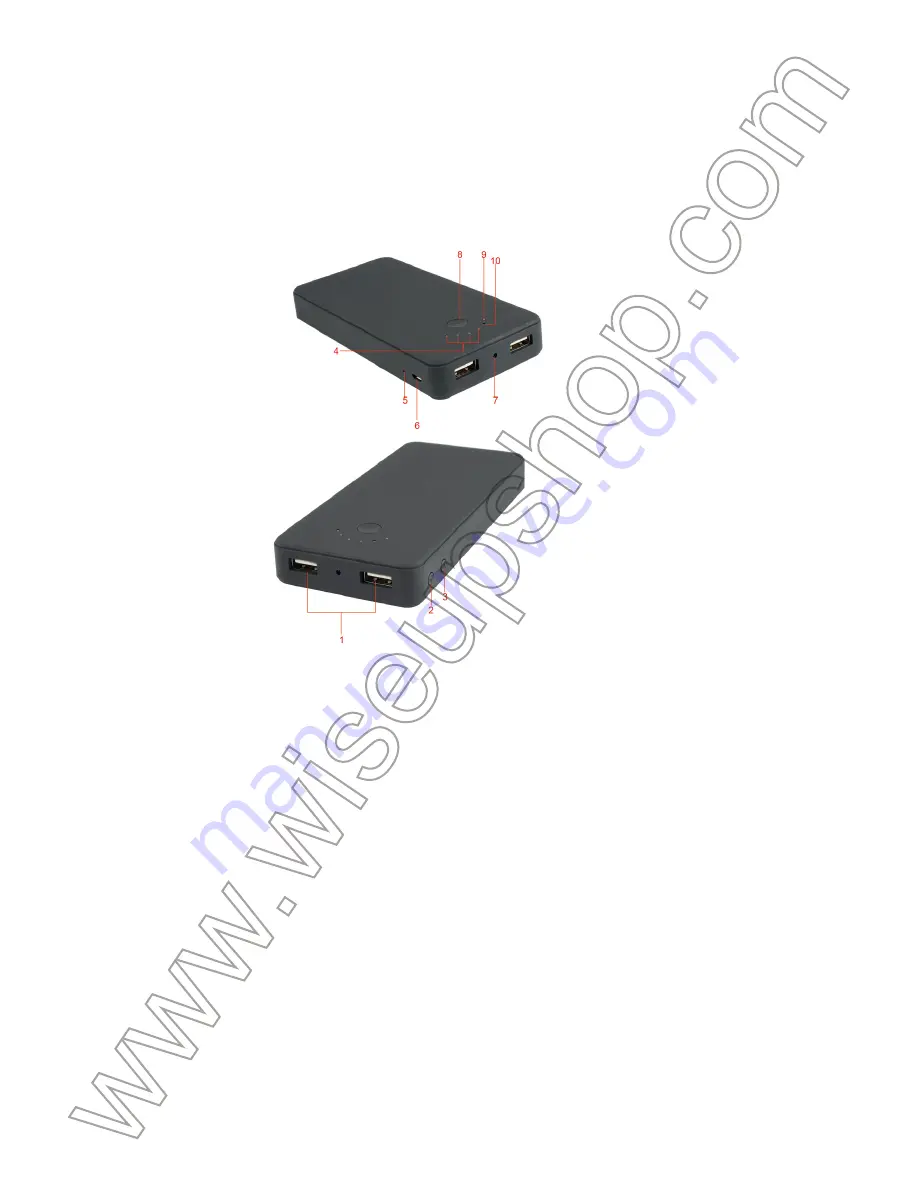
1. DC 5V 2.5A USB Power Output
2. Power Button
3. Camera Button
4. Battery Indicator Lights
5. Reset Button

II. What’s in the Box

-1× Power Bank Camera
-1× USB Cable
-1× AC110-230V to DC 5V Power Adapter
-1× 8GB Micro SD Card (fitted into the Micro SD card slot already)

III. Operation

>> Before using, make sure that the power bank is fully recharged.
>> Before using, make sure the Micro SD card (4GB-64GB) has been formatted 
already and is securely fitted into the camera’s SD card slot, or it will not work. A 

SDHC Class 10 Micro SD card is recommended. If no Micro SD card is fitted into the 
camera, the red and blue indicator lights will flash 10 times and turn off. The camera 
will shut down automatically. If the Micro SD card cannot be read, the camera will not 
respond to your operation.

3.1. POWER ON/OFF

3.1.1. Power on the camera by pressing the Power Button for 2 seconds. The red 
indicator light will stay illuminated, indicating the camera has entered into standby 
mode automatically.
3.1.2. Power off the camera by pressing the Power Button for 3 seconds. The red 
indicator light will turn off.

[Note]: 

The camera will shut down automatically if it is in standby mode without any operation more 

than 1 minute.

3.2. VIDEO RECORDING

3.2.1. Power on the camera by pressing the Power Button for 2 seconds. The red 
indicator light will stay illuminated, indicating the camera has entered into standby 
mode automatically.
3.2.2. Press the Power Button once to record video. The red indicator light will flash 
3 times and then turn off.
3.2.3. Press the Power Button once again to stop recording video. The red indicator 
light will stay illuminated, indicating the camera is back to standby mode.

[Notes]:

1). A video file will be generated and saved every 5 minutes automatically.
2). The camera can record video for 17 hours continuously on a full charge.
3). Video Resolution: 1920×1080P                                      Video Format: MOV

3.3. CAMERA/STILL PHOTOGRAPHY

3.3.1. Power on the camera by pressing the Power Button for 2 seconds. The red 
indicator light will stay illuminated, indicating the camera has entered into standby 
mode automatically.
3.3.2. Press the Camera Button once to take a photo. The blue indicator light will 
flash once and turn off.

3.4. MICRO SD CARD FORMATTING

3.4.1. Power on the camera by pressing the Power Button for 2 seconds. The red 

indicator light will stay illuminated, indicating the camera has entered into standby 
mode.
3.4.2. Press the Camera Button for 2 seconds. The red and blue indicator lights will 
flash 5 times and turn off, indicating the SD card formatting has been completed; the 
red one will stay illuminated, indicating the camera is back to standby mode.

3.5. RESETTING

If, for any reason, the camera stops working or isn’t working properly, a reset will 
restore it back to normal operation.

Operation:

 Use a pin to press the Reset Button once to reset all settings to factory 

default. The camera will shut down automatically. Restart the camera with the de-
fault settings.

IV. Video/Image Files Uploads

4.1. Power off the camera, remove the Micro SD card and insert it into a card reader.
4.2. Insert the card reader into a PC computer.
4.3. The Micro SD card will be recognized as a removable disk drive.
4.4. All the files can be accessed in the “

DCIM

” folder.

V. Setting Time/Date Stamp

5.1. Power off the camera, remove the Micro SD card and insert it into a card reader.
5.2. Insert the card reader into a PC computer.
5.3. Removable disk drive folder appears.
5.4. Click on the drive in the root directory and inside the root directory, create a file 
named “TIMERSET.TXT”.
5.5. Write the current date and time in the “TIMERSET.TXT” file with the correct 
format:
YYYYMMDDHHMMSS Y. (For example: 20160412142432 Y). Save this file. If you 
don’t need stamp on your video or image files, change “Y” into “N” in the “TIM-
ERSET.TXT” file.
5.6. Restart the camera and the system will upgrade the program automatically.

VI. Charging

6.1. Connect the camera to an outlet AC power socket by using the USB cable and 
DC 5V charging adapter provided.
6.2. It will take 12 hours to obtain a full charge.

6. USB Power Input
7. Camera Lens
8. Battery Status Button
9. Red Indicator Light
10. Blue Indicator Light

6.3. All 4 battery indicator lights will be on when the power bank is fully recharged.

Summary of Contents for PBC300

Page 1: ...5V Power Adapter 1 8GB Micro SD Card fitted into the Micro SD card slot already III Operation Before using make sure that the power bank is fully recharged Before using make sure the Micro SD card 4G...

Page 2: ...indicator light will stay illuminated indicating the camera has entered into standby mode automatically 3 2 2 Press the Power Button once to record video The red indicator light will flash 3 times an...

Page 3: ...2 Insert the card reader into a PC computer 4 3 The Micro SD card will be recognized as a removable disk drive 4 4 All the files can be accessed in the DCIM folder V Setting Time Date Stamp 5 1 Power...

Page 4: ...6 3 All 4 battery indicator lights will be on when the power bank is fully recharged...

Page 5: ...SB Kabel 1 AC110 230V DC 5V Netzteil 1 8 GB Micro SD Karte in den Steckplatz Micro SD Karte ausgestattet bereits III Betrieb Vor der Verwendung stellen Sie sicher dass die Strom Bank vollst ndig aufge...

Page 6: ...eb mehr als 1 Minute ist 3 2 VIDEOAUFNAHME 3 2 1 Schalten Sie die Kamera mit der Power Taste 2 Sekunden lang dr cken Die rote Anzeigelampe bleibt beleuchtet was die Kamera hat sich automatisch in den...

Page 7: ...instellungen IV Video Bilddateien Uploads 4 1 Schalten Sie die Kamera aus entfernen Sie die Micro SD Karte und in einen Kartenleser ein 4 2 Setzen Sie den Kartenleser in einen PC Computer 4 3 Die SD M...

Page 8: ...eine Steckdose an Steckdose mit dem USB Ka bel und DC 5V Ladeadapter zur Verf gung gestellt 6 2 Es wird 12 Stunden dauern eine volle Ladung zu erhalten 6 3 Alle 4 Batterie Anzeige leuchtet auf wenn di...

Page 9: ...ra Chargeur Mobile 1 C ble USB 1 AC110 230V DC Power Adapter 5V 1 8 GB Carte SD M moire ins r e dans la fente pour Carte SD M moire d j III Op ration Avant d utiliser assurez vous que la banque d ali...

Page 10: ...ENT VIDEO 3 2 1 Allumez l appareil photo en appuyant sur le bouton d alimentation pendant 2 secondes Le voyant rouge reste allum indiquant que l appareil est entr en mode veille automatiquement 3 2 2...

Page 11: ...s par d faut IV Vid o Image Fichiers Envois 4 1 Mise hors tension de l appareil photo retirez la Carte SD M moire et l ins rer dans un lecteur de carte 4 2 Ins rez le lecteur de carte dans l ordinateu...

Page 12: ...prise de courant alternatif de sortie en utilisant le c ble USB et DC 5V adaptateur de charge fourni 6 2 Il faudra 12 heures pour obtenir une charge compl te 6 3 Tous les voyants 4 de la batterie sera...

Page 13: ...V a CC adattatore di alimentazione 5V 1 8 GB Micro SD Card montato nello slot per schede Micro SD gi III Operazione Prima di utilizzare assicurarsi che la banca di potere completamente carica Prima di...

Page 14: ...di accensione per 2 secondi La spia rossa rimarr illuminato indicando la telecamera entrato in modalit standby automaticamente 3 2 2 Premere il pulsante di accensione una volta per registrare video La...

Page 15: ...finite IV Video Immagine carica i file 4 1 Spegnere la fotocamera rimuovere la scheda Micro SD e inserirla in un lettore di schede 4 2 Inserire il lettore di schede in un computer PC 4 3 La scheda Mic...

Page 16: ...rente alternata presa utilizzando il cavo USB e ricarica DC 5V adattatore in dotazione 6 2 Ci vorranno 12 ore per ottenere una carica completa 6 3 Tutti gli indicatori luminosi della batteria 4 sar su...

Page 17: ...de la energ a 1 USB Cable 1 AC110 230V a DC 5V adaptador de alimentaci n 1 8GB tarjeta micro SD encajado en la ranura de tarjetas Micro SD ya III Operaci n Antes de usar aseg rese de que el banco de e...

Page 18: ...da la c mara por pulsar el Bot n de fuente de alimentaci n durante 2 segundos El indicador de luz roja permanecer iluminado lo que indica que la c mara ha entrado en modo de espera autom ticamente 3 2...

Page 19: ...c mara con la configuraci n predeterminada IV Subidas de Archivos de V deo Imagen 4 1 Apague la c mara retire la tarjeta Micro SD e insertarla en un lector de tarjetas 4 2 Inserte el lector de tarjet...

Page 20: ...C de salida mediante el cable USB y el adaptador de carga DC 5V proporcionada 6 2 Se llevar a 12 horas para obtener una carga completa 6 3 Todas los 4 indicadores de luz de la bater a estar n encendid...

Page 21: ...PBC300 I 1 DC 5V2 5A USB 2 3 4 5 II 1 1 USB 1 DC 5V AC110 230V 1 18GB SD SD III SD 4GB 64GB 6 USB 7 8 9 10...

Page 22: ...SD SDHC 10 SD SD 10 SD 3 1 3 1 1 2 3 1 2 3 1 3 2 3 2 1 2 3 2 2 1 3 3 2 3 1 5 2 17 3 1920 1080P MOV 3 3 3 3 1 2 3 3 2 3 4 SD 3 4 1 2 3 4 2 2 5 SD...

Page 23: ...3 5 IV 4 1 SD 4 2 4 3 SD 4 4 DCIM V 5 1 SD 5 2 5 3 5 4 TIM ERSET TXT 5 5 TIMERSET TXT 20160412142432 Y YYYYMMDDHHMMSS Y TIM ERSET TXT N Y 5 6 VI 6 1 USB DC 5V AC 6 2 12 6 3 4...

Reviews: