T187
User Guide (iOS Version)
I. Product Overview
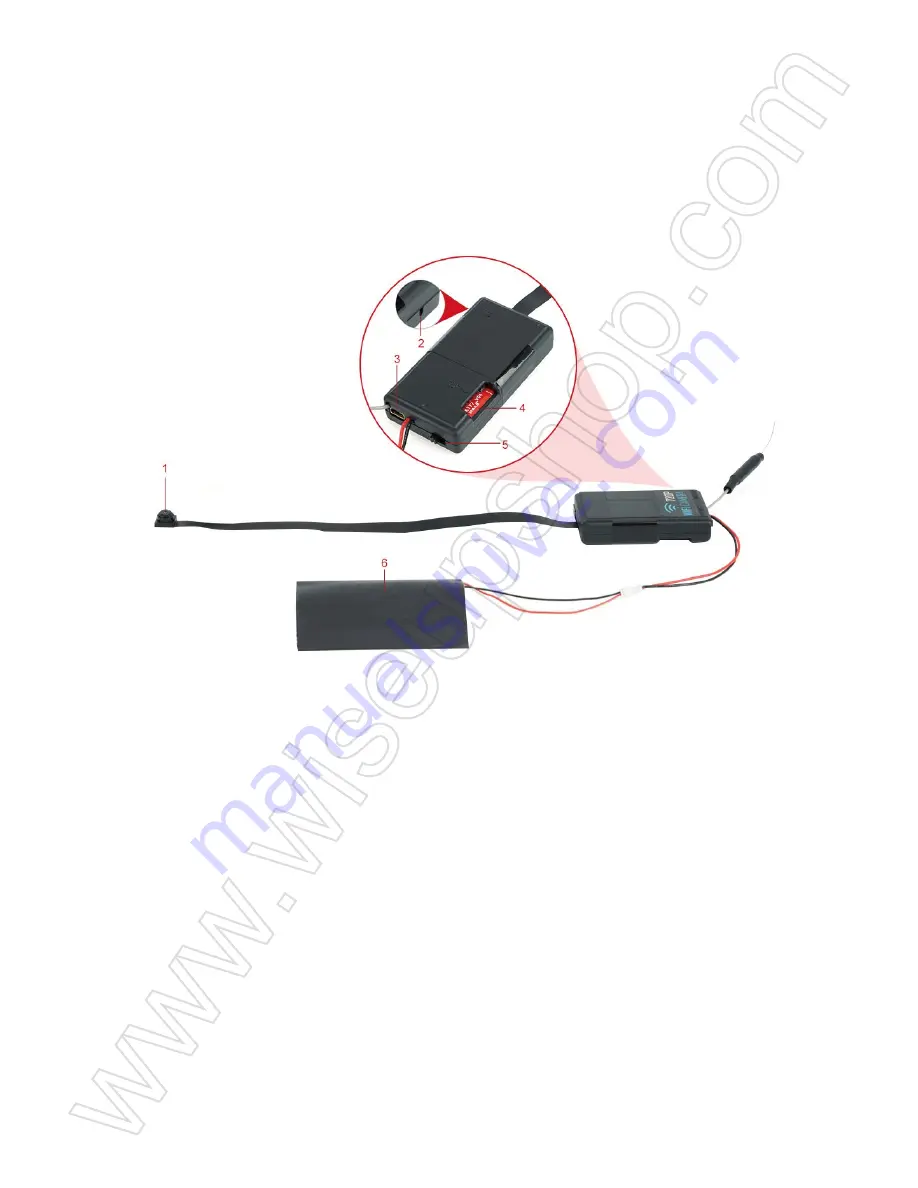
1. Camera Lens
2. Microphone
3. USB Port
4. Micro SD Card Slot
5. Power Switch
6. Backup Battery
II. What’s in the Box
-1× P2P Network Drone Camera
-1× USB Cable
-1× AC110-240V to DC5V Power Adapter
III. Get Camera Ready
3.1. Before using, please make sure the camera is fully charged and the Micro SD card has
been formatted already and is securely fitted into the camera’s SD card slot, or it will not work.
We recommend that you use a SDHC Class 10 Micro SD card.
3.2. If you need the camera to work 7/24 hours, connect it to an outlet AC power supply using
the USB cable and DC 5V power adapter included.
IV. Network Setup
4.1. Install “
Smarp CAM
” APP on your iPhone or iPad
Go to your App store, search for “
SMARP CAM
” and then install it on your iPhone or iPad.
4.2. LAN Mode or P2P Setup
4.2.1. Slide the Power Switch to the ON Position and go to the WIFI or WLAN setting page on
your iPhone or iPad, connect to the camera’s WIFI signal named “
SMARP-******
”. The WIFI
signal password is “
12345
”. Wait for the WIFI to be connected.
[Note]:
If the camera’s WIFI signal cannot be found after a long time, please recharge the camera or
restart it.
4.2.2. Run the “
Smarp Cam
” APP.
4.2.3. Check the picture below for an explanation of the live video screen:
[Note]:
In this P2P (LAN) mode, you can view or record video locally within 70 meters (about 230ft)
open range.
V. Recording to Local Micro SD Card Continuously
>> Please make sure the camera is successfully added to the APP and it's online before you start.
5.1. Follow the steps below to set up SD card recording.
Step 1: Launch the “
Smarp Cam
” APP.
Step 2: Tap the gear icon and select “
Record
” on the setting page.
Step 3: Enable the “
Record On
” to start recording video to the Micro SD card continuously. Also,
you can enable “
Loop On
”, adjust the “
Record volume
”. You can also set your desire video length.
[Note]:
Video Resolution: 1280x720P Video Format: AVI
5.2. Check the available storage of the Micro SD card
Step 1: Launch the “
Smarp Cam
” APP.
Step 2: Tap the gear icon and select “
SD card
” on the setting page.
Step 3: You can check the available space of the Micro SD card. Also, you can format the SD card
here.
VI. Resetting to Factory Default Settings
6.1. Launch the “
Smarp Cam
” APP.
6.2. Tap the gear icon and select “
Device
” on the setting page.
6.3. Tap “
Reset to default
” to reset the camera to factory default settings.
VII. Charging
7.1. Connect the camera to an outlet AC power supply using the power adapter and USB cable
included.
7.2. It will take 7 hours to obtain a full charge.
7.3. The camera can record video up to 3 hours on a single charge.
Frequently Asked Questions
Q1: Why Camera WIFI signal is not appearing on my WIFI page?
A1: There are 3 solutions to this question:
1. Keep your phone or mobile device within the camera’s WIFI hotspot range, refreshing the
WIFI signal page. It may take up to 1 minute for the hotspot to become recognizable on your
phone or mobile device's WIFI setting page.
2. Shut off your phone or mobile device’s WIFI function for a while, then turn it on to search again.
3. The camera is in low battery, connect it to an outlet AC power supply using the USB cable
and power adapter included.
Q2: The camera did not record any video?
A2: Make sure the Micro SD card has been fitted well. If not, you need to take out the SD card,
format it on your PC computer and try it again.
Q3: Why the video footage shows a fuzzy screen during playback on my computer?
A3: Please copy the video footage to your computer before playing them back.


