background image


7

•  Have your stove and chimney system installed by a certi

fi

 ed stove installer or licensed contractor.

•  All installations must meet local codes.
•  Use 4, 5 or 6 inch standard class A 103 HT exhaust chimney system.
•  Use a minimum of 24 gauge, 4 inch or larger connector pipe.
•  This is a wood stove that burns wood pellet fuel, this means natural draft is running the stove, it must 

be treated as a wood stove with the pipe installation being as vertical as possible to obtain maximum 

upward draft.

•  Horizontal runs and elbows are discouraged.
•  Do not install a 

fl

 ue damper in the exhaust vent.

DO NOT CONNECT THIS UNIT TO CHIMNEY FLU SERVING ANOTHER APPLIANCE.

Chimney connector must be in good condition and kept clean. Exhaust venting system termination 

requirements, including location restrictions: relationships to air inlets, distance from windows, doors, air inlets, 

and distance to combustible materials MUST BE MAINTAINED AT ALL TIMES.

For residential use Install only with a chimney complying with the requirements for class A 103 HT chimneys 

in the standard for chimneys, Factory built, residential type and building heating appliance.

Stove is also Mobile home approved in the U.S. but not in Canada. Mobile home installation also requires 

that a direct outside air kit be installed and the stove be bolted or fastened to the 

fl

 oor and a #10 copper 

wire be attached to the stove and then attached to the frame of the manufactured home to ground the 

stove. Only approved pellet vent can be used. No single wall connector pipe is allowed in a Mobile Home. 

For mobile home use (US ONLY) Install with class A 103 HT chimney using 4, 5 or 6 inch diameter with ceiling 

trim plate, attic insulation shield, 

fl

 ashing, storm collar and cap. 4, 5 or 6 inch dual wall connector pipe can 

be used to chimney.


WARNING: DO NOT INSTALL IN A SLEEPING ROOM! CAUTIONS: STRUCTURAL INTEGRITY OF THE MOBILE HOME 

FLOOR, WALL, AND CEILING/ROOF MUST BE MAINTAINED.

When this room heater is not properly installed, a house 

fi

 re may result. To reduce the risk of 

fi

 re, follow the 

installation instructions. Contact local building or 

fi

 re of

fi

 cials about restrictions and installation inspection 

requirements in your area.

For basement use, Install only with a chimney complying with the requirements for class A 103 HT chimneys 

in the standard for chimneys, Factory built, residential type and building heating appliance, outside air source 

must be supplied.

DO NOT CONNECT TO OR USE IN CONJUNCTION WITH ANY AIR DISTRIBUTION DUCT WORK UNLESS SPECIFICALLY 

APPROVED FOR SUCH INSTALLATION.

Taler or longer chimney system’s may need a barometric damper installed immediately off the top of the 

stove to be able to control the stove down in the 400° range as you can experience excessive draft and the 

stove will want to run hotter.

STOVE PIPE INSTALL/ HELPFUL HINTS

Summary of Contents for GW1949

Page 1: ...ww usstove com La version française est disponible pour téléchargement à partir du site U S Stove website http www usstove com This unit is not intended to be used as a primary source of heat MODEL GW1949 OWNER S OPERATION AND INSTALLATION MANUAL 852489 4202E United States Stove Company 227 Industrial Park Rd P O Box 151 South Pittsburg TN 37380 Phone 800 750 2723 www usstove com SAFETY AND EPA CO...

Page 2: ...l safety of your home and loved ones Always read and follow the instructions for safe use and maintenance of your stove Surfaces of the stove get EXTREMELY HOT Be aware that surfaces may still be hot for an extended period of time after the stove has been shut down Never leave young children or pets around any heating source Educate your family before beginning operation of your new stove Never bl...

Page 3: ... exhaust venting system to the product and to each adjoining section All joints for connector pipe shall be required to be fastened with at least three screws The area where the vent pipe penetrates to the exterior of the home must be sealed with silicone or other means to maintain the vapor barrier between the exterior and the interior of the home Vent surfaces can get hot enough to cause burns i...

Page 4: ...xisting chimney then you must run 4 vent all the way through any existing chimney Use minimum 24 gauge single wall pipe in 4 5 or 6 inch diameter when connecting to listed factory built chimney Use a 3 4 3 5 or 3 6 inch increaser directly off the stove then connect to the required length of pipe to reach the factory built chimney a slip joint can be used to allow connection to the factory built ch...

Page 5: ...ière Mur Front Side wall Paroi Latérale Side wall Paroi Latérale Front A F D B C Front Front A F E Mobile homes require outside air use a vent with a rigid or flex pipe connected to the stove and an outside screen vent cap the stove must be secured to the floor and grounded with a number 10 gauge wire Residential standard construction requires fresh air source within 24 of the stove Follow all sta...

Page 6: ...le which has two air channels of 1 25 4 mm each construct a wall pass through There shall be a minimum 6 152 4 mm separation area containing fiberglass insulation from the outer surface of the wall thimble to wall combustibles Support the wall thimble and cover its opening with a 24 gauge minimum sheet metal support Maintain the 6 152 4 mm space There should also be a support sized to fit and hold...

Page 7: ...astened to the floor and a 10 copper wire be attached to the stove and then attached to the frame of the manufactured home to ground the stove Only approved pellet vent can be used No single wall connector pipe is allowed in a Mobile Home For mobile home use US ONLY Install with class A 103 HT chimney using 4 5 or 6 inch diameter with ceiling trim plate attic insulation shield flashing storm colla...

Page 8: ...e and use two 2 self drilling screws to fasten the hopper to the stove as shown CAUTION Do Not over tighten the screws as this could cause stripping of the screw threads Note Make sure you are working on a level work surface Hopper must be level with the stove a second set of eyes looking at the front of the stove is a good idea STEP 4 Install the pellet slide as shown The chute flat end will go i...

Page 9: ...auge Insert the damper slide into place it will only fit one way Screw on damper slide handle by turning clockwise Install primary burn tube secondary burn plate and ash tray Damper Slide Damper Slide Handle Primary Burn Tube Secondary Burn Plate Ash Tray ASSEMBLY ...

Page 10: ...insulation rope to the top edge of the feed tube opening and then fold the rope over the feed tube opening edges Apply adhesive side of insulation rope to open side of feed tube lid Overlap the rope on the open edge of the lid 1 8 and leave a 1 4 of space on each end of the rope FRONT AND BACK SIDE OF HOPPER FEED TUBE Apply silicone around all four edges Fill the entire void SEAL INSTRUCTIONS ...

Page 11: ...ITH AN ASH CONTENT OF 5 OR LESS DO NOT BURN GARBAGE OR FLAMMABLE FLUIDS SUCH AS GASOLINE NAPHTHA ENGINE OIL OR ANY OTHER SUBSTITUTE MATERIALS HOT WHILE IN OPERATION KEEP CHILDREN CLOTHING AND FURNITURE AWAY CONTACT MAY CAUSE SKIN BURNS Store pellet fuel in a dry area DO NOT STORE PELLET FUEL WITHIN SPACE HEATER INSTALLATION CLEARANCES OR WITHIN THE SPACE REQUIRED FOR CHARGING AND ASH REMOVAL This ...

Page 12: ...ELLETS This is simple NOTE surfaces will be hot First remove the ashtray and dispose of any ashes see page 21 of the Installation and Instruction Manual for proper ash disposal and reinstall ashtray Second remove secondary burn plate This will allow any built up ashes and hot coals to fall into the ashtray Inspect the secondary burn plate any layers of ash should be removed and discarded Lightly t...

Page 13: ...the primary chamber end slide the top handle 7 Light the torch and insert into primary burn chamber Let the torch run for approximately one minute This will start the necessary draft and speed the ignition process 8 Slide the feed to the all the way open position the knob should now be at the top of the slot 9 Let the torch run till the stove reaches 200 degrees this should only take approximately...

Page 14: ...EAT GUN CONTROLLING THE TEMPERATURE Because the damper slide is located behind the combustion chamber adjusting the temperature is the opposite of a traditional wood stove To adjust the damper slide turn handle counter clockwise one half turn then slide to the desired position and retighten The open position will reduce the draft and slow the stove down much like a crack in a drinking straw Closin...

Page 15: ...age The primary burn basket that comes with every stove is sent out at a preset measurement This measurement fits most applications but sometimes a user will need to make an adjustment This is simple to perform we find the best tools for widening the basket is two chisels For narrowing the spacing use a pair of pliers TUNING YOUR STOVE The three black arrows indicate the three spaces where pellets...

Page 16: ...nd restrict the flow of the flue gases Incomplete combustion such as occurs during startup shutdown or incorrect operation of the room heater will lead to some soot formation which will collect in the exhaust venting system The exhaust venting system should be inspected at least once every year to determine if cleaning is necessary IMPORTANCE OF PROPER DRAFT Draft is the force which moves air from...

Page 17: ... in the heat exchanger by moving the draft slide to the all the way open position A shop vacuum works well for heat exchanger ash removal NOTE Failure to keep a clean burn chamber or secondary burn plate can result in poor stove performance NOTE Letting ash build up into the primary burn basket can cause choking of the stove and increase the risk of smoldering fuel and or smoke spillage WARNING DR...

Page 18: ...discouraged When an appliance with any sort of fan is used or a window opens or a door opens upstairs it causes a sudden rush of air to escape from the basement having a negative affect on the stove If it was necessary to adjust the primary burn basket wider it may be necessary to clear the secondary burn plate more often during operation Adequate ventilation has to be considered when running the ...

Page 19: ...19 NOTES ...

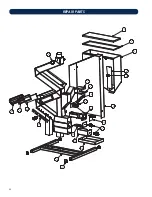
Page 20: ...20 REPAIR PARTS 1 2 3 5 4 6 7 8 11 12 13 14 15 16 18 22 21 20 19 10 9 23 17 ...

Page 21: ...ET STOP 1 5 83936 1 4 20 PLASTIC KNOB 1 6 610209 HEAT SHIELD 7 27427 FEED LID 1 8 88087 GASKET WINDOW 125 x 1 w PSA 3 5 ft 9 27428 PELLET SLIDE 1 10 610192 BURN CHAMBER 1 11 610200 FIREBOX 1 12 610208 WELDMENT AIR COVER 1 13 610189 HANDLE WELDMENT 3 14 610211 BURN PLATE ASSEMBLY 1 15 610188 ASSEMBLY ASH PAN 1 16 27452 ASH RETAINER 1 17 83935 TUBE PLUG SQUARE 4 18 610206 BASE STAND WELDMENT 1 19 61...

Page 22: ...o the heater When ordering repair parts always give the following information as shown in this list HOW TO ORDER REPAIR PARTS 1 The part number________________________________________ 2 The part description_____________________________________ 3 The model number _____________________________________ 4 The serial number ______________________________________ United States Stove Company 227 Industri...

Page 23: ..._______ Reason for Purchase Alternative Heat Main Heat Source Decoration Cost Other _________________________ What was the determining factor for purchasing your new appliance _______ I have read the owner s manual that accompanies this unit and fully understand the Installation Operation and Maintenance of my new appliance Print Name Signature Date Please attach a copy of your purchase receipt Wa...

Page 24: ... CUT HERE CUT HERE Fold Here Fold Here Fold Here PLACE STAMP HERE United States Stove Company 227 Industrial Park Rd South Pittsburg TN 37380 USA ...

Reviews: