background image

22

22

CONTROLS DESCRIPTION

1.  Front right cooking zone control knob
2.  Rear right cooking zone control knob
3.  Rear left cooking zone control knob
4.  Front left cooking zone control knob
5.  Multifunction oven temperature control knob
6.  Multifunction oven function selector control knob
7.  Electronic clock/programmer “Touch-control”

Pilot lamp:

8.  Oven thermostat indicator
9.  Power on indicator

5

6

7

1

2

3

4

9

8

8

CONTROL PANEL

2

Fig. 2.1

Note:

Your appliance has been fitted with a cooling fan to achieve optimum efficiency of the 

controls and to ensure lower surface temperatures are maintained.

When the oven is operating the cooling fan motor switches ON/OFF depending on 

temperature.

Depending on cooking temperatures and times, the cooling fan may run on even after 

appliance has been switched off. The duration of this time is dependent on previous 

cooking temperature and duration.

NOTES:

The knobs and symbols may vary.

The symbols may be printed on the knob itself.

Summary of Contents for 24310030

Page 1: ...Installation advices Instructions for the use INDUCTION COOKERS WIC906SS WIC906AN WIC906BL WIC906BU WIC906WH WIC906SG WIC906CR ...

Page 2: ...DANCE WITH EC DIRECTIVE 2012 19 EC At the end of its working life the product must not be disposed of as urban waste It must be taken to a special local authority differentiated waste collection centre or to a dealer providing this service Disposing of a household appliance separately avoids possible negative consequences for the environment and health deriving from inappropriate disposal and enab...

Page 3: ...ve skin may have a more pronounced temperature perception with some components although these parts are within the limits allowed by the norms The complete safety of the appliance also depends on the correct use we therefore recommend to always pay a extreme attention while using the product especially in the presence of children After having unpacked the appliance check to ensure that it is not d...

Page 4: ...e another model before disposing of it it is recommended that it be made inoperative in an appropriate manner in accordance to health and environmental protection regulations ensuring in particular that all potentially hazardous parts be made harmless especially in relation to children who could play with unused appliances The various components of the appliance are recyclable Dispose of them in a...

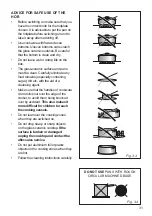
Page 5: ...inguish a fire with water but switch off the appliance and then cover flame e g with a lid or a fire blanket WARNING Danger of fire do not store items on the cooking surfaces Do not place or leave empty pans on the glass ceramic hob Do not allow heavy or sharp objects to drop on the glass ceramic hob Do not scratch the hob with sharp objects Don t use the hob as a work surface WARNING If the hob i...

Page 6: ...ip tray on the base of the oven chamber Do not cover the hob with aluminium foils FIRE RISK Do not store flammable material in the oven or in the storage compartment Always use oven gloves when removing the shelves and food trays from the oven whilst hot Do not hang towels dishcloths or other items on the appliance or its handle as this could be a fire hazard Clean the oven regularly and do not al...

Page 7: ...ccessible parts become hot during use Care should be taken to avoid touching heating elements Children less than 8 years of age shall be kept away unless continuously supervised WARNING Use only hob guards designed by the manufacturer of the cooking appliance or indicated by the manufacturer of the appliance in the instructions for use as suitable or hob guards incorporated in the appliance The us...

Page 8: ...xceeding pressure while heating There is a burning risk with open tins as well because the integrated temperature protection will not work correctly IMPORTANT WARNING The induction hob complies with European Standards for domestic cooking appliances Therefore it should not interfere with other electronic units Persons with cardiac pacemakers or any other electrical implants must check with their d...

Page 9: ...he oven with the door half closed check the oven operating instructions Turn off the oven 5 10 minutes before the end of the theoretical cooking time to recuperate the stored heat We recommend using oven proof dishes and adjusting the oven temperature during cooking if necessary HOB INDUCTION COOKING ZONES AND OR AREAS To save electricity use lids whenever possible When the pan comes to the boil t...

Page 10: ...10 10 ...

Page 11: ...ains power supply before carrying out any maintenance operations or repairs Important The use of suitable protective clothing gloves is recommended when handling or installing this appliance The walls of the units must not be higher than work top and must be capable of resisting temperatures of 70 C above room temperature We would point out that the adhesive which bonds the plastic laminate to the...

Page 12: ...ue used must be resistant to a temperature of 150 C in order to avoid ungluing or deformations Curtains must not be fitted immediatly behind appliance or within 500 mm of the sides The appliance must be housed in heat resistant units The walls of the units must be capable of resisting temperatures of 70 C above room temperature Do not install the appliance near inflammable materials eg curtains If...

Page 13: ...e 1 3 LEVELLING THE COOKER The cooker may be levelled by screwing the lower ends of the feet IN or OUT fig 1 4 BACKGUARD Before installing the cooker assemble the backguard C fig 1 5 The backguard C can be found packed at the rear of the cooker Before assembling remove any protective film adhesive tape Remove the two spacers A and the screw B from the rear of the cooktop Assemble the backguard as ...

Page 14: ...y out this manoeuvre to prevent damage to the adjustable feet fig 1 6 WARNING Be carefull DO NOT LIFT the cooker by the door handle when raising to the upright position fig 1 7 WARNING When moving cooker to its final position DO NOT DRAG fig 1 8 Lift feet clear of floor fig 1 6 Fig 1 7 Fig 1 6 Fig 1 8 ...

Page 15: ...e wall and insert the plastic plugs supplied Important Before drilling the holes check that you will not damage any pipes or electrical wires 3 Loosely attach the anti tilt bracket with the 2 screws supplied 4 Move the cooker to the wall and adjust the height of the anti tilt bracket so that it can engage in the slot on the cooker s back as shown in fig 1 9 5 Tighten the screws attaching the anti ...

Page 16: ...e carried out by qualified personnel in accordance with current regulations The appliance must be connected to the mains checking that the voltage corresponds to the value given in the rating plate and that the electrical cable sections can withstand the load specified on the plate The cooker can be connected directly to the mains placing an omnipolar switch with minimum opening between the contac...

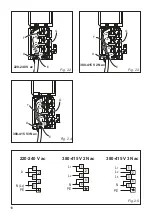
Page 17: ... fig 2 5 Connect the phase neutral and earth wires to terminal board G according to the diagrams in fig 2 5 Strain the feeder cable and block it with cable clamp E by screwing screw D Close the terminal block cover check the two hooks A are correctly hooked NOTE The earth conductor must be left about 3 cm longer than the others IMPORTANT To connect the power supply cable DO NOT unscrew the screws ...

Page 18: ... D E 400 V 2N 1 2 3 5 4 PE N L1 L2 L3 G F D E 400 V 3N Fig 2 2 Fig 2 4 Fig 2 3 PE N L2 L1 230 V 1 2 3 4 5 1 2 3 4 5 1 2 3 4 5 PE PE 400 V 3N 400 V 2N N L1 L2 N L1 L3 L2 Fig 2 5 220 240 V ac 380 415 V 2N ac 380 415 V 3N ac 220 240 V ac 380 415 V 2N ac 380 415 V 3N ac ...

Page 19: ...19 19 ...

Page 20: ...20 20 Advice for the user ...

Page 21: ...tallic objects such as knives forks spoons and lids should not be placed on the hob surface since they can get hot 1 Induction cooking zone Ø 200 mm Normal Power 2300 W Booster Power 3000 W 2 Induction cooking zone Ø 160 mm Normal Power 1400 W 3 Cooking zones display Note The Nominal and Booster Power may change depending on the size and material of the pan set on the cooking zone INDUCTION COOKIN...

Page 22: ...dicator 5 6 7 1 2 3 4 9 8 8 CONTROL PANEL 2 Fig 2 1 Note Your appliance has been fitted with a cooling fan to achieve optimum efficiency of the controls and to ensure lower surface temperatures are maintained When the oven is operating the cooling fan motor switches ON OFF depending on temperature Depending on cooking temperatures and times the cooling fan may run on even after appliance has been ...

Page 23: ...FEE POT FOR INDUCTION COOKING If the pan detection symbol appears on the display your pan is not suitable and your induction hob will not operate After 10 minutes without detecting any pan the cooking zone switches Off automatically and can only be switched On after the control knob has been returned into 0 Off setting In the front central area of the hob the cooking zones display composed by no 4...

Page 24: ...ffee pots made from the following materials are not suitable glass wood porcelain ceramic stoneware pure stainless steel aluminium or copper without magnetic bottom To check if a pan coffee pot is suitable or not Test the bottom of the pan coffee pot with a magnet if the magnet sticks the pan is suitable If a magnet is not available pour a small amount of water inside the pan coffee pot and place ...

Page 25: ...do not select the maximum level for a too long time the pan may become deformed due to the excessive heat Always use pans with thick bottom It is possible to use oversized pans coffee pots but its bottom shall not touch the other cooking zone Always use pans coffee pots with thick completely flat bottom Do not use pans coffee pots with concave or convex bottom these could cause overheating of the ...

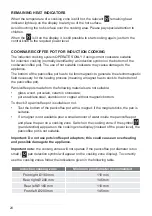
Page 26: ... Power level of Cooking zones Operation time limit 360 minutes 360 minutes 300 minutes 300 minutes 240 minutes 90 minutes 90 minutes 90 minutes 90 minutes CONTROL KNOBS Each cooking zone is adjusted by a separate control knob positioned on the control panel and the operation is controlled by the electronic system If a cooking zone is not turned Off the electronic system automatically switches it O...

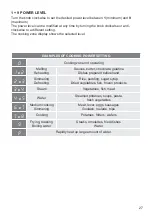
Page 27: ...asta fresh vegetables 6 e 7 Medium cooking Simmering Meat lever eggs sausages Goulash roulade tripe 7 e 8 Cooking Potatoes fritters wafers 9 Frying roasting Boiling water Steaks omelettes fried dishes Water P Rapidly heat up large amount of water 1 9 POWER LEVEL Turn the knob clockwise to set the desired power level between 1 minimum and 9 maximum The power level can be modified at any time by tur...

Page 28: ...n is put back on the cooking zone within 10 minutes BOOSTER FUNCTION Turn the control knob clockwise to set the maximum power level 9 then turn clockwise again to the P setting and release the knob after the beep the control knob returns to the maximum setting 9 automatically and the relative symbol lights up on the cooking zone display The Booster program is now operative This function allows the...

Page 29: ... programme is deleted and the power reduced to the maximum power available THERMAL PROTECTIONS The induction hob is fitted with safety devices to protect the electronic system and to protect each cooking zone from overheating In case of overheating one of the following automatic functions could be started by the electronic system Booster program deleted and power reduced one or more cooking zone s...

Page 30: ...em continues do not use the induction hob only use the oven and contact your Authorised Service Centre E6 or display not operative The cooker has been incorrectly connected The appliance shall be connected to the appropriate power supply by a qualified technician Symbol as per side figure This indicates an incorrect operation of one or more cooking zone control knob 1 Turn the cooking zone control...

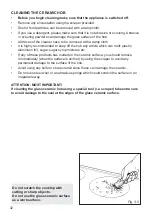
Page 31: ... food remains especially containing sugar dirt etc with the aid of a cleansing agent Make sure that the handles of cookware do not stick out over the edge of the cooker to avoid them being knocked over by accident This also makes it more difficult for children to reach the cooking vessels Do not lean over the cooking zones when they are switched on Do not drop heavy or sharp objects on the glass c...

Page 32: ...m foil sugar sugar syrup mixtures etc If any of these products has melted on the ceramic surface you should remove it immediately when the surface is still hot by using the scraper to avoid any permanent damage to the surface of the hob Avoid using any knife or sharp utensil since these can damage the ceramic Do not use steel wool or an abrasive sponge which could scratch the surface in an irrepar...

Page 33: ...ide the oven Do not line the oven walls or base with aluminium foil Do not place baking trays or the drip tray on the base of the oven chamber OPERATING PRINCIPLES Heating and cooking in the MULTIFUNCTION oven are obtained in the following ways a by normal convection The heat is produced by the upper and lower heating elements b by forced convection A fan sucks in the air contained in the oven muf...

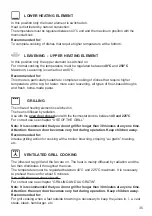
Page 34: ...ing FUNCTION SELECTOR KNOB fig 4 1 Rotate the knob clockwise to set the oven for one of the following functions OVEN LIGHT By turning the knob onto this setting we light the oven cavity The oven remains alight while any of the functions is on TRADITIONAL CONVECTION COOKING The upper and lower heating elements are switched on The heat is diffused by natural convection and the temperature must be re...

Page 35: ...door closed and with the thermostat knob to between 40 and 225 C For correct use see chapter USE OF THE GRILL Note It is recommended that you do not grill for longer than 30 minutes at any one time Attention the oven door becomes very hot during operation Keep children away Recommended for Intense grilling action for cooking with a broiler browning crisping au gratin toasting etc VENTILATED GRILL ...

Page 36: ... foods that must be well done on the outside and tender or rare on the inside i e lasagna lamb roast beef whole fish etc DEFROSTING FROZEN FOODS AND ECO FUNCTION DEFROSTING FROZEN FOODS With the thermostat knob on only the oven fan is on The defrosting is done by simple ventilation without heat ECO FUNCTION ENERGY SAVING The upper and lower heating elements and the fan turn on The heat coming from...

Page 37: ... energy saved with this type of cooking is obvious REGENERATION Set the switch to position and the thermostat knob to position 150 C Bread becomes fragrant again if wet with a few drops of water and put into the oven for about 10 minutes at the highest temperature ROASTING To obtain classical roasting it is necessary to remember that it is advisable to maintain a temperature between 180 and 200 C ...

Page 38: ... on the quality and amount of food Remember to use ovenproof dishes and to adjust the oven temperature during cooking if necessary DISH TEMPERATURE Lasagne 220 C Baked pasta 220 C Pizza 225 C Creole rice 225 C Baked onions 190 C Spinach crêpes 185 C Potatoes baked in milk 185 C Stuffed tomatoes 180 C Cheese soufflé 170 C Roast veal 180 C Grilled veal chops 210 C Chicken breasts with tomato 180 C G...

Page 39: ...nt pizzas Put the ball of dough into a plastic or glass oven proof container and place it on a grill in the middle of the oven Turn the control knob to the leavening icon and set the temperature to 40 degrees by turning the other control knob to the thermostat icon Let the dough leaven in the oven for at least 3 hours though this will depend greatly on the type of dough and the type of flour in th...

Page 40: ... control panel symbols 11 Program selection 12 Digit backward setting for all functions 13 Digit forward setting for all functions 14 Menu selection IMPORTANT NOTE When using the timer and during a semi automatic or automatic cooking the countdown of the function with less time remaining prevails on the display ATTENTION MOST IMPORTANT ELECTRONIC PROGRAMMER DISPLAY CLEANING Strictly follow the inf...

Page 41: ... not in use ATTENTION MOST IMPORTANT This is only an alarm that DOES NOT switch off the oven or grill REMEMBER TO TURN OFF THE OVEN GRILL MANUALLY The timer can be set for a maximum time of 23 hours and 59 minutes 1 To set the timer with the appliance already connected touch the key several times until the symbol flashes on the display Set the time increase in minutes within 5 seconds using the or...

Page 42: ...ctive no timer in use touch the key for 3 seconds the symbol and the word End fine are shown on the display 1B With active timer touch the key several times until the symbol flashes Then touch the key within 5 seconds until 00 00 appears on the display replaced after a few seconds by the symbol and the word End 2 Touch the key again to return the programmer to manual mode the time of day is shown ...

Page 43: ...ionally activating or modifying its functions The key lock can be activated at any time with a cooking in progress or with the oven off To lock Touch the key for more than 2 seconds until the indicator light starts flashing Then touch the key to activate the key lock the word On appears on the display wait a few seconds until the operation is completed When this function is active the indicator li...

Page 44: ...the or key the display shows the brightness set d 01 d 02 or d 03 The last brightness displayed remains active TIME FORMAT It is possible to choose the 24 hour or 12 hour clock format To activate the 12 hour format touch the key for more than 5 seconds until the or symbol is activated To activate the 24 hour format touch the key for more than 5 seconds until the or symbol is deactivated ...

Page 45: ...aning this appliance Clean the surfaces with a damp cloth and using neutral non aggressive detergents Complete the cleaning with a dry clean cloth IMPORTANT Never use abrasive products e g certain type of sponges and or aggressive products e g caustic soda detergents containing corrosive substances that could irreversibly damage the surfaces WARNING When correctly installed your product meets all ...

Page 46: ...tc can damage the enamel if left too long INSIDE OF OVEN The oven should always be cleaned after use when it has cooled down The cavity should be cleaned using a mild detergent solution and warm water Suitable proprietary chemical cleaners may be used after first consulting with the manufacturers recommendations and testing a small sample of the oven cavity Abrasive cleaning agents or scouring pad...

Page 47: ...ews fig 6 2 Slide in on the guides the shelf and the tray fig 6 1 The rack must be fitted so that the safety notch which stops it sliding out faces the inside of the oven the guard rail shall be at the back To dismantle operate in reverse order Fig 6 2 Fig 6 1 Guard rail Stop notch ...

Page 48: ...fig 6 3 Replace the halogen lamp B with a new one suitable for high temperatures 300 C having the following specifications 220 240V 50 60 Hz and same power check watt power as stamped in the lamp itself of the replaced lamp IMPORTANT WARNING Never replace the bulb with bare hands contamination from your fingers can cause premature failure Always use a clean cloth or gloves Refit the protective cov...

Page 49: ...il left and right hinge levers A are hooked to part B of the door fig 6 6 Withdraw the hinge hooks from their location following arrow C fig 6 9 Rest the door on a soft surface B A C Fig 6 9 Fig 6 8 Fig 6 7 Fig 6 6 Fig 6 5 Important Always keep a safe distance from the door hinges paying special attention to position of your hands If the door hinges are not correctly hooked they could unhook and c...

Page 50: ...the slots making sure that the groove drops into place as shown in the figure 6 11 3 Open the door to its full extent 4 Fully close the levers A on the left and right hinges as shown in the figure 6 12 5 Close the door and check that it is properly in place A Fig 6 11 Fig 6 10 Fig 6 12 ...

Page 51: ...51 51 ...

Page 52: ...preavviso le eventuali modifiche opportune per qualsiasi esigenza di carattere costruttivo o commerciale Cod 1106273 GB ß0 The manufacturer cannot be held responsible for possible inaccuracies due to printing or transcription errors in the present booklet The manufacturer reserves the right to make all modifications to its products deemed necessary for manufacturer commercial reasons at any moment...

Reviews: