background image

8


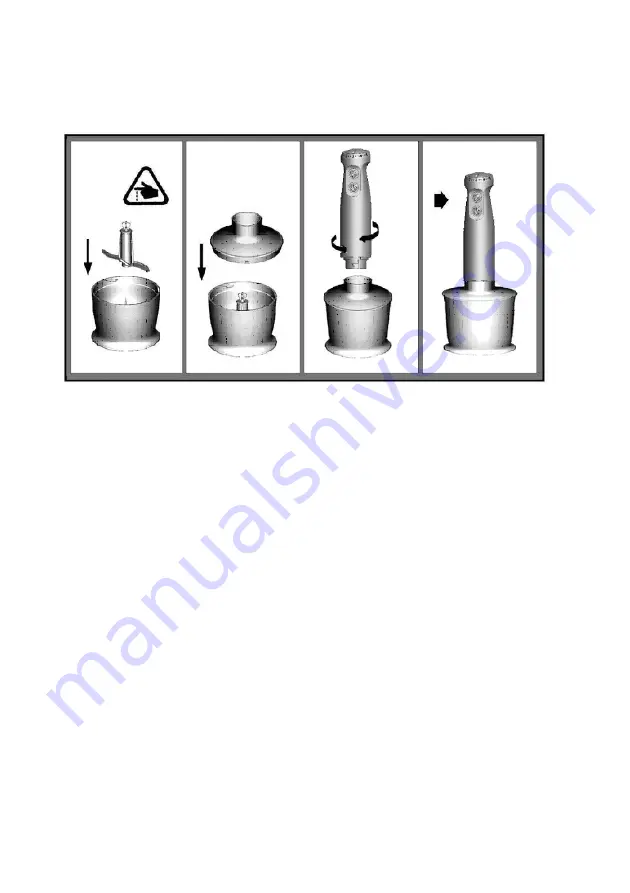
How to use the mini chopper 


1.  The mini chopper is ideal when working with hard ingredients such as meat, cheeses, 

herbs, garlic, carrots, walnuts, almonds, prunes, etc. 

2.  Do not attempt to chop up extremely hard ingredients such as ice cubes, muscat nuts, 

coffee beans and corn. 


Before chopping... 


1.  Carefully remove the plastic packaging from the blade. Be careful: the blade is very sharp! 

Always maintain a grip on the accessory in the upper part of the plastic. 

2.  Place the blade in the middle of the container. Press down and lock it into place. Always 

place the mini chopper on the non-slip base. 

3.  Put the food into the container. 
4.  Place the adapter on top of the container. 
5.  Lock the adapter into place by turning it on the motor unit. 
6.  Press button 

 to use the mini chopper. Always hold the motor unit with one hand and the 

adapter with the other while using the device. 

7.  Separate the motor unit and adapter for the mini chopper after use. 
8.  Remove the lid. Carefully remove the blade. 

Summary of Contents for 61650003

Page 1: ...PREMIUM STICK BLENDER WPHB800 Jett ...

Page 2: ...2 STICK BLENDER EN WPHB800 Jett 220 240V 50 60Hz 800W ...

Page 3: ...SAFETY INSTRUCTIONS 4 The stick blender s components and functions 6 How to use the stick blender 7 How to use the mini chopper 8 How to use the whisk 9 Cleaning 10 Table with guidelines 11 WARRANTY AND SERVICE 12 ...

Page 4: ...of the table and keep the cord away from hot devices or surfaces such as a turned on stove 7 Always ensure that the device is not attached to a power source if it is left unsupervised and also before adding or removing parts and before cleaning 8 Be careful the blade is very sharp 9 Before attaching the device to a power source please ensure that your voltage is the same as what is shown on the ty...

Page 5: ...the stick blender is turned on as it may result in serious damage to the product or yourself You can use spatulas but NEVER while the device is in operation 21 If the power cord is damaged it must be replaced by the manufacturer a service centre or another qualified professional in order to ensure safety 22 The device is not intended to be used by persons including children with physical sensory o...

Page 6: ...6 Components and functions of the stick blender 1 Speeds 1 5 2 Button Ⅰ 3 Button Ⅱ 4 Motor unit ...

Page 7: ... is ideal for making dips sauces soups mayonnaise baby food and milkshakes 1 The stick blender is attached to the motor unit by turning it until it locks into place 2 Place the blender stick in the blender container and press button Ⅱ to start 3 Never use the stick blender for more than 1 minute at a time 4 Be careful The blade is very sharp 5 Be careful Never blend ingredients without adding wate...

Page 8: ...intain a grip on the accessory in the upper part of the plastic 2 Place the blade in the middle of the container Press down and lock it into place Always place the mini chopper on the non slip base 3 Put the food into the container 4 Place the adapter on top of the container 5 Lock the adapter into place by turning it on the motor unit 6 Press button Ⅱ to use the mini chopper Always hold the motor...

Page 9: ...fy sugar bread dough and ready mix desserts 1 Insert the whisk into the whisk adapter and turn it until it fastens to the motor unit 2 Place the whisk in a bowl and press button Ⅱ to start using it 3 Do not use the whisk for more than 2 minutes at a time 4 Separate the adapter and motor unit after use Then pull the whisk out of the adapter ...

Page 10: ...ry high salt content it is recommended to rinse the blades under water immediately after use 2 Please be careful not to use too many cleaning or descaling product 3 When processing colourful ingredients the colour may seep into the plastic parts on the device Lubricate these parts with plant oil before placing them in the dishwasher 4 Be careful The blades are very sharp 5 The device must be disco...

Page 11: ...perating time Size Speed Meat 250g 15 20 seconds 1 2 cm Ⅱ Nuts 100g 15 20 seconds Ⅱ Cheese 100g 15 20 seconds 1 2 cm Ⅱ Bread 80g 8 seconds 1 2 cm Ⅱ Onions 150g 8 seconds 1 2 cm Ⅱ Cakes 150g 8 seconds 1 2 cm Ⅱ Flour 400g 10 seconds Ⅱ Water 240g Ⅱ Sugar 8g Ⅱ Salt 8g Ⅱ ...

Page 12: ... in these instructions so that you have them at hand This makes it easier for the service technician to find the correct spare parts The warranty does not cover Faults and damage that are not due to manufacturing or material issues Damage caused by failure to properly maintain the device including failing to clean it Fire and or water damage or moisture damage on the product Damage caused during t...

Page 13: ...instead intended to be used for commercial purposes in restaurants cafés canteens etc or intended to be rented out or otherwise used by multiple users in turn There is no warranty offered for commercial purchases as this product is only intended for regular household use Service For service and spare parts in England and Ireland please call below mentioned number and you will be directed according...

Page 14: ...14 ...

Page 15: ...15 ...

Page 16: ...16 ...

Reviews: