background image

page


6

G

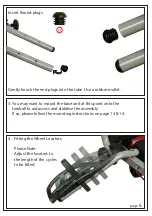
Gently knock the end plugs into the tube. Use a rubber mallet.

You may want to mount the base unit at this point onto the


towball to aid access and stabilise the assembly.

If so, please follow the mounting instructions on page 1

3

 & 1

4

3.

Fitting the Wheel Locators.

Please Note: 

Adjust the locators to 

the length of the cycles 

to be fitted.

4.

Insert Round plugs.

Summary of Contents for ZX302/EU

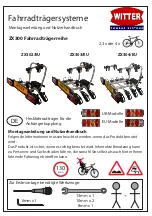
Page 1: ...anleitung Instructions de montage THE REAR CYCLE RACK FOR MOUNTING ON TOW BAR FAHRRADTRÄGER ZUR MONTAGE AUF DER ANHÄNGERKUPPLUNG PORTE VELOS ARRIERE POUR DISPOSITIF D ATTELAGE ZX303 EU 15 10 Kg ZX304 EU 17 50 Kg x4 x3 ZX302 EU 13 50 Kg x2 ...

Page 2: ...into consideration The cycle carrier is a safe product IF used correctly whereas if it is used incorrectly it can cause damage to you your vehicle and anyone driving behind you 2 3 or 4 x UK Models EU Models CYCLE CARRIER SYSTEMS ASSEMBLY AND USER INSTRUCTIONS ZX300 Cycle Carrier Rear cycle carrier for mounting onto a towball km h 130 6mm x1 ZX302 EU ZX303 EU ZX304 EU ...

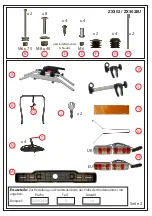
Page 3: ...elf Tapper M6 x 4 x 2 x 4 x 4 M6 x 75 M8 x 40 B C D H E F G x 2 x 4 A N M K V T Q X J x 8 x 2 S P Replacement Parts When ordering please prefix with the model number Example Prefix Part Amount ZX302 EU D x4 UK EU W ...

Page 4: ...f Tapper M6 x 6 x 2 x 4 x 12 x 2 x 4 M6 x 75 M8 x 40 B C D H E F G x 2 x 6 A N M K V T Q X S P R J Replacement Parts When ordering please prefix with the model number Example Prefix Part Amount ZX303 EU D x4 UK EU W ...

Page 5: ...please prefix with the model number Example Prefix Part Amount ZX304 EU D x4 page 4 x 2 Self Tapper M6 x 8 x 2 x 4 x 16 x 2 x 2 x 8 x 4 x 2 x 2 x 2 x 2 x 2 UK EU W A M6 x 75 M8 x 40 B C D H N J E M K F G V T Q X Z Z1 Z2 Z3 Z4 S P R L ...

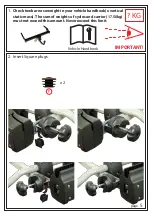
Page 6: ...gs 1 page 5 x 2 F KG Vehicle Handbook IMPORTANT Check towbar nose weight in your vehicle handbook s vertical static mass The sum of weights of cycles and carrier 17 50kg must not exceed this amount Never exceed this limit ...

Page 7: ...ant to mount the base unit at this point onto the towball to aid access and stabilise the assembly If so please follow the mounting instructions on page 13 14 3 Fitting the Wheel Locators Please Note Adjust the locators to the length of the cycles to be fitted 4 Insert Round plugs ...

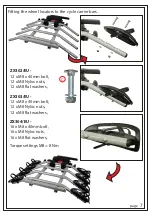
Page 8: ...er bars C page 7 ZX302 EU 12 x M8 x 40mm bolt 12 x M8 Nyloc nuts 12 x M8 flat washers ZX303 EU 12 x M8 x 40mm bolt 12 x M8 Nyloc nuts 12 x M8 flat washers ZX304 EU 16 x M8 x 40mm bolt 16 x M8 Nyloc nuts 16 x M8 flat washers Torque settings M8 8 Nm ...

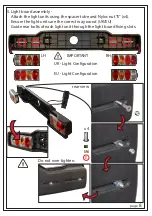
Page 9: ...he spacer tube and Nyloc nut E x4 Ensure the light units are the correct way round UK EU Guide rear bolts of each light unit through the light board fixing slots rear view Do not over tighten x 4 E IMPORTANT UK Light Configuration EU Light Configuration M6 LH RH ...

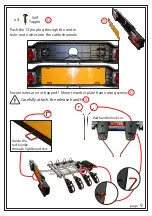
Page 10: ... centre hole route wires into the cable channels Ensure wires are not trapped Mount number plate frame using screws D Self Tapper x 4 D Red handle hooks in Guide the red handle through lightboard slot Carefully attach the release handle X V ...

Page 11: ...he red handle through the lightboard slot x 2 M6 x 75 B Secure the lightboard to the carrier with bolts B placing a washer at the top and bottom Tighten the Nyloc nut to 4 Nm Tighten Ensure the hooks are still engaged ...

Page 12: ... The cam buckle assembly once fully tightened should be able to pivot freely Route the cable carefully down the sub frame Cable tie in position and ensure the cable length is correct Ensure the carrier can tilt freely without trapping or causing stress to the cable ...

Page 13: ...page 12 Ensure teeth engage fully home Assemble the fixing arms as per instructions within the arm packaging 7 Mount the cycle support frame The support frame is best fitted at 900 to the platform 90o ...

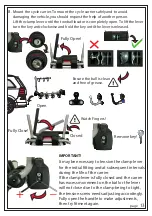
Page 14: ...se and hold the key until the lever is released Fully Open Fully Close Remove key IMPORTANT It may be necessary to tension the clamp lever for the initial fitting and at subsequent intervals during the life of the carrier If the clamp lever is fully closed and the carrier has excess movement on the ball or the lever will not close due to the clamp being to tight the tension screw needs adjusting a...

Page 15: ...e hitch ball Z2 Attach the protective plastic cover Z4 to the strap hook Attach hooks to vehicle tailgate boot at a suitable point ensuring the position is stable and strong enough to hold the weight of the carrier and cycles Do Not attach to plastic trimming or glass window Ensure the strap is correctly routed through the cambuckle Plastic Glass Rubber Metal Tailgate Boot Level ...

Page 16: ...ratchet straps T attached at one end to the cycle support frame and to the cycle frame at the other Secure the wheels in the wheel locators using the ratchet straps T Cycle 4 Fits in the outer locators this should be the smallest lightest bike using the attached to the bike frame from the previous T bike frame Secure the wheels in the wheel locators using the ratchet straps CHECK ALL FIXING ARMS A...

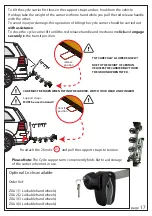
Page 17: ... locators by feeding the strap into the buckle and pulling down until tight Note To release the strap push in the strap retainer lever on the buckle CHECK cycles carrier are secure before your journey then at regular intervals whilst on your journey Route arms through inner cycles to reach 3 4 Ensure the cycle tube is FULLY home within the arm jaws cycles 3 4 ...

Page 18: ...the cycle carrier should be carried out with assistance To close the cycle carrier lift until the red release handle and mechanism click and engage securely in the transit position release position CARE MUST BE TAKEN WHEN TILTING THE CARRIER WATCH YOUR HEAD AND FINGERS Re a Z4 ttach the 2 hooks and pull the support straps to tension Support straps MUST be used in transit transit position Please No...

Page 19: ...y code speed limits and pay attention to the road conditions to prevent jolts Be aware that the loaded cycle carrier may change the driving characteristics of the car while braking during windy conditions and whilst cornering To avoid damage if the boot lid is equipped with an automatic opening function use this function with care Check all the cycle carrier fixing elements after a short while the...

Page 20: ...dukt ist sicher wenn es richtig benutzt wird Inkorrekte Benutzung kann zu Personen und Sachschäden führen die sowohl Sie selbst als auch hinter Ihnen fahrende Fahrzeuge betreffen kann 2 3 oder 4 x UK Modelle EU Modelle Fahrradträgersysteme Montageanleitung und Nutzerhandbuch ZX300 Fahrradträgerreihe Heckfahrradträger für die Anhängerkupplung km h 130 6mm x1 ZX302 EU ZX303 EU ZX304 EU ...

Page 21: ...M6 x 4 x 2 x 4 x 4 M6 x 75 M8 x 40 B C D H E F G x 2 x 4 A N M K V T Q X J x 8 x 2 S P Ersatzteile Zur Bestellung von Ersatzteilen bitte das Präfix der Modelnummer mit angeben Beispiel Präfix Teil Anzahl ZX302 EU D x4 UK EU W ZX302 ZX302EU ...

Page 22: ... M6 x 75 M8 x 40 B C D H E F G x 2 x 6 A N M K V T Q X S P R J Ersatzteile Zur Bestellung von Ersatzteilen bitte das Prà fix der Modelnummer mit angeben Beispiel Präfix Teil Anzahl ZX303 EU D x4 UK EU W ZX303 ZX303EU gewindeformende Schraube ...

Page 23: ... x 2 x 2 x 2 x 2 UK EU W A M6 x 75 M8 x 40 B C D H N J E M K F G V T Q X Z Z1 Z2 Z3 Z4 S P R L Seite 4 Ersatzteile Zur Bestellung von Ersatzteilen bitte das Prà fix der Modelnummer mit angeben Beispiel Präfix Teil Anzahl ZX304 ZX304EU gewindeformende Schraube ...

Page 24: ... Seite 5 x 2 F KG Fahrzeughandbuch WICHTIG Stützlast des Fahrzeugs im Fahrzeughandbuch unbedingt vor Benutzung überprüfen S Wert Das Gesamtgewicht von allen Fahrädern UND dem Kupplungsträger zusammen darf diesen Wert NIEMALS überschreiten ...

Page 25: ...htert werden wenn die Haupteinheit an dieser Stelle auf einen Kugelkopf gesetzt und befestigt wird Wenn dies möglich ist die Haupteinheit bitte jetzt laut Anleitung auf Seite 12 und 13auf dem Kugelkopf befestigen 3 Anbau der Radaufnahmen für die Fahrräder 4 Runde Stopfen G einsetzen Bitte beachten Bringen sie die Radaufnahmen entsprechend der Radlänge Ihrer eigenen Räder an ...

Page 26: ...mm Schrauben 8 x M8 Sicherheitsmuttern 8 x M8 Unterlegscheiben ZX303 ZX303EU 12 x M8 x 40mm Schrauben 12 x M8 Sicherheitsmuttern 12 x M8 Unterlegscheiben ZX304 ZX304EU 16 x M8 x 40mm Schrauben 16 x M8 Sicherheitsmuttern 16 x M8 Unterlegscheiben Torque settings Drehmoment M8 8Nm ...

Page 27: ... im Plastikrahmen führen Die Lichteinheiten mit Hilfe der Abstandshülsen und Sicherheitsmutten E x4 am Plastikrahmen befestigen Stellen Sie sicher dass die Leuchten auf der richtigen Seite angebracht werden siehe Abbildung Rückansicht Nicht zu fest anziehen x 4 E Wichtig UK Lichtanordnung EU Lichtanordnung M6 LH RH ...

Page 28: ...e Halterung ein Sicherstellen dass die Kabel nicht eingeklemmt sind Den Nummernschildhalter mit 4 Schrauben D anbringen x 4 D Roten Klemmhebel einhaken Den roten Klemmhebel durch den Schlitz am Plastikrahmen führen VORSICHTIG den roten Klemmhebel am Abklappmechanismuss anbringen X V gewindeformende Schraube ...

Page 29: ...ahmen führen x 2 M6 x 75 B Leuchtenrahmen mit Schrauben B an der Basiseinheit befestigen Dabei je eine Unterlegscheibe oben und unten benutzen Die Sicherheitsmutter mit 4Nm Drehmoment anziehen Festziehen Stellen Sie sicher das der Klemmhebel noch eingehakt ist ...

Page 30: ...ssen wenn sie am Bügel befestigt wurde Kabel der Leuchten vorsichtig an der Unterseite der Basiseinheit entlangführen und mit Kabelbindern am Träger befestigen Darauf achten dass die Länge des Kabels bis zur Steckdose am Fahrzeug reicht Stellen Sie auch sicher dass sich der Fahrradträger abkippen lässt ohne das Leuchtenkabel einzuklemmen oder zu überspannen ...

Page 31: ...äder vollkommen ineinander greifen Greifarme laut separater Anleitung in Tüte mit Armteilen enthalten zusammenbauen 7 Stützbügel an der Basiseinheit anbringen Stützbügel sollte in einem 90 Grad Winkel zur Basiseinheit befestigt werden 90o ...

Page 32: ...sinns gedreht werden aufschließen und gehalten werden bis der Hebel sich öffnet Vollständig geöffnet Vollständig schließen Schlüssel abziehen WICHTIG Es ist möglich dass der Hebel beim ersten Zusammenbau und dann in regelmäßigen Abständen fester angezogen werden muss Falls der Träger bei geschlossenen Hebel sich zu sehr auf dem Kugelkopf bewegt oder sich der Hebel nicht schließen lässt weil der Me...

Page 33: ...itsgurte anbringen und festziehen Schützende Plastikabdeckung Z2 am Riemenhaken Z4 anbringen Haken am Fahrzeug an geeigneter Stelle anbringen z B Heckklappe oder Kofferraum und prüfen das die Positionierung das Gewicht des Trägers sowie der Fahrräder tragen kann NICHT an Plastikleisten oder Glasfenstern anbringen Sicherstellen das der Stabilisierungsriemen richtig durch die Gurtschnalle geführt wi...

Page 34: ...n und Greifarm auf der anderen Seite beim ersten Zusammenbau am Stützbügel befestigen Räder des Fahrrads mit Rasterriemen T an den Radaufnahmen befestigen Fahrrad 3 Auf die dritten Radaufnahmen aufsetzen und mit Greifarm R befestigen Greifklemme am Radrahmen anbringen und Greifarm auf der anderen Seite beim ersten Zusammenbau am Stützbügel befestigen Räder des Fahrrads mit Rasterriemen T an den Ra...

Page 35: ...unten festgezogen wird Beachten Um den Riemen zu lösen muss der Druckhebel an der Schnalle gedrückt werden Überprüfen Sie vor jeder Abfahrt und in regelmäßigen Abständen das der Träger sowie die Räder sicher auf der Kupplung und dem Träger sitzen Greifarme durch die inneren Räder den äußeren Rädern zuführen 3 4 Sicherstellen dass der Greifarm den Radrahmen vollständig umschließt Räder 3 und 4 Fahr...

Page 36: ...ieder in die Ausgangsposition zu bringen den Träger wieder zurückklappen bis der Träger vollständig und hörbar in den Abklappmechanismus einrastet Entriegelungsposition Vorsicht ist beim Abkippen des Trägers geboten Achten Sie auf Ihren Kopf und Finger Sicherheitsriemen müssen während der Fahrt befestigt sein Bringen sie die Sicherheitsriemen mit 2 Haken wieder an und ziehen sie diese fest Learn t...

Page 37: ...n und Straßenverhältnisse beachten Beachten Sie das ein beladener Fahrradträger das Verhalten des Fahrzeugs beeinträchtigen kann Dies gilt besonders beim Bremsen Abbiegen und windigen Verhältnissen Um Schäden an Autos mit automatischer Heckklappe zu vermeiden sollte diese Funktion bei Benutzung der Fahrradträgers mit Vorsicht benutzt werden Überprüfen Sie den sicheren Sitz der Räder sowie des Träg...

Reviews: