Mechanical installation
INTORQ | BA 14.0210 | 12/2016
29
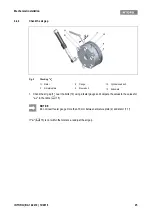
2. Mount the disc (12.2) with the three dowel pins into the holes on the brake (14). The protruding pins on
the visible side of the disc must be oriented towards the nearest microswitch.
3. Insert the balls (12.3) using some assembly paste into the holes of the lever (12.1).
4. Put the lever (12.1: with balls (12.3) already inserted) onto the disc (12.2) so it is concentric with the stud
bolts (12.4). The dowel pin must protrude into the slot of the lever.
5. Place two thrust washers (12.5) on the lever (12.1) so that the lubricated coated sides face each other.
6. Place four disc springs (12.6) in alternate directions in each of the two sleeves (12.7).
7. Finally, insert the sleeves (12.7) into the holes in the lever (12.1).
8. Screw the self-locking nuts (12.8) onto the stud bolts and tighten them until they are flush against the
sleeves (12.7)
9. Connect the brake to a suitable power supply and switch on the voltage (electrical release).
10. Tighten the nuts (12.8) using a tightening torque of:
4 Nm for sizes 17S –19S,
7 Nm for sizes 20S – 25S, or
10 Nm for size 28S.
11. Then turn the nuts (12.8) counter-clockwise:
450° (1 1/4 turns) for sizes 17S – 19S,
360° (1 turn) for sizes 20S – 25S, or
300° (5/6 of a turn) for size 28S.
12. Check if a gap remains between the slot in the lever (12.1) and the bolt while in this state (during manual
release).
13. Switch off the voltage.
14. Hang the Bowden cable on the levers. Actuate the manual release about five times in order to check the
manual release functionality (check whether the rotor is rotating). If necessary, repeat the settings as
described in steps 9 to 14.
NOTICE
Keep the friction lining free from grease and oil!
NOTICE
Comply with all safety regulations!
NOTICE
Before setting manual release, make sure that you check the air gap "s
L
" and adjust (when
required) "s
LN
". Refer to
25 and 26 for this procedure.
Summary of Contents for WSG-TB.3 series
Page 29: ......
Page 30: ......
Page 31: ......
Page 33: ......
Page 37: ......
Page 38: ......
Page 39: ......
Page 43: ......
Page 44: ......
Page 45: ......
Page 46: ......
Page 47: ......
Page 95: ...Notes INTORQ BA 14 0197 04 2016 48 Notes...
Page 144: ...Notes INTORQ BA 14 0210 12 2016 48 Notes...
Page 145: ...Notes INTORQ BA 14 0210 12 2016 49...
Page 146: ...Notes INTORQ BA 14 0210 12 2016 50...
Page 147: ......


