\Manuals\GettingStartedManual8500eRev2
10/02/08
1
MatDesigner
™
- Getting Started Manual - Model 8500e
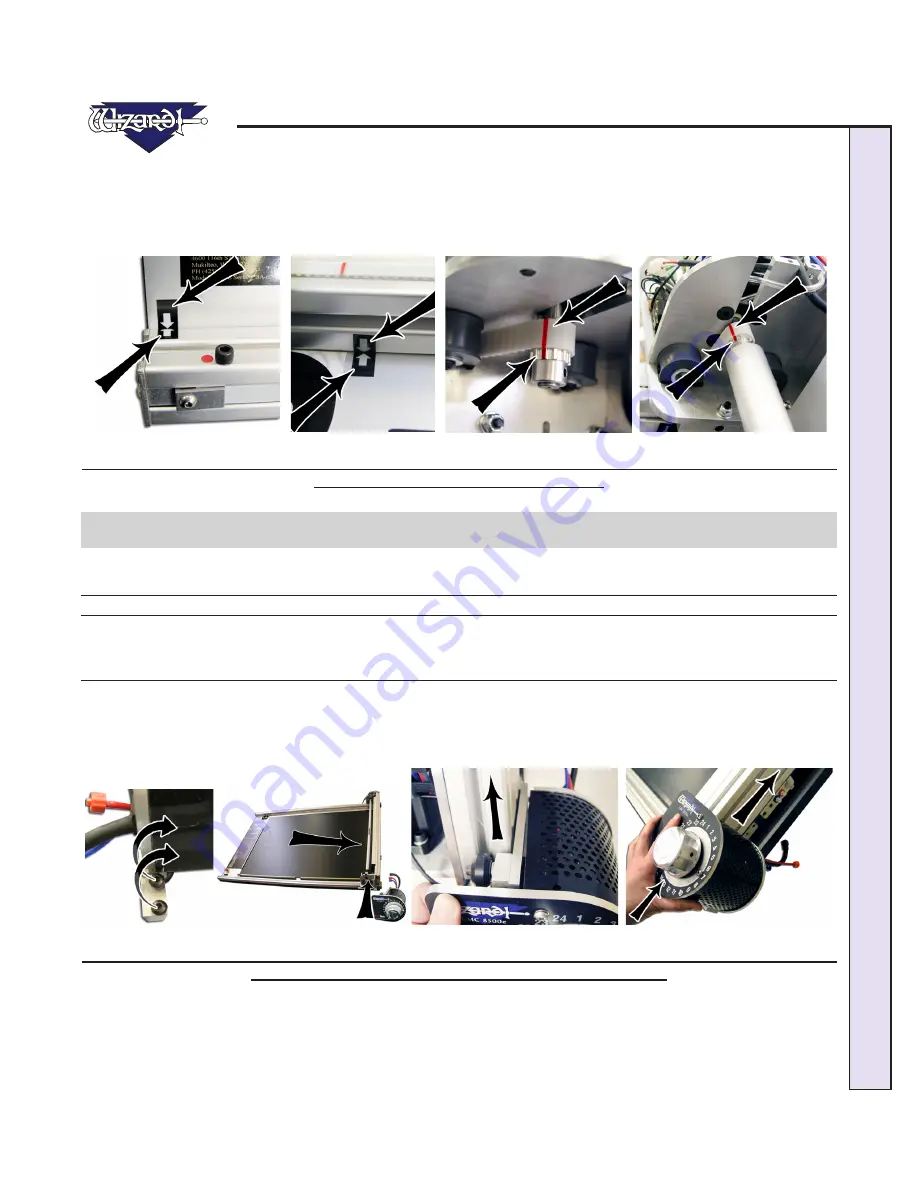
Check the Toothed Belt Lines
Move the Gantry to the right and back. Looking at the upper Toothed Belt, slowly move the Gantry toward the right again until
you see a red line on the Toothed Belt. Confirm that the red line lines up with the red line on the Toothed Pulley (Fig C). If
they don’t, call Help Desk. Without moving the Gantry, look at the lower Toothed Belt and make sure the red lines line up on
the Toothed Belt and the Toothed Pulley (Fig D). If not, call Help Desk.
Fig A.
Fig B.
Fig C.
Fig D.
Fig A: Alignment Arrows on the bottom Rail. Fig B: Alignment Arrows on the top Rail. Fig C-D: Make sure the red lines
line up at the top and the bottom of the Gantry.
Head Installation
Install the Head onto the Gantry
*The Head is shipped with a Blade installed. Take care when handling
the Head so as to avoid injury.*
1. Remove the two 5/32" screws from the Head and set aside (Fig A). Move the Gantry to the right edge of the Board (Fig
B).
2. Point the Head so that the Foot Block faces toward the Board and the wheels are close to the bottom of the Gantry (Fig C).
Line up the wheels on the Head to the center channels of the Gantry arm. Ease the Head onto the Gantry (Fig D).
Fig A.
Fig B.
Fig C. Fig D.
Fig A: Remove screws from Head. Fig B: Move the Gantry to the right edge of the Board. Fig C: Line up Head wheels to
bottom of Gantry. Fig D: Ease Head wheels onto Gantry channels.


